
Use PC or robot cameras for vision tracking: color, QR, glyph, face, object, motion; record video/data, control servos and movement, run scripts
 Hardware Info
 Source Code
 Windows
How to add the Camera Device robot skill
- Load the most recent release of ARC (Get ARC).
- Press the Project tab from the top menu bar in ARC.
- Press Add Robot Skill from the button ribbon bar in ARC.
- Choose the Camera category tab.
- Press the Camera Device icon to add the robot skill to your project.
Don't have a robot yet?
Follow the Getting Started Guide to build a robot and use the Camera Device robot skill.
How to use the Camera Device robot skill
This skill uses any camera installed on your PC or robot to combine computer vision tracking with movement and data acquisition. Computer vision is an experimental technology that requires a clean and bright environment to detect objects and colors accurately. If a camera is mounted on your robot, you can use this skill to track color objects, motion, human faces, or view the camera image. The attributes of the detected image can be adjusted manually in this skill to remove any false positives. Test in a bright room and change the image attributes until the desired object/thing is solidly detected.*Note: The included video tutorials are a little dated due to ARC's rapidly evolving interface and features. You should be able to extract the necessary tracking information within the videos even though the interface may not be identical to ARC today. :)
There are many sections on this page; here are some shortcuts:
- Device
- Tracking Type
- Color Tracking
- QR Code Tracking
- Multi Color Tracking
- Face Tracking
- Custom Haar Tracking
- Object Tracking
- Motion Tracking
- Glyph Tracking
- YCbCr Tracking
- Grid Overlay
- Servo/Movement Tracking
- Scripts Configuration
- Variables
- Augmented Reality Configuration
- Detection Settings
- Media Configuration
- Advanced Configuration
- How to Use This Skill
- Video Resolutions and Performance
- Camera Code
- Troubleshooting
Main Window - Device
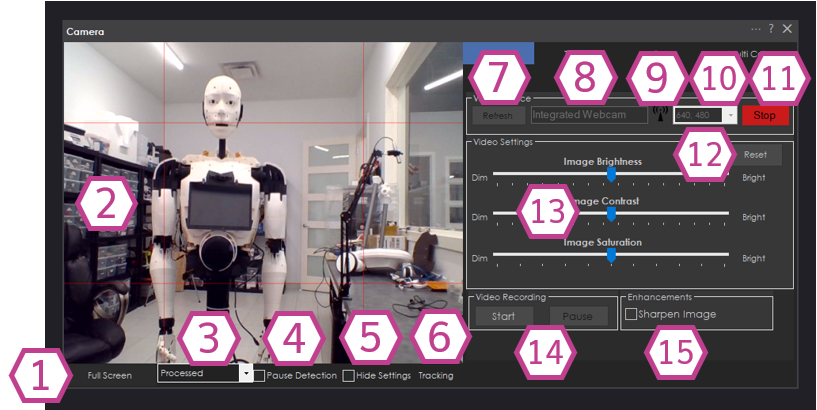
This camera device is connected to or built into your computer or robot. It can be an integrated webcam, USB, serial, wireless, etc.
Additional camera devices may be selected or entered when the camera is stopped (not running). If the EZB supports video, the robot skill will display the IP Address and any other USB or local cameras. The camera robot skill will also display cameras for other supported robots, such as the AR Parrot Drone. Additionally, you may manually enter a JPEG Snapshot HTTP address.USB Camera Device - Clicking on the video device list will display USB cameras and capture devices. Select the USB device to use.
EZB Camera Device - If the EZB supports a video stream, the syntax for connecting to EZB cameras is EZB://192.168.0.1 or EZB://192.168.0.1:24 (if the port is specified). The type of EZBs that support video for this syntax is ESP32, EZ-B v4, IoTiny, Raspberry Pi, etc..
Automatically Discovered Cameras - EZB camera devices that announce themselves on the local network (UDP broadcast discovery) are added to the video device list automatically as EZB://[ip address] while ARC is running. If a discovered camera stops broadcasting, its entry is removed from the list again. Additionally, the IP address of the EZB that this project is connected to (from the Connection robot skill) is added to the list when the project loads.
COM (UART) Device - If a camera is connected via a USB COM UART adapter, the port will be displayed in the dropdown. The syntax will be COMx (i.e., COM1, COM2, and so on). The default baud rate will be 3,333,333 if only the COM port is selected. However, if the camera UART port uses a different baud rate, it can be specified next to the COM port in the textbox with a ":" (colon) separator. Such as COM1:9600
Custom - This option allows the camera device robot skill to be in slave mode. It allows other robot skills to push video data to this robot skill. Some robot skills, such as the AR Parrot Drone, Intel Realsense, and Stream All The Video Sources will use this option.
JPEG Snapshot HTTP Video Device - a camera or video source that provides JPEG images may be selected as a camera device. Enter the complete HTTP URL of the video source. If the HTTP video source requires authentication, consult your device's documentation for the correct syntax. You may test the JPEG URL in a web browser to verify that it is valid and that only the JPEG is displayed, not any HTML. Example: https://192.168.100.2/cgi-bin/snapshot.cgi or https://192.168.100.2/image.jpg, etc..
1. Full Screen/Restore Button
This button makes the Camera Device skill full screen and restores it to its original size. Pressing the ESC key while the skill is full screen will also restore it to its original size.
2. Camera Image Display
This section displays the Camera image, which the Image attributes sliders can manipulate.
3. Processed Image Drop-down
This dropdown selects what is displayed in the camera image area. There are three options. Processed displays the image after the attribute adjustments and detection overlays have been applied. Original displays the raw image from the camera device before processing. Off disables the preview entirely, which saves CPU because no image needs to be drawn on the screen. Detection continues to run when the preview is Off.
4. Pause detection Checkbox
Once checked, this checkbox stops the detection until unchecked. The camera keeps streaming and recording while detection is paused.
5. Hide Settings Checkbox
Once checked, this checkbox makes the camera image fill up the camera skill; the option on the right side is hidden.
6. Tracking Frame Count
This displays how many frames per second are being tracked.
7. Refresh Button
This button refreshes the camera device list. It adds newly installed cameras to the list and removes unplugged devices.
8. Camera Device Drop-down
This dropdown lists the available camera devices that the camera device can use.
9. Network Scan Button
This button finds a camera on the network to which ARC is connected. When a camera is selected from the scan results, the camera is started automatically.
10. Resolution Drop-down
This dropdown lists the resolutions reported by the selected camera device. If your camera image doesn't appear when you click the Start/Stop button, you have the wrong resolution. The default is 320x240, which is the recommended resolution for computer vision. Selecting a resolution larger than 320x240 may prompt for a subscription upgrade, and it will significantly increase the CPU load (see Video Resolutions and Performance).
11. Start/Stop Button
This button will begin or end the camera image display from the selected camera device. The button is green when the camera is stopped and red when the camera is running. The device and resolution dropdowns are disabled while the camera is running.
12. Reset Button
This button resets the changes to the image adjustment sliders.
13. Image Adjustment Sliders
These sliders adjust three different attributes of the camera image (Brightness, Contrast, and Saturation).
14. Start/Stop & Pause/Resume Video Recording Buttons
These buttons begin/end or pause/resume video recording from the active camera device. The file extension depends on the codec selected in the Media configuration tab (WMV1 and WMV2 produce a .wmv file, H263P5 produces an .avi file). The recording is named with the date and time it was started and is saved in the media save folder, which defaults to your "\Pictures\My Robot Pictures" folder.
15. Sharpen Image Checkbox
This checkbox will sharpen the camera image. The image will have less blur and look crisper.
Main Window - Tracking
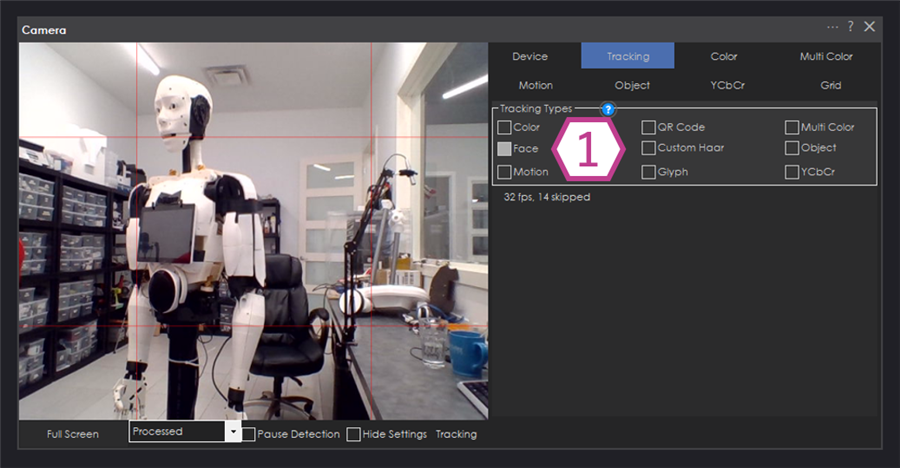
A tracking type is a function of what to recognize for tracking. For example, you would only select the Color tracking type to track the color RED. Each tracking type has configuration settings that are on its tabs. If you have Color checked as a tracking type, then the configuration for the Color tracking type is found in the tab labeled Color.
1. Tracking Type Checkboxes
These checkboxes will turn the different tracking types on/off. You can track multiple types simultaneously, but it's not often used this way. When several tracking types are enabled, all of the detected objects are combined into one list, and that list is sorted by the "Sort detected blobs by" setting in the Scripts configuration tab. The first object in the sorted list is the object used for servo and movement tracking, and it is the object assigned to the non-array script variables.
Main Window - Color Tracking
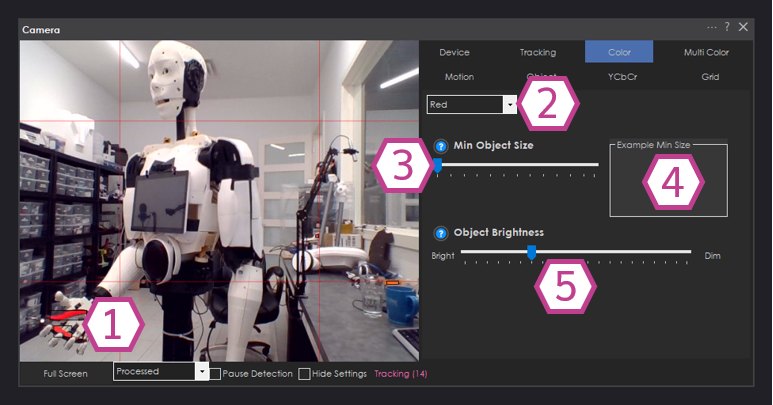
This will track the specified predefined color from the Color tab. You can select the color between Red, Green, or Blue. The Color tab will also give you settings to adjust the brightness and size of the object. Hold the object in front of the camera while changing the settings. This is the basic color tracking method used in RoboScratch's "wait for color."
1. Detection Boxes
These boxes show where the selected color is detected on the camera image.
2. Color Drop-down
This dropdown gives you the selection of 3 colors (Red, Green, and Blue).
3. Minimum Object Size Slider
This slider allows you to select how large the detected colored object size must be before registering as a detection.
4. Example Minimum Size Display
This display gives you a visual reference of how large (in pixel size) the detected object will have to be in the camera image display.
5. Object Brightness Slider
This slider will adjust the brightness of the detected color. Adjust until only the desired object is detected. The value ranges from 1 (bright) to 200 (dim) and it can also be set from a script with the SetColorTrackingBrightness ControlCommand.
Main Window - QR Code Tracking
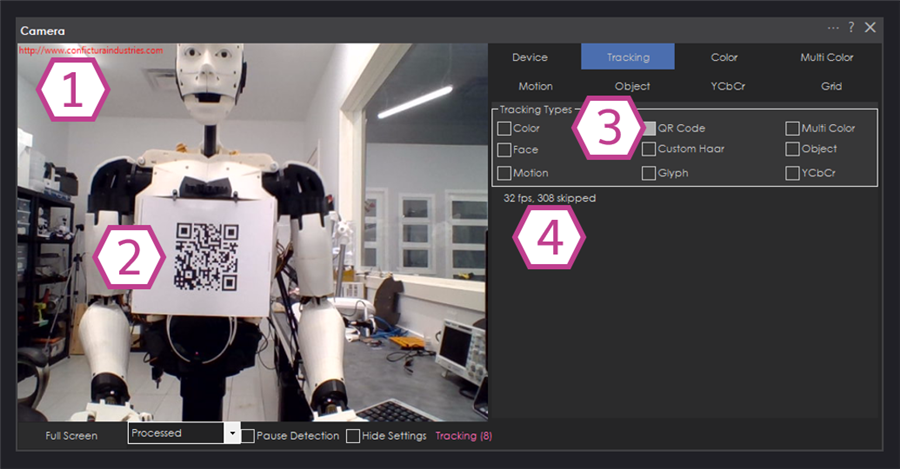
You can use this tracking type to detect pre-encoded QR codes or the QR Code Generator (Add Skill -> Camera -> QR Code Encoder) to create your QR Codes and print them out. QR Code Tracking will detect QR codes, set the $CameraQRCode variable, or execute the code within the QR Code. Remember that QR Code recognition is CPU intensive and, therefore, slow. We do not recommend using QR codes for tracking. It is best used for identification and triggering events, not movement tracking. Note that the QR Code tracking type has additional settings in the Camera Device Settings.
A script assigned to a QR code will only execute once when that code is detected. The same code will not execute its script again until a different QR code from your list has been detected, or until the CameraResetQRCode ControlCommand is called. If the detected QR code is not in your list, the "QR Code Not Found" script is executed.
1. QR code Detection Output
This is where the detected output from the QR code will be displayed.
2. QR Code
This QR code will be detected on the camera image display.
3. QR Code Checkbox
This checkbox will need to be enabled to track QR codes.
4. Camera Frame Rate
This displays the camera frame rate per second (fps) and the number of skipped frames.
Main Window - Multi Color Tracking
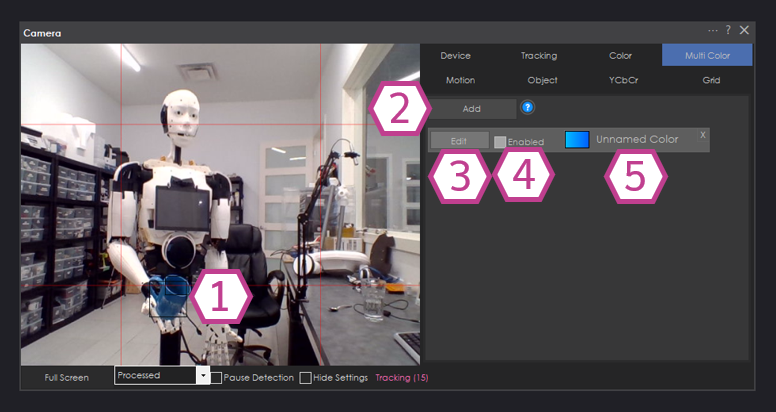
This is an advanced and more detailed tracking method over the generic Color tracking type. With Multi-Color, you can specify and fine-tune your color and add multiple colors. The camera robot skill will configure an ez-script variable to hold the name of the current detected color that has been detected. The multi-color definitions can be trained in the Multi-Color tab. If you name a custom color "Red," this does not override the basic predefined color tracking types. Basic color tracking (discussed above) has three predefined colors. This multicolor tracking type is separate and has no relationship to predefined colors.
Individual colors in the list can be enabled or disabled from a script with the CameraMultiColor_SetColorEnable ControlCommand by using the color name.
1. Detection Boxes
These boxes show the selected colors detected on the camera image.
2. Add Button
This button adds color to the detection list.
3. Edit button
This button will open the Custom HSL Color window to edit/adjust the color you want to detect. The camera must be running to open this window. The main items you will be adjusting are the color name field, the two color wheel wipers, the saturation min slider, and the luminance max slider. Here's how the Custom HSL Color window looks:
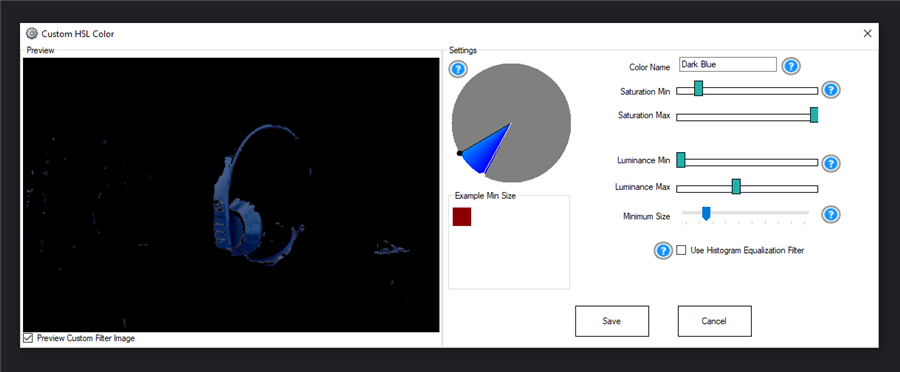
4. Enable Checkbox
This checkbox turns on/off the color you have added to the detection list.
5. Color Name
This is a text display of your chosen name in the Custom HSL Color window.
Main Window - Face Tracking
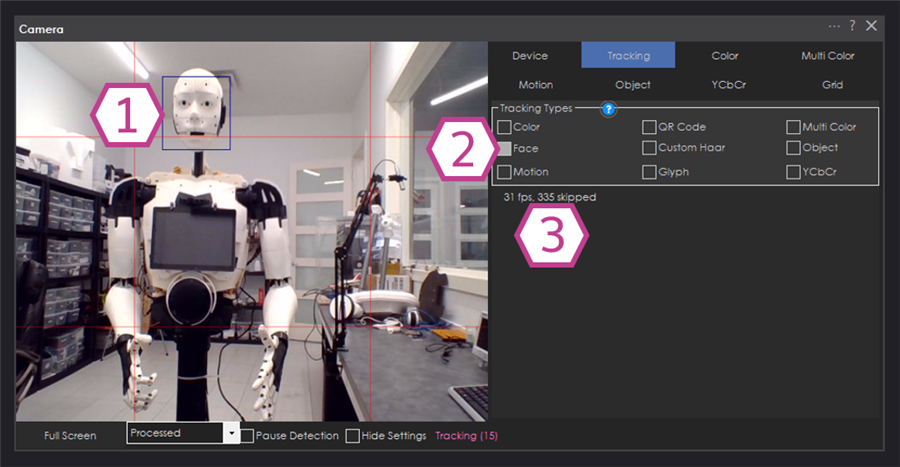
Face tracking will attempt to detect faces within the image. Face tracking uses calculations to detect eyes and a mouth. This does require additional processing and will slow the framerate. Also, detecting images within a video stream with many complicated objects will return false positives. Use Face Tracking against a white wall or non-complicated background. If you wish to detect specific faces, use the Object Tracking type, as you can train your face to be an object.
The minimum size, maximum size, and minimum detection count used by this tracking type are set in the Detection configuration tab.
1. Detection Box
This box shows where a face has been detected on the camera image.
2. Face Tracking Checkbox
This checkbox will need to be enabled to track faces.
3. Camera Frame Rate
This displays the camera frame rate per second (fps) and the number of skipped frames.
Main Window - Custom Haar Tracking
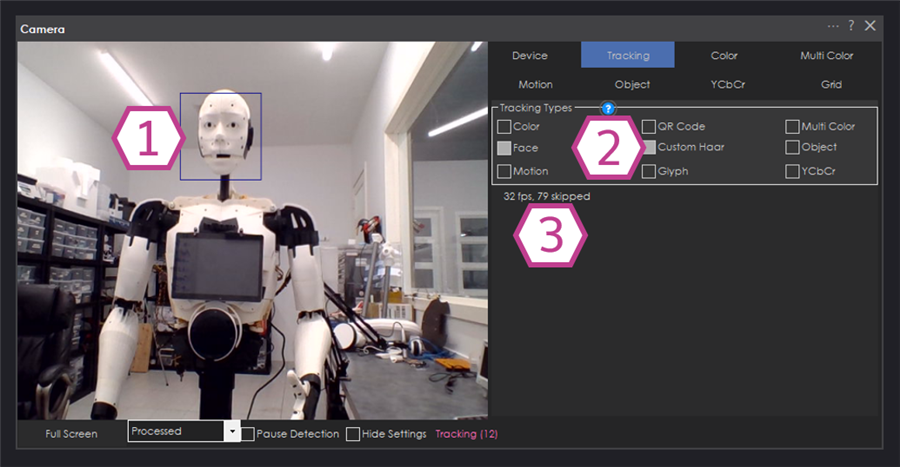
Unless you have experience with computer vision, ignore this tracking type. In brief, this tracking type is used for computer vision specialists who generate HAAR Cascades in OpenCV-compatible v1 Haar XML files. Ensure the XML haar files are the v1 (first version) of the OpenCV Haar format or you will get an error when attempting to load a newer haar XML file. This is very CPU intensive and will most likely bring a slower computer to a halt. If the input cascade is not optimized, it will greatly affect framerate processing performance. Documenting this tracking type and generating HAAR v1 OpenCV-compatible XML files is out of the scope of this document.
The cascade XML file is loaded in the Detection configuration tab and is stored in the project, so the XML file does not need to be present on other computers that load the project.
1. Detection Box
This box shows where the camera image has detected a custom haar cascade.
2. Custom Haar Tracking Checkbox
This checkbox will need to be enabled to track custom haar cascades.
3. Camera Frame Rate
This displays the camera frame rate per second (fps) and the number of skipped frames.
Link to OpenCV v1 Haar Cascades: XML Files
Main Window - Object Tracking
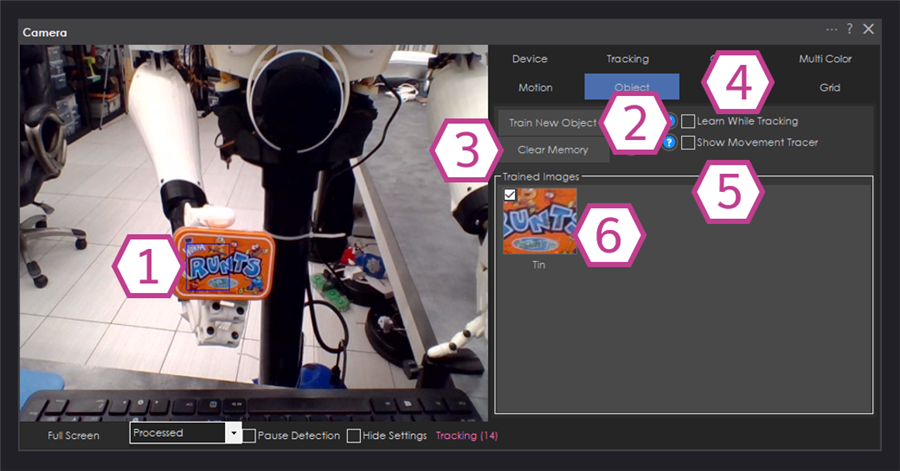
This advanced computer vision learning tracking type allows you to teach the robot an object (such as a face, logo, etc.) and have it detect it. Computer vision learning is very experimental and requires patience and consistent lighting.
*Note: For best results with object training, consider that you are teaching the robot specific details of the object, not the object itself. This means the entire object must not be in the training square. Only details unique to that object need to be in the training square. For example, you may not wish to teach the robot a can of soda/cola by putting the entire can in the square. Merely put the logo in the square or any other identifying features.
Trained objects are saved in the project. Individual trained objects can be enabled or disabled from a script with the CameraObject_SetObjectEnable ControlCommand by using the object name.
1. Detection Box
This box shows a trained object detected on the camera image.
2. Train New Object Button
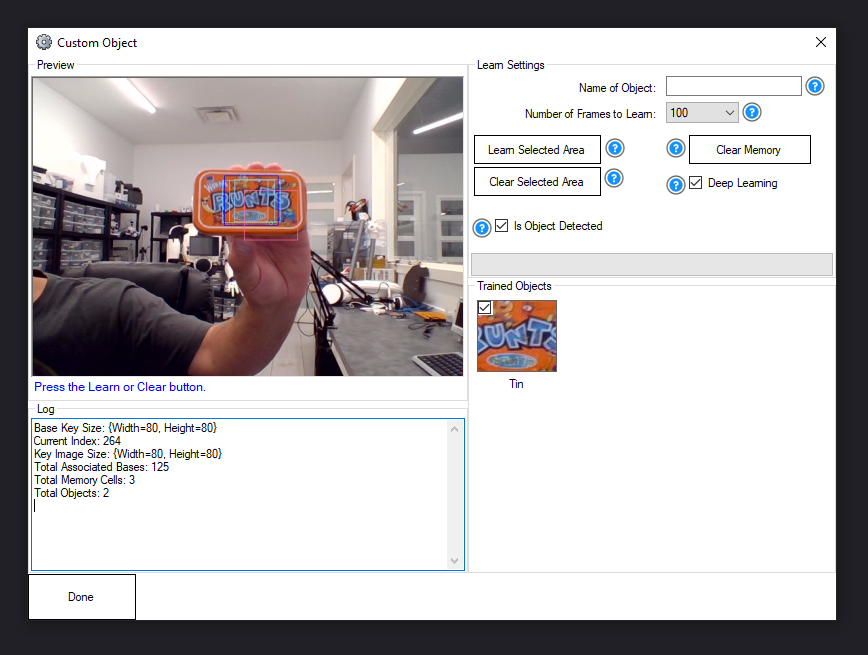
This button will open the Custom Object window to train new custom objects you want to detect. The camera must be running to open this window. To train a new object, first enter the name of the object, then click in the camera image area to create a pink box; place your object in front of the camera in such a way that a unique detail of your object fills the box, click the learn selected area button, and then tilt your object slowly at different angles until the learning is complete. Here's how the Custom Object window looks:
3. Clear Memory Button
This button removes all the trained objects from the trained images window. You will be asked to confirm, and the Object tracking type will be unchecked when the memory is cleared.
4. Learn While Tracking Checkbox
This checkbox enables the object learning module to keep learning the tracked object. Be aware that if this checkbox is left enabled, there is a chance that, over time, the module will start learning the objects around the tracked object.
5. Show Movement Tracer Checkbox
This checkbox enables the trajectory tracer to be displayed as the object moves.
6. Trained Images Display
This displays the objects trained in the train new object window.
Main Window - Motion Tracking
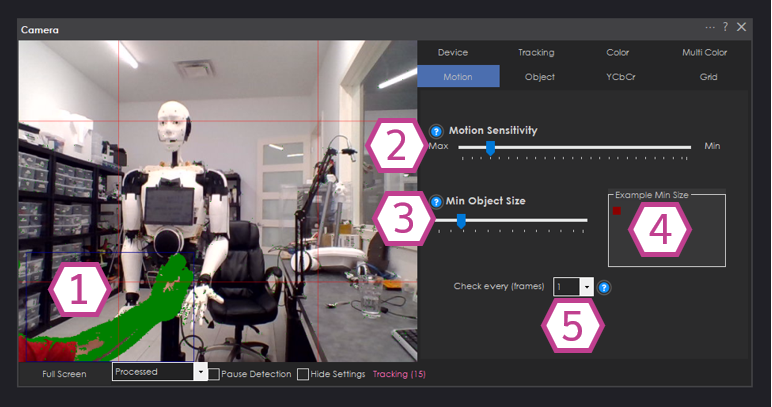
This observes changes within the camera image. The motion should not be confused with the "Movement" Setting from the configuration menu, as they are different and should not be used together. The Motion Tracking Type will detect a change in the camera image and return the changing area. For example, if your camera is stationary and you wave your hand in a small area of the camera image, you will see the motion display of your hand moving. If a robot moves during Motion Tracking Type, the entire image would have been changed, which is not helpful for tracking. So, the Motion Tracking Type is only beneficial for stationary cameras.
1. Detection Box
This box shows where motion has been detected on the camera image.
2. Motion Sensitivity Slider
This slider adjusts the amount of motion needed for the motion to be detected.
3. Minimum Object Size Slider
This slider allows you to select the size of the detected motion object before registering it as a detection.
4. Example Minimum Size Display
This display gives you a visual reference of how large (in pixel size) the detected object will have to be in the camera image display.
5. Check Every (frames) Drop-down
This dropdown allows you to select how many frames to wait between detection samples. The range is 0 to 59 frames.
Main Window - Glyph Tracking
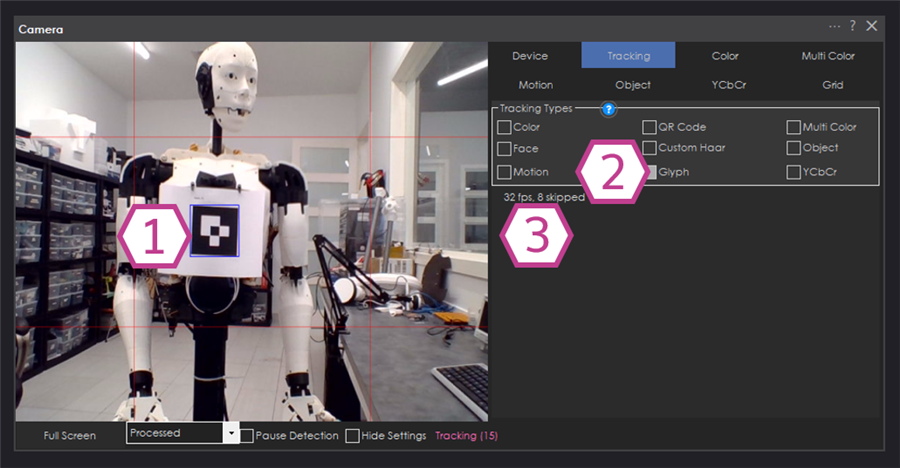
This tracking type will look for images of black and white squares. The camera robot skill will use a set of specific glyphs (1, 2, 3, and 4) for this tracking type. This tracking type will detect those glyphs if you download and print the glyph PDF in the link below. You may also visit the Camera configuration to set up augmented reality overlays on the glyphs. This means the camera will superimpose a selected image over the detected glyph. When tracking glyph images, the glyph will only execute its respective tracking script once until another glyph has been detected or the CameraClearLastGyph ControlCommand has been called. To see all available controlcommand(), press the Cheat Sheet tab when editing scripts.
Glyph Downloads: Glyph PDF
1. Detection Box
This box shows where the glyph has been detected on the camera image.
2. Glyph Tracking Checkbox
This checkbox will need to be enabled to track glyphs.
3. Camera Frame Rate
This displays the camera frame rate per second (fps) and the number of skipped frames.
Main Window - YCbCr Tracking
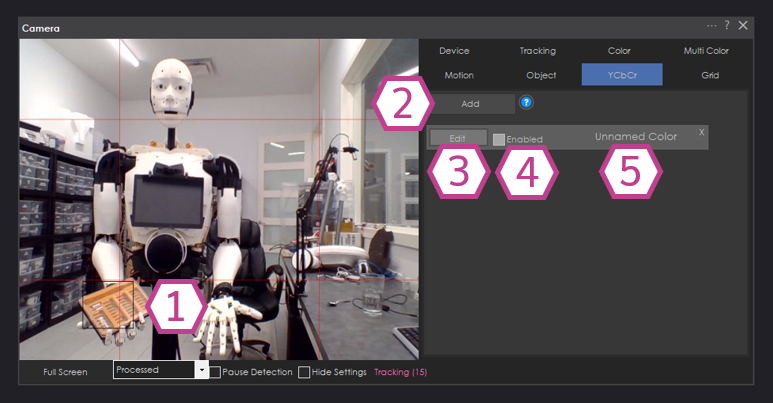
This tracking type is much like multi-color. You can specify and fine-tune your color and add multiple colors. While multi-color uses classical RGB values, YCbCr uses blue-difference and red-difference chroma (Cb and Cr) and luma (Y) components.
Individual colors in the list can be enabled or disabled from a script with the CameraYCbCrColor_SetColorEnable ControlCommand by using the color name.
1. Detection Box
This box shows where the color has been detected on the camera image.
2. Add Button
This button adds color to the detection list.
3. Edit Button
This button will open the Custom YCbCr Color window to edit/adjust the color you want to detect. The camera must be running to open this window. The main items you will be adjusting are the color name field, the Cb sliders, the Cr sliders, and the Y sliders. Here's how the Custom YCbCr Color window looks:
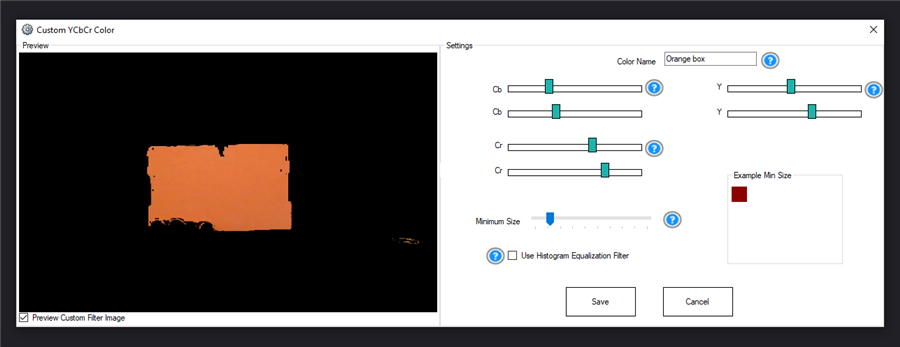
4. Enable Checkbox
This checkbox turns on/off the color you have added to the detection list.
5. Color Name
This is a text display of your chosen name in the Custom YCbCr Color window.
Main Window - Grid
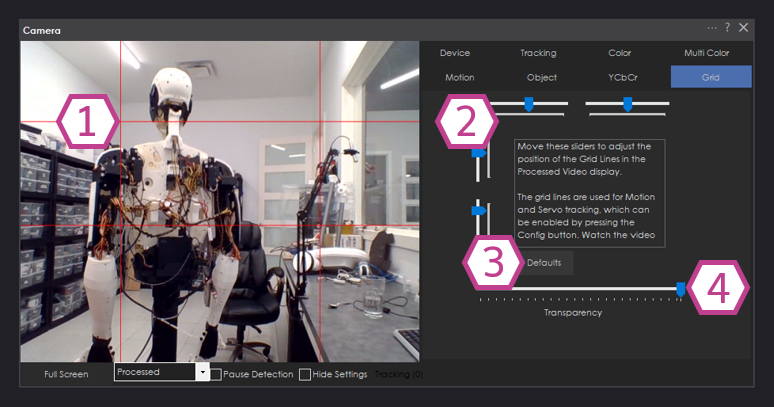
These grid lines are used for movement and servo tracking. With tracking enabled, a robot can move to keep the detected object in the center of the grid lines. Move the sliders to adjust the position of the grid lines on the camera image. The field of detection can be narrowed or expanded with the grid lines. The grid lines also determine the values of the $CameraObjectHorizontalQuadrant and $CameraObjectVerticalQuadrant variables.
1. Grid Line Overlay
These grid lines are overlaid on the camera image and are always there, even if you make them completely transparent.
2. Grid Line Sliders
These sliders are for moving the grid lines. There are four sliders for each of the four grid lines. The slider ranges are set from the processing resolution when the camera starts, so the camera must be running to adjust them.
3. Defaults Button
This button resets the grid lines back to their default position, which is 1/4 and 3/4 of the image width and height.
4. Grid Line Transparency Slider
This slider controls the transparency of the grid lines, from bold red to invisible.
Configuration - Servo/Movement Tracking
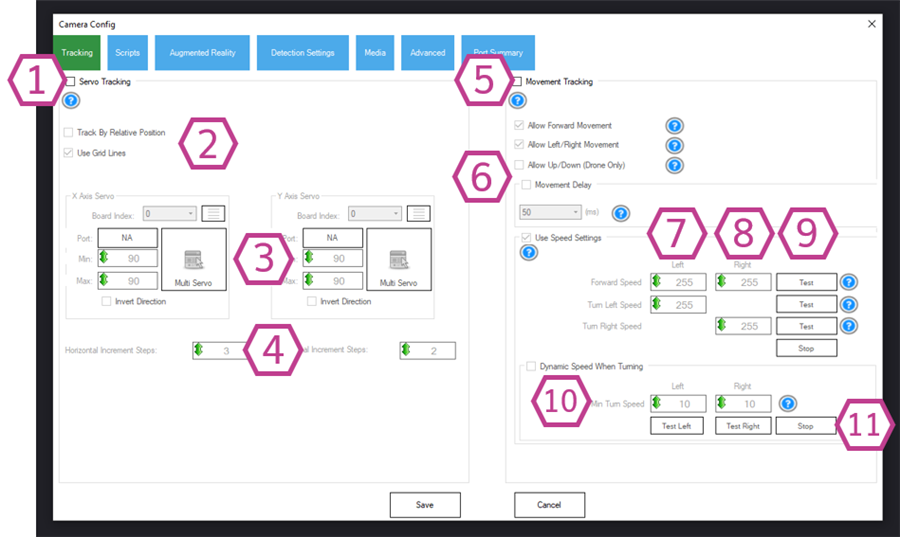
These settings set up how a robot reacts when an object is detected by one of the enabled tacking types. Servo, Movement, or Scripts are the three reaction types you can enable individually or simultaneously. The skill assumes the camera is mounted on the specified servos if servo tracking is checked. The servos will be moved from left to right, up to down, and down to track the detected object based on the servo settings that you have provided. The Movement reaction type is physically moving the entire robot toward an object. If Movement is checked, the robot will follow the detected object when visible using the project's movement panel. The movement panel may be an Auto Position, H-Bridge, or more. The robot will move forward, left or right, to follow the desired object. The Scripts tab of the camera device configuration menu is a Tracking Start and Tracking End script. When an object is detected, the Tracking Start script will execute. The Tracking End script will run when the camera no longer tracks an object.
1. Servo Tracking Checkbox
This checkbox will enable X and Y-axis Servos to move to track a detected object.
2. Relative Position/Grid Line Checkboxes
These checkboxes allow the servos to track the detected object via relative position (moving to the center of the camera image) or using the grid lines (moving to wherever the center of the grid lines is set). Using relative position assumes a stationary camera is being used, and using grid lines assumes a pan/tilt mechanism is being used. If neither option is selected, the servos increment toward the object based on which half of the camera image the object is in.
3. Servo Setup Drop-downs
These dropdowns allow for the setup of the X and Y axis Servos. You can set board index, port number, min and max position limits, and multiple servos. You can also invert the servo direction with the included checkbox.
4. Horizontal/Vertical Increment Steps Drop-downs
These dropdowns adjust the number of steps the servos will move toward the detected object. The smaller the number, the more precise the movements will be.
Movement Tracking Settings
The Movement Tracking checkbox instructs the camera to drive the robot using the project's movement panel when an object is detected. These additional settings are available for movement tracking.
- Allow Forward Movement - The robot moves forward when the detected object is in the middle horizontal quadrant. If this is disabled, the robot will stop instead of moving forward.
- Allow Left/Right Movement - The robot turns when the detected object is in the left or right horizontal quadrant.
- Allow Up/Down (Drone Only) - The robot ascends or descends when the detected object is in the top or bottom vertical quadrant. This is only useful for flying robots.
- Use Speed Settings - When enabled, the Forward Speed, Turn Left Speed, and Turn Right Speed values are used for the movement commands. When disabled, the movement panel's default speed is used.
- Forward Speed - The left and right wheel speeds used when moving forward.
- Turn Left Speed / Turn Right Speed - The speed used when turning toward the object.
- Dynamic Speed When Turning - Rather than turning at a fixed speed, the turning speed is scaled by how far the object is from the center grid line. The further the object is from the center, the faster the turn. The Min Turn Speed value is the slowest speed used when the object is nearly centered.
- Movement Delay (ms) - When enabled, the robot is issued a Stop command this many milliseconds after each turn or up/down movement. This produces a "pulsed" movement for robots that would otherwise overshoot.
- Turn Overshoot Protection - Issues a Stop command as soon as the object is no longer detected after a turn, which prevents the robot from continuing to spin.
Configuration - Scripts
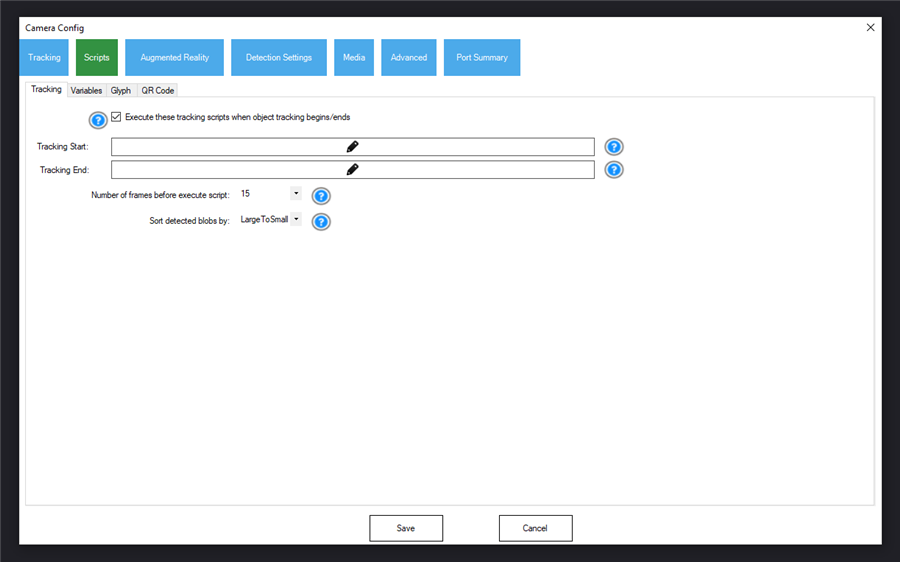
This section of the Scripts tab includes a checkbox to enable the execution of tracking scripts. You can add tracking start and end scripts and use dropdowns to select how many frames to delay before the tracking start/end scripts execute and sort by the detected object (blob) order.
- Tracking Start - Executes when an object has been detected for the configured number of consecutive frames.
- Tracking End - Executes when no object has been detected for the configured number of consecutive frames.
- Number of tracking frames before execute script - How many consecutive frames an object must be present (or absent) before the Tracking Start/End scripts execute. The default is 15. This prevents the scripts from repeatedly triggering on brief false positives.
- Camera Start - Executes when the camera device is started.
- Camera Stopped - Executes when the camera device is stopped.
- Sort detected blobs by - The order in which detected objects are sorted before the variables are set and before the first object is used for servo/movement tracking. The options are Large To Small (default), Small To Large, Top To Bottom, Bottom To Top, Left To Right, and Right To Left.
- Max number of objects that will be detected - How many detected objects are processed and pushed into the variable arrays each frame. The default is 4.
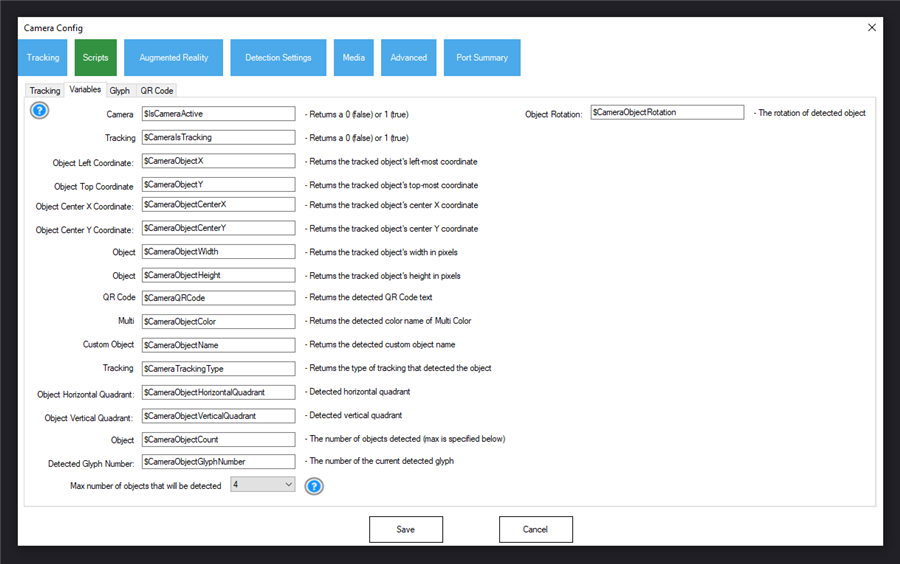
This section includes all the variables that are used with the camera skill. You can change the variable names here if you'd like. You can use these variables throughout your scripts and applications. You can view their value or state in real-time with the Variable Watch skill. There is also a dropdown for selecting the maximum number of objects to detect.
Each variable listed below holds the value of the first detected object in the sorted list. In addition, every one of these variables also has a matching array variable that holds the value for every detected object, up to the maximum object count. The array name is the variable name with Array appended to it. For example, $CameraObjectCenterX holds the center X of the first detected object, and $CameraObjectCenterXArray[0], $CameraObjectCenterXArray[1] ... hold the center X of each detected object. Use $CameraObjectCount to know how many entries in the arrays are valid.
$CameraIsTrackingThis variable returns true or false if the camera tracks an object.
$CameraObjectCenterX
The X-pixel location of the center of the detected object.
$CameraObjectCenterY
The Y-pixel location of the center of the detected object.
$CameraObjectX
The X-pixel location of the left-most edge of the detected object.
$CameraObjectY
The Y-pixel location of the top-most edge of the detected object.
$CameraObjectWidth
The width in pixels of the detected object.
$CameraObjectHeight
The height in pixels of the detected object.
$CameraObjectColor
The detected object's color name if the Color, Multi Color, or YCbCr tracking type detected it.
$CameraObjectName
If the current tracking type is Object, this is the trained object's name.
$CameraObjectRotation
The rotation in degrees of the object. Not all tracking types support this value. Multicolor and Glyph tracking types do support the rotation, but not others.
$CameraObjectShape
The detected shape type of the object. Not all tracking types support this value.
$CameraObjectCount
How many objects were detected in the current frame. This is also how many valid entries there are in each of the Array variables.
$CameraObjectGlyphNumber
The current detected glyph number from the glyph PDF.
$CameraObjectHorizontalQuadrant
The horizontal quadrant that the detected object is in (Left, Middle, or Right), based on the grid line positions.
$CameraObjectVerticalQuadrant
The vertical quadrant that the detected object is in (Top, Middle, or Bottom), based on the grid line positions.
$CameraTrackingType
The tracking type that detected the object (Color, MultiColor, CbCr, Object, Face, QRCode, Glyph, Motion, or Custom).
$CameraQRCode
If QR code tracking type is selected, this is the text that is read from the detected QR code.
$CameraResolutionHeight
The current height resolution of the camera. You may need this if using another robot skill to scale how many height pixels there are in the camera.
$CameraResolutionWidth
The current width resolution of the camera. You may need this if using another robot skill to scale how many width pixels there are in a camera frame.
$IsCameraActive
Sets a true or false if the camera is currently active (running).
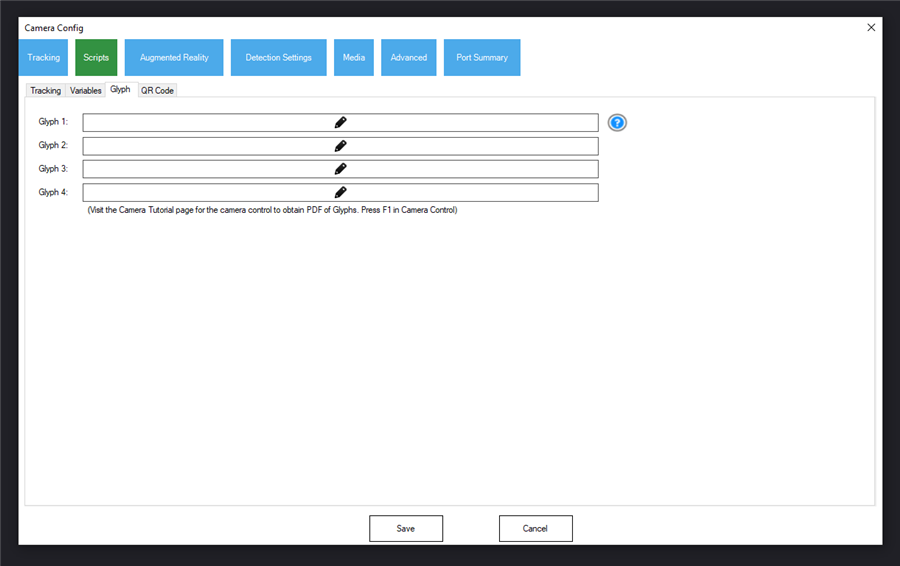
This section executes scripts when the corresponding glyph is detected. A glyph script only executes once until a different glyph is detected, or until the CameraClearLastGyph ControlCommand is called. Find more information about glyphs in the Glyph Tracking section.
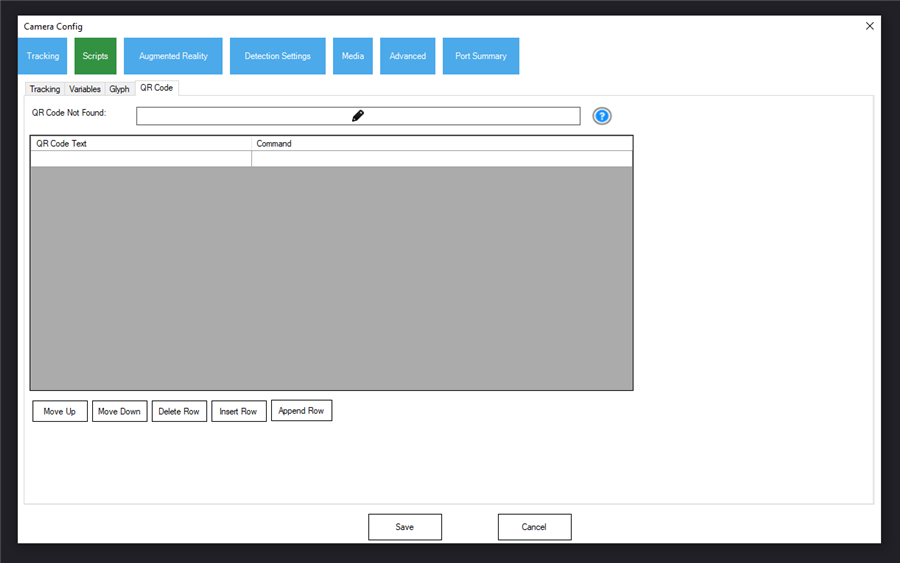
In this section, you can generate a list of different QR Code texts and enter a script to execute when that certain text is detected. You can also generate a script that executes when a QR Code not on your list is detected. There are also buttons included to manage your list of QR Codes.
Configuration - Augmented Reality
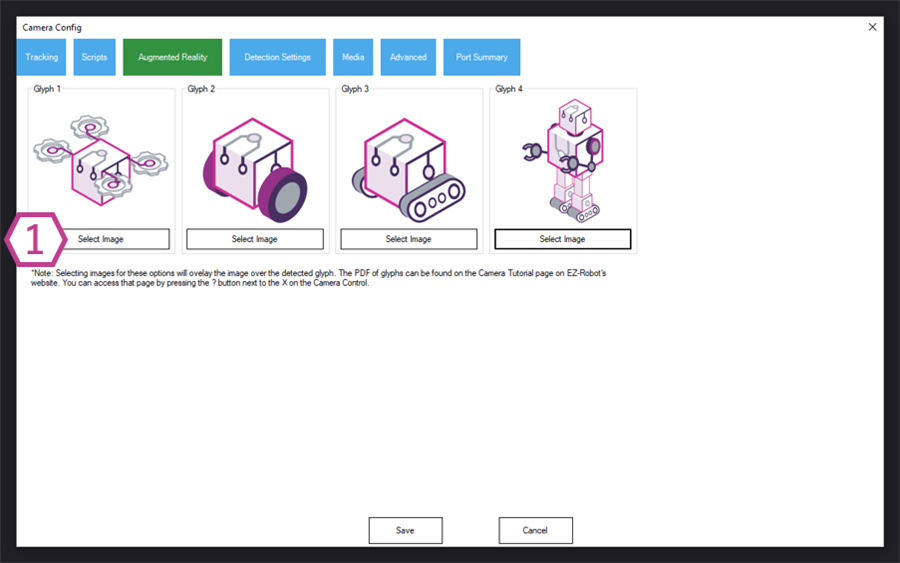
1. Select Image Buttons
These buttons assign an image to be displayed when the corresponding glyph is detected. The image is superimposed over the glyph in the camera image, and it is stretched and rotated to match the detected glyph. Find more information about glyphs in the Glyph Tracking section.
Configuration - Detection
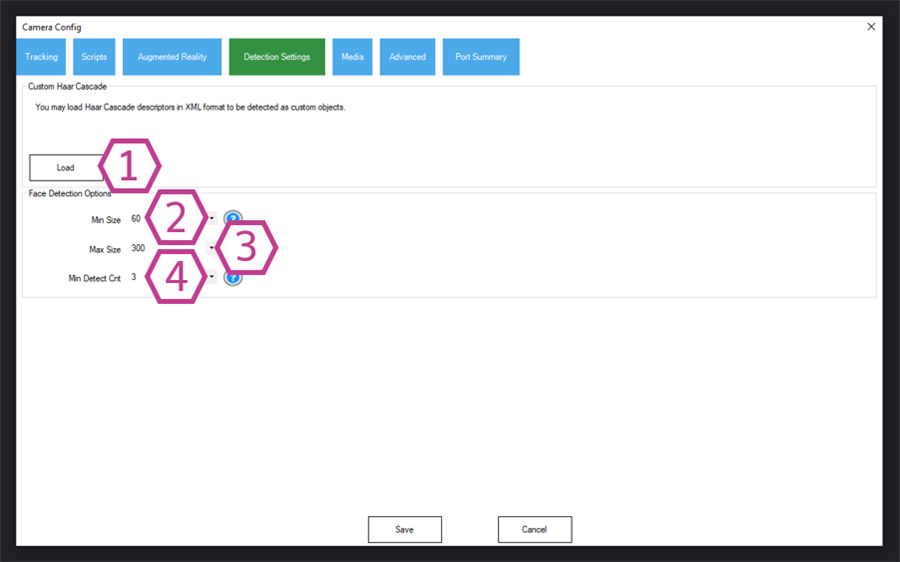
1. Load Button
This button loads custom haar cascades (in Open CV Haar v1 XML format). You can download custom cascades from OpenCV on github. The XML is stored in the project once loaded.
2. Minimum Size Drop-down
This dropdown sets up the minimum size the detected face (in pixels) must be to register as a detection. The default is 60.
3. Maximum Size Drop-down
This dropdown sets up the maximum size the detected face (in pixels) will have to be to register as a detection. The default is 300.
4. Minimum Detection Count Drop-down
This dropdown sets the minimum of detected frames the face must present to register as a detection. The default is 3. There's more information on Face Tracking above.
Configuration - Media
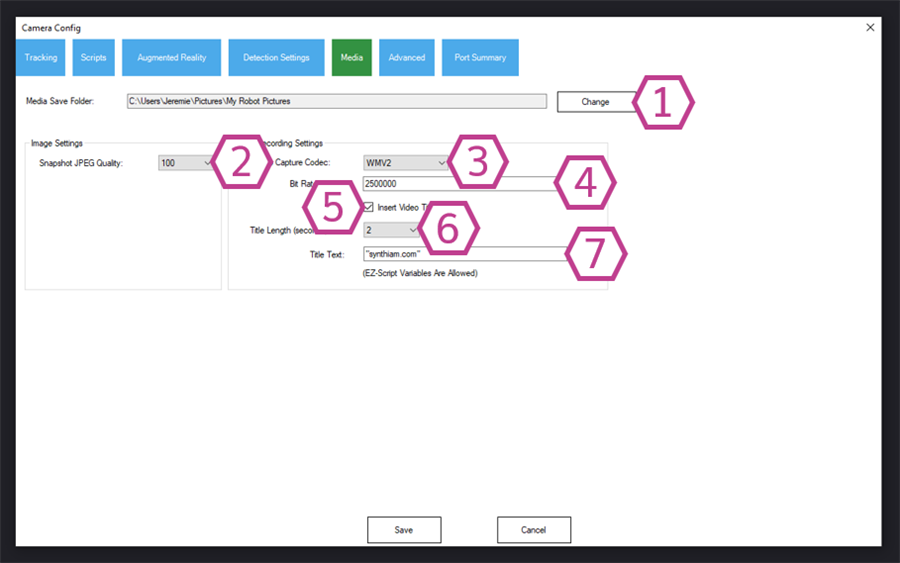
1. Change Button
This button lets you change the save location on your PC where your robot took photos with the camera device. This folder is used for both snapshots and video recordings. If the folder is missing or cannot be created, the default "\Pictures\My Robot Pictures" folder is used.
2. Snapshot Quality Drop-down
This dropdown sets up the percentage of JPEG quality you would like (10 to 100%). The larger the percentage, the larger the file size will be.
3. Video Capture Codec Drop-down
This dropdown sets up the video capture compression format (WMV1, WMV2, or H263P5). WMV1 and WMV2 save as a .wmv file, and H263P5 saves as an .avi file.
4. Bit Rate Field
This value determines the codec resolution and size of each video frame.
5. Insert Video Title Checkbox
This checkbox enables the Video Title text to be shown at the beginning of your recorded video.
6. Title Length Drop-down
This dropdown allows you to set how long the title will be displayed (in seconds) at the beginning of your recorded video.
7. Title Text Field
This field allows you to enter the text title you want displayed at the beginning of your recorded video. The title is an EZ-Script expression, so variables can be used. Literal text must be surrounded with quotes, such as "synthiam.com".
Configuration - Advanced
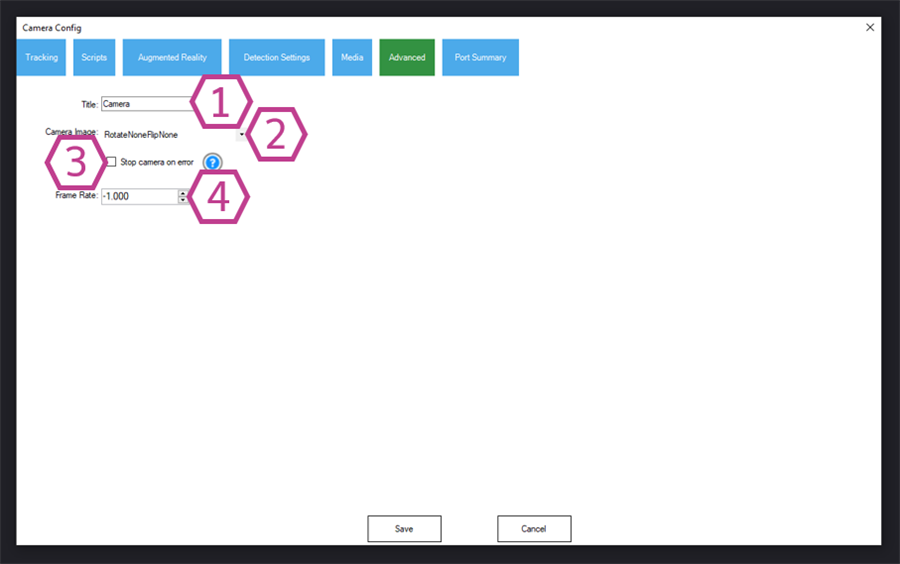
1. Title Field
This field allows you to change the text title of the camera device skill. *Note: Changing the title here will also change the title in the controlCommand() associated with this skill.
2. Camera Image Orientation Drop-down
This dropdown sets the orientation of the camera image. If your camera is mounted in an odd orientation, you can use this dropdown to correct how it displays the camera image on the screen. There are 16 different orientation options (rotate and/or flip).
3. Stop Camera on Error Checkbox
This checkbox is for plug-in troubleshooting. It allows the camera device to stop if an error occurs and allows you to show the error to Synthiam in the debug window.
4. Display every n frame
This value skips drawing frames on the screen to save CPU. A value of 0 displays every frame. Detection is not affected by this setting because only the display is skipped. This can also be changed from a script with the CameraSkipDisplayFrames ControlCommand.
5. Force Process Image Resize
When enabled, the camera image is resized to the specified width and height before the detection algorithms run. This lets you capture and display a high resolution image while processing a smaller, faster image. Enabling, disabling, or modifying the resize values requires stopping and restarting the camera.
How to Use Camera Device
1) Add the Camera Device skill to your ARC project (Project -> Add Skill -> Camera -> Camera Device).2) Select the Camera you would like to use from the Video Device dropdown.
3) Select the resolution. If the camera image doesn't show up, you may have selected an unsupported resolution for that camera.
4) Press the Start/Stop Button to begin transmitting camera images.
5) Select a tracking type in the tracking tab to track objects using the camera image data.
6) Select the other settings tabs or the triple dots to configure the tracking type (if applicable).
Video Resolutions and Performance
Machine vision and computer recognition are very high CPU-intensive processes. The cameras for computer vision are much less resolution than what you, as a human, would use for recording a birthday party. If you were to run computer vision to recognize objects and decode frames at HD quality, your computer response would grind to a halt.160x120 = 57,600 Bytes per frame = 1,152,000 Bytes per second
320x240 = 230,400 Bytes per frame = 4,608,000 Bytes per second
640x480 = 921,600 Bytes per frame = 18,432,000 Bytes per second
So, at 320x240, your CPU processes a complex algorithm on 4,608,000 Bytes per second. When you move to a mere 640x480, it's 18,432,000 Bytes per second.
To expand on that, 4,608,000 Bytes per second is just the data, not including the number of CPU instructions per step of the algorithm(s). Do not let television shows, such as Person Of Interest, make you believe that computer vision and CPU processing are accessible in real-time; many of us are working on it! We can put 4,608,000 Bytes into perspective by relating that to a 2-minute MP3 file. Imagine your computer processing a 2-minute MP3 file in less than 1 second - that is what vision processing for recognition is doing at 320x240 resolution. As soon as you increase the resolution, the CPU has to process an exponentially larger amount of data. Computer vision recognition does not require as much resolution as your human eyes, as it looks for patterns, colors, or shapes.
If you need a high resolution image for display or recording but not for detection, use the Force Process Image Resize option in the Advanced configuration tab. This captures at the high resolution while the detection algorithms run against a smaller image. You may also use the Display every n frame option to reduce how often the image is drawn on the screen.
If you want to record a birthday party, do not use a robot camera - buy a real camera. Synthiam software algorithms are designed for vision recognition with robotics.
Use Camera with Code
You may also instruct the Camera Device Skill to change settings programmatically through code. The ControlCommand() can be called in EZ-Script to change the Camera Device settings. Learn more about the ControlCommand() here. The complete list of commands is always available in the Cheat Sheet tab when editing a script.
Camera Device- CameraStart - Starts the camera using the currently selected video device.
- CameraStart, "[Camera URL:PORT]" - Sets the video device to the specified address and starts the camera.
- CameraStart, "[Device Index]" - Selects the video device by its index in the dropdown and starts the camera.
- CameraStop - Stops the camera.
- PauseOn / PauseOff / PauseToggle - Pauses or resumes the detection. The camera keeps streaming while paused.
- CameraSetPreviewType, Off / Original / Processed - Sets what is displayed in the camera image area.
- CameraSkipDisplayFrames, [0-100] - Skips drawing every n frame on the screen to save CPU. 0 is no frame skipping.
- CameraSnapshot - Saves a JPEG snapshot into the configured media folder.
- CameraSnapshot, "[filename]" - Saves a JPEG snapshot with the specified filename. The filename must end with a .jpg extension. If no folder is included in the filename, the configured media folder is used.
- CameraDisableTracking - Turns off every tracking type.
- CameraAutoTracking - Enables the Color, Face, Motion, Glyph, Multi Color, YCbCr, and Object tracking types.
- CameraColorTracking - Enables only the Color tracking type.
- CameraColorTracking, "[red/green/blue]" - Enables only the Color tracking type and selects the color.
- CameraColorTrackingEnable / CameraColorTrackingEnable, "[red/green/blue]" / CameraColorTrackingDisable - Enables or disables the Color tracking type without changing the other tracking types.
- CameraFaceTracking / CameraFaceTrackingEnable / CameraFaceTrackingDisable - Face tracking type.
- CameraMotionTracking / CameraMotionTrackingEnable / CameraMotionTrackingDisable - Motion tracking type.
- CameraGlyphTracking / CameraGlyphTrackingEnable / CameraGlyphTrackingDisable - Glyph tracking type.
- CameraClearLastGyph - Clears the last detected glyph so that the same glyph will execute its script again.
- CameraQRCodeTracking / CameraQRCodeTrackingEnable / CameraQRCodeTrackingDisable - QR Code tracking type.
- CameraResetQRCode - Clears the last detected QR code so that the same code will execute its script again.
- CameraHaarTracking / CameraHaarTrackingEnable / CameraHaarTrackingDisable - Custom Haar tracking type.
- CameraObjectTracking / CameraObjectTrackingEnable / CameraObjectTrackingDisable - Object tracking type.
- CameraObject_SetObjectEnable, "Object Name", true/false - Enables or disables an individual trained object.
- CameraMultiColorTracking / CameraMultiColorTrackingEnable / CameraMultiColorTrackingDisable - Multi Color tracking type.
- CameraMultiColor_SetColorEnable, "Color Name", true/false - Enables or disables an individual multi color.
- CameraYCbCrColorTracking / CameraYCbCrColorTrackingEnable / CameraYCbCrColorTrackingDisable - YCbCr tracking type.
- CameraYCbCrColor_SetColorEnable, "Color Name", true/false - Enables or disables an individual YCbCr color.
- CameraServoTrackEnable / CameraServoTrackDisable / CameraServoTrackToggle - Servo tracking.
- CameraServoTrackRelativeEnable / CameraServoTrackRelativeDisable / CameraServoTrackRelativeToggle - Servo tracking by relative position.
- CameraMovementTrackEnable / CameraMovementTrackDisable / CameraMovementTrackToggle - Movement tracking.
- CameraUseTrackingScripts, true / CameraUseTrackingScripts, false - Enables or disables the Tracking Start and Tracking End scripts.
- CameraRecordStart / CameraRecordStop / CameraRecordToggle - Starts or stops video recording.
- CameraRecordPauseOn / CameraRecordPauseOff / CameraRecordPauseToggle - Pauses or resumes a recording that is in progress.
These commands are used with ControlCommand() in JavaScript or Python, where a value is returned.
- IsCameraActive - Returns true or false if the camera is active.
- SetColorTrackingBrightness, [1-200] - Sets the Object Brightness slider on the Color tracking tab. 1 is bright and 200 is dim.
Troubleshooting
If you experience camera troubles with disconnections over WiFi or USB, it should be addressed before attempting a workaround via reconnection scripts. It's to identify the root cause of the camera disconnection to ensure a stable and reliable robot operation. Addressing the underlying issue will provide a more permanent solution than a script that repeatedly attempts to reconnect the camera.
Power issues, servo stalling, Wi-Fi saturation, saturated USB bandwidth, and open network WiFi vulnerabilities can all contribute to camera disconnections. Investigating these potential causes and taking appropriate measures to resolve them will help maintain a consistent connection to the camera.
A USB camera or TCP wifi camera connection will be maintained for years if it is not disconnected. The cause of the disconnection should be identified, as a reconnect script is a bandaid to a much larger problem.
- Power. The power consumption of your robot may be exceeding the power supply. When this happens, the EZB and camera may brown out. This will disconnect the camera.
- Servos Stalling. The servos are stalling, which means they are attempting to move further than their limits or lifting something too heavy. If this is the case, it's essentially shorting out the power supply, which will cause a brownout
- Wifi saturation. Depending on your environment, you may be experiencing wifi saturation. This is when too many wifi devices are within a localized area, causing interference. You can use a wifi scan tool to find a free wifi channel. We have a tool and info available on this page: https://synthiam.com/Support/troubleshooting/Troubleshoot-WiFi-Connections (scroll down to find WiFi Channel/Signal Scan)
- WiFi Open Network. If your WiFi EZB is in access point mode, it may allow connections from anyone with a wifi device. That means a phone, laptop, TV, dishwasher, etc.. Without a passphrase or password on the wifi network, anyone can connect to it. Having more connections can cause WiFi-enabled EZBs to drop other connections.
- USB Saturation. Computers may have multiple USB ports, but they all may be connected internally to a hub. The bandwidth will be limited if too many devices are on the same port. Check with your PC manufacturer or the device manager to find a USB port that has the least number of devices connected.
- Camera does not appear in the device list. Press the Refresh button next to the video device dropdown to rescan for cameras. Cameras discovered on the network appear automatically as EZB://[ip address] while they are broadcasting.
- No image after pressing Start. The selected resolution is most likely not supported by the camera. Stop the camera and choose a different resolution. The Debug tab will display the error reported by the camera driver.
Control Commands for the Camera Device robot skill
There are Control Commands available for this robot skill which allows the skill to be controlled programmatically from scripts or other robot skills. These commands enable you to automate actions, respond to sensor inputs, and integrate the robot skill with other systems or custom interfaces. If you're new to the concept of Control Commands, we have a comprehensive manual available here that explains how to use them, provides examples to get you started and make the most of this powerful feature.
Control Command Manual1. Playback / Processing Pause
PauseOn
Syntax
ControlCommand("Camera", "PauseOn")
Description
Pauses camera processing and tracking logic while leaving the camera stream running. No tracking updates or scripts will run while paused.
PauseOff
Syntax
ControlCommand("Camera", "PauseOff")
Description
Resumes camera processing and tracking after it has been paused with PauseOn or PauseToggle.
PauseToggle
Syntax
ControlCommand("Camera", "PauseToggle")
Description Toggles camera processing between paused and running states.
2. Starting and Stopping the Camera
CameraStart (default device / current selection)
Syntax
ControlCommand("Camera", "CameraStart")
Description Starts the camera using the currently selected device and resolution as configured in the Camera control UI.
CameraStart with URL:PORT
Syntax
ControlCommand("Camera", "CameraStart", "CameraURL:PORT")
Examples
ControlCommand("Camera", "CameraStart", "EZB://192.168.1.5:24")
ControlCommand("Camera", "CameraStart", "http://192.168.1.10:8080";)
Description Starts the camera using a specific device or stream, identified by URL/address and optional port. Typical usage is for EZ-B v4 or IP-based cameras.
- If the value is numeric, see the next overload.
- If it contains non-numeric characters (e.g., colon,
://), it is treated as a device/URL string.
CameraStart with device index
Syntax
ControlCommand("Camera", "CameraStart", DeviceIndex)
Example
ControlCommand("Camera", "CameraStart", 0)
Description Starts the camera using a specific device index from the camera device list. Index is zero-based.
0- first camera device in the list1- second device, etc.
If you pass a numeric string, it is interpreted as this index.
CameraStop
Syntax
ControlCommand("Camera", "CameraStop")
Description Stops the currently active camera. Resets tracking variables and stops any further frame processing.
3. Global Tracking Modes
CameraDisableTracking
Syntax
ControlCommand("Camera", "CameraDisableTracking")
Description Disables all tracking modes at once:
- Color
- Face
- Motion
- Glyph
- Haar
- QR Code
- Object
- Multi-Color
- YCbCr Color
No objects will be tracked until specific tracking modes are re-enabled.
CameraAutoTracking
Syntax
ControlCommand("Camera", "CameraAutoTracking")
Description Enables all supported tracking modes:
- Color
- Face
- Motion
- Glyph
- Multi-Color
- YCbCr Color
- Object
Useful for quickly turning on all detection types at once.
4. Color Tracking (simple red/green/blue)
CameraColorTracking
Syntax
ControlCommand("Camera", "CameraColorTracking")
ControlCommand("Camera", "CameraColorTracking", "red")
ControlCommand("Camera", "CameraColorTracking", "green")
ControlCommand("Camera", "CameraColorTracking", "blue")
Description Enables simple color tracking and disables all other tracking modes. Optional color parameter restricts tracking to one of:
"red""green""blue"
If the parameter is omitted, the previously selected color is used.
CameraColorTrackingEnable
Syntax
ControlCommand("Camera", "CameraColorTrackingEnable")
ControlCommand("Camera", "CameraColorTrackingEnable", "red")
ControlCommand("Camera", "CameraColorTrackingEnable", "green")
ControlCommand("Camera", "CameraColorTrackingEnable", "blue")
Description
Enables simple color tracking but does not disable other tracking modes.
Optional color parameter works the same as CameraColorTracking.
CameraColorTrackingDisable
Syntax
ControlCommand("Camera", "CameraColorTrackingDisable")
Description Disables simple color tracking while leaving other tracking modes unchanged.
5. Motion Tracking
CameraMotionTracking
Syntax
ControlCommand("Camera", "CameraMotionTracking")
Description Enables motion tracking only and disables all other tracking modes.
CameraMotionTrackingEnable
Syntax
ControlCommand("Camera", "CameraMotionTrackingEnable")
Description Enables motion tracking without altering other tracking modes.
CameraMotionTrackingDisable
Syntax
ControlCommand("Camera", "CameraMotionTrackingDisable")
Description Disables motion tracking while leaving other tracking modes unchanged.
6. Face Tracking
CameraFaceTracking
Syntax
ControlCommand("Camera", "CameraFaceTracking")
Description Enables face tracking only and disables all other tracking modes.
CameraFaceTrackingEnable
Syntax
ControlCommand("Camera", "CameraFaceTrackingEnable")
Description Enables face tracking without altering other tracking modes.
CameraFaceTrackingDisable
Syntax
ControlCommand("Camera", "CameraFaceTrackingDisable")
Description Disables face tracking while leaving other tracking modes unchanged.
7. Glyph Tracking
CameraGlyphTracking
Syntax
ControlCommand("Camera", "CameraGlyphTracking")
Description Enables glyph tracking only and disables all other tracking modes.
When glyphs change, the camera can automatically run configured scripts (Glyph1-Glyph4).
CameraGlyphTrackingEnable
Syntax
ControlCommand("Camera", "CameraGlyphTrackingEnable")
Description Enables glyph tracking without altering other tracking modes.
CameraGlyphTrackingDisable
Syntax
ControlCommand("Camera", "CameraGlyphTrackingDisable")
Description Disables glyph tracking while leaving other tracking modes unchanged.
CameraClearLastGyph
Syntax
ControlCommand("Camera", "CameraClearLastGyph")
Description Resets the last detected glyph memory. This allows the controller to re-trigger glyph scripts even if the same glyph remains in view.
8. Object Tracking (AVM)
CameraObjectTracking
Syntax
ControlCommand("Camera", "CameraObjectTracking")
Description Enables trained object tracking only (AVM) and disables all other tracking modes.
CameraObjectTrackingEnable
Syntax
ControlCommand("Camera", "CameraObjectTrackingEnable")
Description Enables trained object tracking without altering other tracking modes.
CameraObjectTrackingDisable
Syntax
ControlCommand("Camera", "CameraObjectTrackingDisable")
Description Disables trained object tracking while leaving other tracking modes unchanged.
CameraObjectTracking_SetObjectEnable
Syntax
ControlCommand("Camera", "CameraObjectTracking_SetObjectEnable", "Object Name", trueOrFalse)
Examples
ControlCommand("Camera", "CameraObjectTracking_SetObjectEnable", "Cup", true)
ControlCommand("Camera", "CameraObjectTracking_SetObjectEnable", "Cup", false)
Parameters
"Object Name"- name of the trained object (as shown in the trained objects list).trueOrFalse- enable (true) or disable (false) that specific object.
Description Enables or disables individual trained objects within AVM. The object name must match an existing trained object name.
9. Multi-Color Tracking (Custom RGB)
CameraMultiColorTracking
Syntax
ControlCommand("Camera", "CameraMultiColorTracking")
Description Enables custom multi-color tracking only and disables all other tracking modes. Uses custom multi-color definitions configured in the Camera control.
CameraMultiColorTrackingEnable
Syntax
ControlCommand("Camera", "CameraMultiColorTrackingEnable")
Description Enables custom multi-color tracking without altering other tracking modes.
CameraMultiColorTrackingDisable
Syntax
ControlCommand("Camera", "CameraMultiColorTrackingDisable")
Description Disables custom multi-color tracking while leaving other tracking modes unchanged.
CameraMultiColor_SetColorEnable
Syntax
ControlCommand("Camera", "CameraMultiColor_SetColorEnable", "Color Name", trueOrFalse)
Examples
ControlCommand("Camera", "CameraMultiColor_SetColorEnable", "BallRed", true)
ControlCommand("Camera", "CameraMultiColor_SetColorEnable", "BallRed", false)
Parameters
"Color Name"- name of the custom multi-color configuration.trueOrFalse- enable (true) or disable (false).
Description Enables or disables a specific multi-color configuration by name.
10. YCbCr Color Tracking (Custom YCbCr)
CameraYCbCrColorTracking
Syntax
ControlCommand("Camera", "CameraYCbCrColorTracking")
Description Enables custom YCbCr color tracking only and disables all other tracking modes.
CameraYCbCrColorTrackingEnable
Syntax
ControlCommand("Camera", "CameraYCbCrColorTrackingEnable")
Description Enables custom YCbCr color tracking without altering other tracking modes.
CameraYCbCrColorTrackingDisable
Syntax
ControlCommand("Camera", "CameraYCbCrColorTrackingDisable")
Description Disables custom YCbCr color tracking while leaving other tracking modes unchanged.
CameraYCbCrColor_SetColorEnable
Syntax
ControlCommand("Camera", "CameraYCbCrColor_SetColorEnable", "Color Name", trueOrFalse)
Examples
ControlCommand("Camera", "CameraYCbCrColor_SetColorEnable", "MarkerYellow", true)
ControlCommand("Camera", "CameraYCbCrColor_SetColorEnable", "MarkerYellow", false)
Parameters
"Color Name"- name of the custom YCbCr color configuration.trueOrFalse- enable (true) or disable (false).
Description Enables or disables a specific YCbCr color rule by name.
11. QR Code Tracking
CameraQRCodeTracking
Syntax
ControlCommand("Camera", "CameraQRCodeTracking")
Description Enables QR code tracking only and disables all other tracking modes.
CameraQRCodeTrackingEnable
Syntax
ControlCommand("Camera", "CameraQRCodeTrackingEnable")
Description Enables QR code tracking without altering other tracking modes.
CameraQRCodeTrackingDisable
Syntax
ControlCommand("Camera", "CameraQRCodeTrackingDisable")
Description Disables QR code tracking while leaving other tracking modes unchanged.
CameraResetQRCode
Syntax
ControlCommand("Camera", "CameraResetQRCode")
Description Clears the last detected QR code memory so scripts can trigger again when the same QR code is seen next time.
12. Haar (Custom Cascade) Tracking
CameraHaarTracking
Syntax
ControlCommand("Camera", "CameraHaarTracking")
Description Enables custom Haar cascade tracking only and disables all other tracking modes. Uses the cascade XML loaded into the Camera control options.
CameraHaarTrackingEnable
Syntax
ControlCommand("Camera", "CameraHaarTrackingEnable")
Description Enables Haar tracking without altering other tracking modes.
CameraHaarTrackingDisable
Syntax
ControlCommand("Camera", "CameraHaarTrackingDisable")
Description Disables Haar tracking while leaving other tracking modes unchanged.
13. Movement Tracking (Driving the Robot)
These commands control whether the camera can drive the robot’s Movement Panel based on tracking results.
CameraMovementTrackEnable
Syntax
ControlCommand("Camera", "CameraMovementTrackEnable")
Description Enables movement tracking. When active, the robot can automatically move (left/right/forward/up/down) based on the position of the tracked object.
CameraMovementTrackDisable
Syntax
ControlCommand("Camera", "CameraMovementTrackDisable")
Description Disables movement tracking so the camera no longer commands robot movement.
CameraMovementTrackToggle
Syntax
ControlCommand("Camera", "CameraMovementTrackToggle")
Description Toggles movement tracking on or off.
14. servo Tracking (Camera Servos)
These commands control whether the camera moves servos to follow the tracked object.
CameraServoTrackEnable
Syntax
ControlCommand("Camera", "CameraServoTrackEnable")
Description Enables servo tracking. The configured horizontal/vertical servos will be moved in order to center the tracked object.
CameraServoTrackDisable
Syntax
ControlCommand("Camera", "CameraServoTrackDisable")
Description Disables servo tracking.
CameraServoTrackToggle
Syntax
ControlCommand("Camera", "CameraServoTrackToggle")
Description Toggles servo tracking on or off.
CameraServoTrackRelativeEnable
Syntax
ControlCommand("Camera", "CameraServoTrackRelativeEnable")
Description Enables relative servo tracking mode, where grid lines or deltas are used to increment servos rather than absolute scalar mapping.
CameraServoTrackRelativeDisable
Syntax
ControlCommand("Camera", "CameraServoTrackRelativeDisable")
Description Disables relative servo tracking mode (returning to absolute/scalar positioning if configured).
CameraServoTrackRelativeToggle
Syntax
ControlCommand("Camera", "CameraServoTrackRelativeToggle")
Description Toggles relative servo tracking mode on or off.
15. Recording Video (AVI / WMV)
CameraRecordStart
Syntax
ControlCommand("Camera", "CameraRecordStart")
Description Starts video recording using the camera’s configured codec, intro screen, and media folder.
CameraRecordStop
Syntax
ControlCommand("Camera", "CameraRecordStop")
Description Stops video recording and finalizes the output file.
CameraRecordToggle
Syntax
ControlCommand("Camera", "CameraRecordToggle")
Description Toggles recording on/off:
- If not recording: starts recording.
- If recording: stops recording.
CameraRecordPauseOn
Syntax
ControlCommand("Camera", "CameraRecordPauseOn")
Description Pauses the video recording without closing the file. No frames will be written while paused.
CameraRecordPauseOff
Syntax
ControlCommand("Camera", "CameraRecordPauseOff")
Description Resumes recording after a pause.
CameraRecordPauseToggle
Syntax
ControlCommand("Camera", "CameraRecordPauseToggle")
Description Toggles recording pause/resume state (only valid while recording is active).
16. Snapshots (JPEG)
CameraSnapshot (auto-filename)
Syntax
ControlCommand("Camera", "CameraSnapshot")
Description
Captures the current frame and saves it as a .jpg file in the camera’s configured media folder.
The filename is generated automatically using the current timestamp.
CameraSnapshot with explicit filename
Syntax
ControlCommand("Camera", "CameraSnapshot", "filename.jpg")
Examples
ControlCommand("Camera", "CameraSnapshot", "C:\\Pictures\\robot1.jpg")
ControlCommand("Camera", "CameraSnapshot", "robot1.jpg")
Parameters
"filename.jpg"- Must include
.jpgextension. - If no folder path is specified, the camera media folder is used.
- Must include
Description
Saves a snapshot to the specified .jpg file. If necessary, the folder will be created.
17. Tracking Scripts On/Off
CameraUseTrackingScripts
Syntax
ControlCommand("Camera", "CameraUseTrackingScripts", true)
ControlCommand("Camera", "CameraUseTrackingScripts", false)
Parameters
true- enable running tracking scripts.false- disable running tracking scripts.
Description Globally enables or disables the camera’s tracking scripts, such as:
- Object found / lost scripts
- Glyph scripts
- QR Code scripts
Tracking itself still runs; this only controls whether scripts fire.
18. Preview Type and Frame Skipping
CameraSetPreviewType
Syntax
ControlCommand("Camera", "CameraSetPreviewType", "Off")
ControlCommand("Camera", "CameraSetPreviewType", "Original")
ControlCommand("Camera", "CameraSetPreviewType", "Processed")
Parameters
"Off"- no preview is shown."Original"- shows the raw image from the camera."Processed"- shows the processed image (with overlays, tracking boxes, etc.).
Description Changes what the Camera control displays in the preview window. Processing and tracking still occur regardless of preview type.
CameraSkipDisplayFrames
Syntax
ControlCommand("Camera", "CameraSkipDisplayFrames", N)
Example
ControlCommand("Camera", "CameraSkipDisplayFrames", 5)
Parameters
N- integer 0-1000- do not skip frames>0- display only every N-th frame to reduce CPU usage
Description Skips rendering some frames to the preview to save CPU. This does not change tracking frequency; it only affects how often the image is drawn.
19. QR Code & Glyph Memory Helpers
These are already documented above but summarized here:
CameraResetQRCode Clears the last QR code so related scripts can fire again.
CameraClearLastGyph Clears the last glyph so glyph scripts can re-fire on the same glyph.
20. Status / Query Commands (V2)
These commands return values when used with a ControlCommand function that supports return values.
IsCameraActive
Syntax
var active = ControlCommandWait("Camera", "IsCameraActive")
Return Type
bool-trueif the camera is currently active;falseotherwise.
Description Checks whether the Camera control currently has an active camera connection.
Use this when your script needs to take different actions depending on whether the camera is on or off.


Related Tutorials
Detect Multiple Colors
Time Lapse With A Gopro
Use Camera As A Button
The Robot Program Episode 009: Getting Six To Move
The Robot Program Episode 012: Getting Adventurebot To Move
The Robot Program Episode 006: Introducing ARC
Related Hack Events
The Lattepanda Robot Hack
Robot Learn A New Object
D-0 Droid Live Hack
Related Robots
Related Questions
2 Iotinys With Camera Power Needs
Detect Multiple Face From EZ Blocky Logic
Upgrade to ARC Pro
Experience the transformation – subscribe to Synthiam ARC Pro and watch your robot evolve into a marvel of innovation and intelligence.
woohoo! Yay Jer!
Thank you, everyone! I definitely have put a lot of work into it, I've been taking a break from it for a little bit here but I'll be back at it over the Holiday break. It definitely encourages me to hear that you appreciate the effort!
It's almost like Facebook here lately with all the "Like" going on, but that's a good thing! Even with FB falling apart in the courts lately.
I have run into problems with Face Tracking on my Pepper robot. If I use the USB camera you recommended, Face Tracking does not work unless the resolution is set to 320x240. However, this camera does not display video properly at this setting - it has to be 640x480 or higher to get a meaningful image. If I use the Surface Go2 front camera instead, again I can't get Face Tracking to work either because I can't set this camera's resolution to 320x240. Any ideas would be appreciated.
When the resolution has been changed, the settings for optimizing face tracking performance must be adjusted. See this manual above for information on the Detection setting in the device settings.
*Note: We moved your question to this thread because it was asked in an unrelated conversation.
OK. Very useful advice. I adjusted detection settings to 500 max and Face Tracking worked. It was set to 300 by default. A simple fix when you know what to do.
Sure is! I always thought that should be automatically adjusted when the resolution was changed. But if someone manually fine tunes the value, we don’t want to override and change it.
oh, there’s also a setting that will take the high res video resolution and lower it for processing. It’s under the Advanced tab. So if you don’t need the high res to save some cpu, that option is useful.
Hello DJ I want to setup face tracking but my neck system has one servo to rotate the head and two servos up and down movement independent of each other as seen in the picture below.
In the skill you support a two servo solution I am hope you can tell me a way I can get this work.
Is my only option to use a Y connector and make a hardware mod to reverse one of the servos?