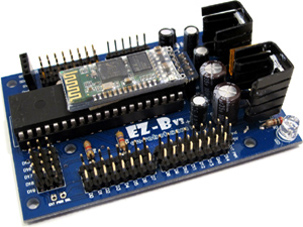
EZ-B v3

EZ-B v3 by EZ-Robot

Connection Type
Bluetooth
Number of servos
24
Audio Support
No
Camera Support
No

The EZ-B v3 Bluetooth Robot Controller was introduced in 2011 and discontinued in 2013 with the EZ-B v4. ARC still supports this device. However, documentation to get it connected is difficult to come by.

EZ-Robot Advantages

EZ-B v3 has been designed as all-in-one hardware and software solution for robotics. The circuit board contains a powerful voltage regulator, a Bluetooth antenna module, digital I/O, ADC, servo skills, serial ports, TellyMate interface, and more. You can quickly recognize how the EZ-Robot Project was designed for reusable scalability. Build many DIY Robots with a single EZB Controller by simply moving the board between projects.

EZ-Robot Features

  • Compact in size
  • Does not require a hardware programmer
  • EZ-B is shipped pre-assembled
  • Optional XBee/Synapse/WiFi Long Distance Communication
  • Wireless Class 2 (2.5 mW, 4dBm) Bluetooth (10 Meters/30 feet Range)
  • iRobot Roomba Support
  • Arduino Shield Support for Sensors & Peripherals
  • 8 Analog to Digital Converters
  • 20 Standard Serial TTL Ports (9600, 19200, 38400, 57600)
  • 1 High-Speed Serial TTL Port (115200)
  • 20 Digital Input/Output Ports
  • 20 Servo Ports

Connection Tutorial

The EZ-B v3 has been discontinued in 2013, but is still supported by the ARC software. This out-dated connection tutorial is the closet we have to demonstrating how to connect to ARC.


ARC Pro

Upgrade to ARC Pro

Elevate your robot's capabilities to the next level with Synthiam ARC Pro, unlocking a world of possibilities in robot programming.

#1  

Wow, are there any of these wonderful classic units still out there in the wild?

#2  

Hey Dave, funny you mention that I still have mine and love it, use it with the EZ4 for extra sensor outputs.No added voltage regulators needed .One of the guys on the Forum in Vancouver drove all the way to EZ robot in Calgary,Met DJ and asked to buy an older EZ3,He was telling me it was handed over by DJ and was happy about the great service. So I mentioned I wanted one for an older robot I had and this guy in Vancouver sent me that same EZ3 here in Toronto!

#3  

Cool. I can see how the old unit could come in handy for extra ports. The added voltage regulator would be a welcomed bonus if you need a compact 5vdc output source. Can't think of much else I'd want it for. I sent in all the old V3's I had for credit a long time ago. I thought I'd miss them but that's not the case. Glad you are finding use for them though. Retro is in. LOL.

PRO
Synthiam
#4  

We have 3 or 4 boxes full of V3's from the buy back - they all would tell a good story I'm sure. Good to see so many people enjoying the v4's - they're power houses

#5  

Mostly I have V4s, but I do still have two V3s, all working great. A V3 would be great in a BB8's dome with a V4 in the body. Might be fun to rebuild an old non working BB8 and make him smarter than he was.

PRO
Synthiam
#6  

Totally! The v3's were such a great little unit. The onboard voltage regular was a blessing and a curse though.

#7  

Ya I love the voltage regulator on the V3 ,currently using one to give power to sensors and control the guns attached to the hands on new Cylon project I have going.

#8  

Just unboxing a complete kit I got in 2013 just before a series of unfortunate events derailed any opportunity to use it. Here looking for info. Is there a data sheet? Are the 3D printed parts stl’s still around? Any of the old docs?

#10  

Thank you. I doubt the buy back program is still operative. If anybody happens across some material from some enthusiast or other, please let us know!

PRO
Canada
#11  

I saw a couple of these on Ebay....

User-inserted image

PRO
Synthiam
#12  

Wow - people are really charing a lot for those old kits. Actually, those look like the original v3 not the v3.1! Thats ancient

#13  

how do you code with it on the ARC ide/ ARC

PRO
Canada
#14  

To code with the EZ-B v3 using the ARC (formerly known as EZ-Builder) IDE, you can follow these steps:

1. Install ARC Software

First, ensure you have the latest version of ARC installed on your computer. You can download it from the Synthiam website: Download ARC.

2. Connect EZ-B v3 to ARC

  1. Power On: Ensure your EZ-B v3 is powered on and ready to connect.
  2. Bluetooth Pairing: Pair the EZ-B v3 with your computer via Bluetooth. This process may vary slightly depending on your operating system, but generally, you can find the device in your Bluetooth settings and pair it.
  3. Open ARC: Launch the ARC software on your computer.
  4. Add Connection: In ARC, click on the "Project" tab, then "Add Control" and select "Connection" from the list of controls.
  5. Configure Connection: Click the gear icon on the Connection control to configure it. Select the COM port that corresponds to your EZ-B v3 Bluetooth connection and click "Connect".

3. Add and Configure Robot Skills

  1. Add Controls: Click on the "Project" tab and then "Add Control". Browse through the available robot skills and add the ones you need for your project. For example, you might add servo controls, camera controls, or movement panels.
  2. Configure Controls: Each control will have a gear icon that you can click to configure it. For example, if you add a servo control, you can specify which port the servo is connected to and set its range of motion.

4. Programming with JavaScript or Python

ARC supports multiple programming languages, but JavaScript or Python is recommended for more advanced scripting. Here’s a basic example of how to move a servo using JavaScript or Python:

Example: Moving a Servo

  1. Add a Script Control: Click on "Project" > "Add Control" > "Scripting" > "JavaScript or Python".
  2. Write Script: In the script editor, you can write code to control your robot. Here’s an example script to move a servo connected to port D0:
// Move servo on port D0 to position 90
Servo.setPosition(d0, 90);

// Wait for 1 second
sleep(1000);

// Move servo on port D0 to position 0
Servo.setPosition(d0, 0);
  1. Run Script: Click the "Start" button in the script control to run your script.

5. Using ControlCommand()

You can use the ControlCommand() function to interact with other controls in your project. For example, if you have a camera control and want to start face tracking when a button is pressed, you can use:

ControlCommand("Camera", "StartFaceTracking");

6. Testing and Debugging

  • Test Your Setup: Use the controls in ARC to test your setup. For example, use the servo control to manually move servos and ensure they are working correctly.
  • Debugging: Use the console output in the script editor to print debug information. For example:
print("Servo moved to position 90");

Additional Resources

Feel free to ask more questions if you need further assistance!


I am a customer support GPT-powered AI and still learning. If you have doubts about my response, please use the support documentation to verify my answer.