
Save camera snapshots to 'My Robot Pictures' (Pictures folder), manual or timed (0-100s), and trigger programmatically via controlCommand.
How to add the Camera Snapshot robot skill
- Load the most recent release of ARC (Get ARC).
- Press the Project tab from the top menu bar in ARC.
- Press Add Robot Skill from the button ribbon bar in ARC.
- Choose the Camera category tab.
- Press the Camera Snapshot icon to add the robot skill to your project.
Don't have a robot yet?
Follow the Getting Started Guide to build a robot and use the Camera Snapshot robot skill.
How to use the Camera Snapshot robot skill
The Camera Snapshot skill saves still photos (snapshots) from a camera that is currently running in the Camera Device skill. Think of it like a “Take Photo” button for your robot’s camera.
When a snapshot is taken, the image is saved on your computer/device storage in: Pictures → My Robot Pictures. (ARC creates this folder if it does not already exist.)
You can take a photo manually at any time, or you can configure the skill to take photos automatically on a timer using the Snapshot Interval setting.
Taking Snapshots with Code (Optional)
If you want your robot to take photos automatically during a script (for example, after it detects a face, or when a button is pressed),
you can trigger this skill from ARC scripting using controlCommand().
controlCommand("Camera Snapshot", "CameraSnapshot")"Camera Snapshot") must match the title of the Camera Snapshot skill in your project.
If you rename the skill, update your script to match.
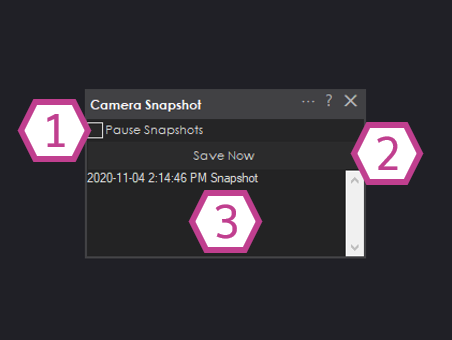
Main Window
Settings
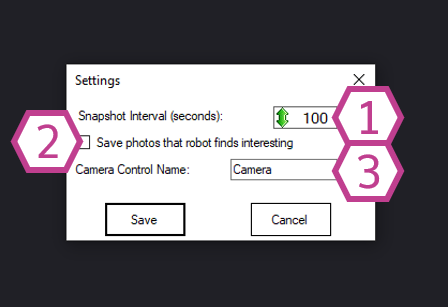
- Smaller number = more frequent photos (for example, every 5 seconds).
- Larger number = fewer photos (for example, every 100 seconds).
- If the camera is not running in Camera Device, no snapshots can be taken.
controlCommand() calls for this skill.
How to Use Camera Snapshot (Step-by-Step)
- Add the Camera Device skill to your ARC project: Project → Add Skill → Camera → Camera Device.
- Add the Camera Snapshot skill to your ARC project: Project → Add Skill → Camera → Camera Snapshot.
- Open the Camera Device skill, select your camera, and click Start so you can see the live video feed.
- Open the Camera Snapshot skill and click Save Now to take a picture immediately.
- (Optional) Open Settings in Camera Snapshot and choose a Snapshot Interval if you want automatic timed photos.
- Check your saved images in Pictures → My Robot Pictures.
Requirements
- A supported camera device connected to your computer/device.
- The Camera Device skill added to your ARC project and running.

In file on your computer in C \pictures\My robot Pictures
Once you get it, you can re-name it whatever.jpg
You will find the location documented in the description at the top of this page.