A movement panel to control brushless motor controllers. These are used in hoverboards or many other robot types.
How to add the Brushless Motor Movement Panel robot skill
- Load the most recent release of ARC (Get ARC).
- Press the Project tab from the top menu bar in ARC.
- Press Add Robot Skill from the button ribbon bar in ARC.
- Choose the Movement Panels category tab.
- Press the Brushless Motor Movement Panel icon to add the robot skill to your project.
Don't have a robot yet?
Follow the Getting Started Guide to build a robot and use the Brushless Motor Movement Panel robot skill.
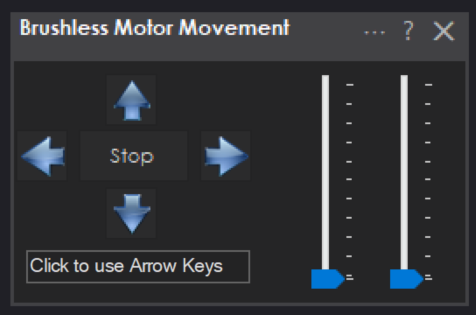
How to use the Brushless Motor Movement Panel robot skill
A Movement Panel to control brushless motor controllers. These are used in hoverboards or many other robot types. This uses generic (popular amongst DIY projects) brushless motor controllers. These controllers have a pin for direction, speed, and brake for each motor.
Configuration

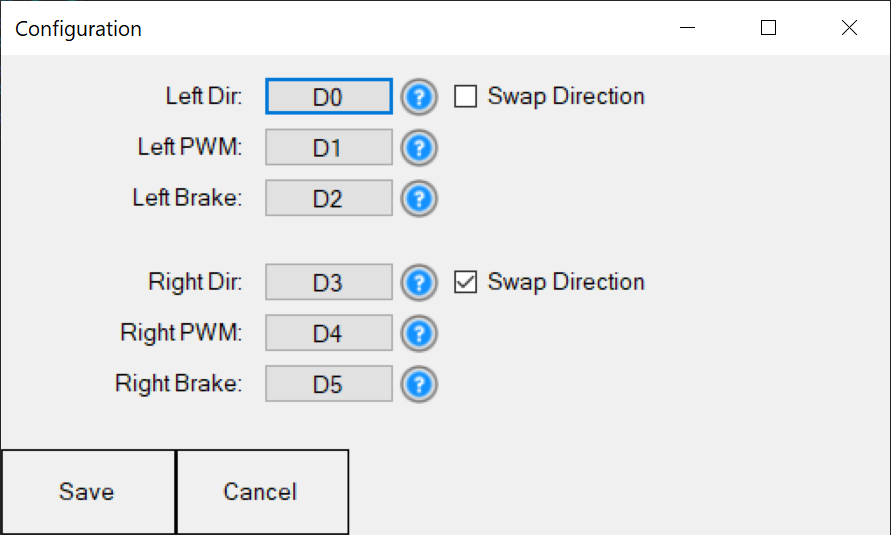
The configuration menu has options to select the ports for generic brushless motor controllers. Select the ports that are connected to the appropriate connections between the EZB and motor controller.
*Optional: the brake port is optional as it may not be necessary for some applications. Some applications may leave this wire disconnected from the EZB.
Related Questions
question

Brushless Motor Controller
Dear; Can anyone help me to create a custom movement panel to control this brushless motor controller on Arc for EZB...
question

Brushless Motor Controller V3
I am building, built, a platform to move my Inmoov robot, Bourne, around. Im using hoverboard motors. I have found that...
Upgrade to ARC Pro
Get access to the latest features and updates with ARC Early Access edition. You'll have everything that's needed to unleash your robot's potential!
Looks like video didn’t send so, I checked and voltage goes from 0-5 volts with no pwm, I also had an issue when using zen v4 and that was to fast turning hard l or r.
Hopefully we can figure this out. Like I said earlier, have rechecked hook up and settings and as video shows, it’s not working on LattePanda with Leonardo!
Thanks for any guidance you can give.
Scott
EZB 0: 2021/07/19 5:30:46 -07:00 Windows version: Microsoft Windows NT 10.0.18363.0
2021/07/19 5:30:46 -07:00 Screen Resolution: 1920x1080 (96x96 dpi)
2021/07/19 5:30:46 -07:00 ARC (Early Access) Version: 2021.07.01.00
2021/07/19 5:30:56 -07:00 TCP Server started on 5685
2021/07/19 5:32:27 -07:00 Attempting connection on COM6
2021/07/19 5:32:28 -07:00 Connected to COM6 at 9600
2021/07/19 5:32:28 -07:00 Reports CapabilityController
2021/07/19 5:32:28 -07:00 Firmware 'DJs Arduino Leonardo v1' on 'Arduino Leonardo' supports the following capabilities:
- ADC with 10 bit resolution
- Read/Write Digital I/O Ports
- Hardware UART TX/RX with DMA buffer and adjustable baud rate
- PWM Duty on digital ports
- PWM servos on digital ports
- PWM servos on digital ports can release their position
- Transmit Uart TX on all digital ports
- Native USB Connectivity from ARC
2021/07/19 5:32:28 -07:00 Connected
2021/07/19 7:46:09 -07:00 DTR Enable cannot be changed while connected. Reconnect for this setting to take effect.
2021/07/19 7:46:09 -07:00 TCP Server: Stopped
2021/07/19 7:46:09 -07:00 TCP Server stopped
EZB 1:
EZB 2:
EZB 3:
EZB 4:
That message explains you would need to reconnect for DTR to take effect. You need to enable DTR before a connection is established. Always a good idea to read the log when experiencing difficulties. Additionally, you can verify the Leonardo works by checking one of the i/o pins and setting it ON and OFF with a digital port robot skill: https://synthiam.com/Support/Skills/Digital/Set-Digital?id=16094
I will be using just one motor (not like a hoover board dual motor setup).
If this will work, what do I connect each pin on the motor to on the control?
What kind of control do you want over this motor? How will you be using it? There may be better options for you.
I'm not an expert but I learned by experience and though questions that electronic noise travels on the grounds (neutral). So if you have all grounds tied together you will get any noise generated passed to the other devices if not wired properly.
Without seeing your wiring it's hard to give direct advice on what to do. You may have a different things going on here and may have to address more then one issue.
Do you have a second power supply you can wire the motor to? This would isolate that motor and it's noise to that power supply. This may be the cheapest and easiest way to solve this problem.
You may have a ground loop. These are insidious and hard to find but from what you tell us it may center around your crown motor. Here is an excellent article on this and it also gives suggestions on how to fix it:
https://en.wikipedia.org/wiki/Ground_loop_(electricity)
Here's a few lines from that article explaining what a Ground loop is:
One great suggestion from that article above is to install a ground loop isolation transformer in the cable. However I've not really found a electric ground loop isolation transformer. All I can find are ones for audio. I don not know if you can use an audio isolation transformer in your power system.
One other issue may be induction (even if a ground loop is a problem). Your power lines feeding the crown motor may be to close to the other lines that you see having the issues. The electric magnetic fields (EMF) produced by the power cable feeding the crown motor are leaking into the cables feeding the other devices. Move the power cable from the crown motor as far away as possible from other wires. The signal wires going to the servos and lights are probably being induced and causing the servos to twitch. Do you hear any pinging or other noise in the background of your robot's audio system?
You can also try Ferrite Suppression Chokes on the wires. I did this on some of my servo's signal wires that were twitching when the neon flashed. It's worked nicely. They are all over Amazon for very little money.
Again, I don't know how you have your robot wired but you also may be getting induction on the brain's wiring directly from the crown motor it's self. The wiring for the brain goes directly past that motor and up into the brain. It's very hard to get any separation in the brain cup. I'm using a motor just like Craig Reinbrecht sells on his vendor page. I've never had the issue you currently have using this motor: For some reason I can't post a link in this page to Craig's vendor page so copy and paste this link:
http://www.b9robotbuildersclub.com/pub/parts/B90032/index.html#Motor
I have my motor powered directly with 12v and adjust it's speed with PWM controlled through Synthiam's ARC.
Someone please correct me if I'm wrong on any of this or have a better way.
Good luck and keep us posted.
Question, do you see the interference while the crown motor is running or when it starts or stops? If starting and stopping, I'm thinking you might be seeing the DC motor's electric field collapsing.
The way I'm reading this is that even with the separate power supply you are getting the interference. This really sounds like an induction problem. Is the crown motor the only thing attached to that new supply? No other grounds from other devices?
I only have a couple more suggestions,
#Replace your power cable feeding the motor with shielded cable making sure the shielding is grounded as to bleed off the induction. If you don't ground the shielding you can have an even bigger problem.
#I know this is a lot of work but pull the motor out of the brain cup and bench test it out of the robot to see if you still get interference. Try testing both using the existing wiring you have going down through the robot and with new wiring directly to the power supplies. Both of them, one at a time.
#Look closely at how the affected devices are wired. It may be that they have a wiring issue and by adding the crown motor this has just tipped the scale (so to speak).
#As a last resort replace that motor with Craig's setup. He even has a motor mount that fits into the brain cup for it.
#I have been assuming you are using a AC-DC converter to power your robot. Switching power supplies can also introduce noise into the circuit.
#Relocate the crown motor down below the brain cup in the collar or even as far down as in the torso. You would then need to run a longer shaft up unto the brain to rotate the finger lights and crown. If your radar turns you would need to attach the lowered motor bracket to the radar so the motor tunes with the head. This way you can bet a bigger motor. You may even consider using a continuous rotating servo.
That brushless motor your friend suggested may be a solution if you can find one small enough.
You may want to post this on the B9 Robot builders Facebook page. There are lots of builders that may have an idea of how to approach this or know of a brushless motor you can use that would fit.
Is there a way to control the speed of a brushless motor via a script? I have a brushless motor with built-in controller (https://www.robotshop.com/en/36d-brushless-dc-motor-with-planetary-gearbox-12v-32rpm.html), and have connected it using the Brushless Motor Movement panel, but I really need to control the speed with code instead of sliders. Is there a way to do that?
here’s a link to the set speed command. But also look into the movement commands: https://synthiam.com/Support/javascript-api/Movement/setSpeed