
Maps PC microphone volume to servo positions - control multiple servos (e.g., robotic mouth) with scalar, min/max and invert options.
How to add the Sound Servo (PC Mic) robot skill
- Load the most recent release of ARC (Get ARC).
- Press the Project tab from the top menu bar in ARC.
- Press Add Robot Skill from the button ribbon bar in ARC.
- Choose the Audio category tab.
- Press the Sound Servo (PC Mic) icon to add the robot skill to your project.
Don't have a robot yet?
Follow the Getting Started Guide to build a robot and use the Sound Servo (PC Mic) robot skill.
How to use the Sound Servo (PC Mic) robot skill
The Sound Servo (PC Mic) skill uses the volume (amplitude) coming from your computer’s audio input device (your microphone) to move a servo. In simple terms: quiet = one servo position and loud = another servo position, with smooth movement in between.
You can control more than one servo in two ways:
- Use Multi Servo in the settings to mirror the same movement to additional servos (great for multiple mouth parts, eyebrows, etc.).
- Add multiple instances of this skill (useful if you want different settings/ranges for different servos).
How It Works (Beginner Explanation)
This skill constantly measures your microphone’s loudness. That loudness becomes a number (the Level), and then:
- The Level is multiplied by a Scalar (a sensitivity multiplier).
- The result is converted into a servo position between your Minimum and Maximum position settings.
If the servo hardly moves, increase the Scalar and/or increase your mic input level in Windows. If the servo slams to max too easily, reduce the Scalar and/or reduce the mic input level.
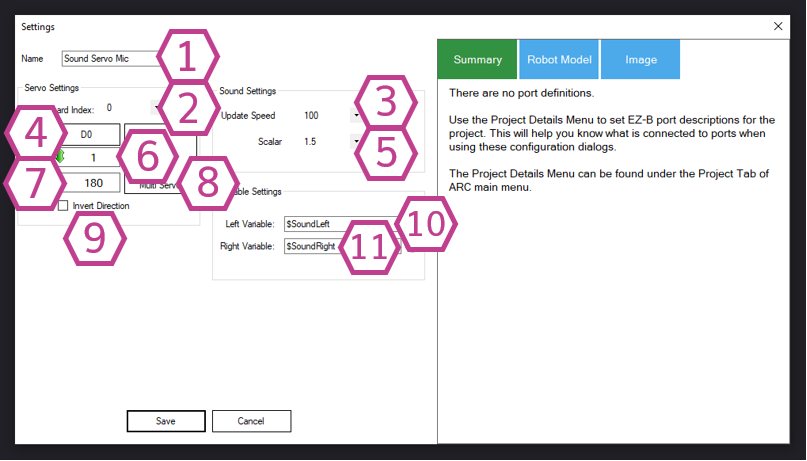
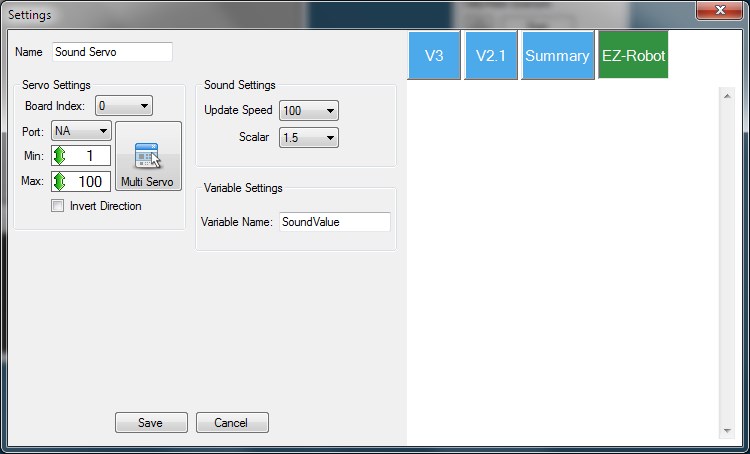
Main Window

1. Level Value
Shows the current sound level detected by your microphone input. By default, the skill uses the Right channel. If you speak or make noise and this number doesn’t change, Windows likely isn’t using the microphone you think it is (see the Resources section below).
2. Servo Position
Displays the servo position being sent, limited by the Minimum and Maximum values you set. This value comes from: Level × Scalar, then mapped into your servo range.
3. Pause Checkbox
Temporarily stops listening to the microphone. Use this when you want to adjust settings without the servo constantly moving, or when testing your robot.
4. Audio Waveform
A visual “is my mic working?” display. If you talk and you see waveform movement, ARC is receiving audio.
Settings
Beginner tip: Start with the default. If the mouth looks “laggy,” try lowering slightly; if it looks too twitchy, try increasing.
- Servo barely moves: increase Scalar (ex: 1.5 → 3.0).
- Servo hits max too easily: decrease Scalar (ex: 1.5 → 1.0).
Controls: left-click to adjust; right-click to type a value.
Beginner tip: Choose a value that does not strain the servo or the mouth mechanism.
Controls: left-click to adjust; right-click to type a value.
Beginner tip: Start with a conservative max (smaller opening), then increase slowly to avoid binding.
Quick Start (Step-by-Step)
- Connect a servo to your EZ-B and make sure it works using a basic servo control first.
- Add the Sound Servo (PC Mic) skill to your ARC project.
- In Settings, choose your Board Index and Port.
- Set Minimum (mouth closed) and Maximum (mouth open) positions.
- Talk into the microphone and watch the Waveform and Level Value.
- If movement is too small or too big, adjust the Scalar (and optionally your Windows mic volume).
- If the motion is backwards, enable Invert Direction.
Requirements
- An EZ-B I/O controller
- A servo
- A working microphone connected to your PC (built-in, USB, headset, Bluetooth, etc.)
Headset or External Mic (Strongly Recommended)
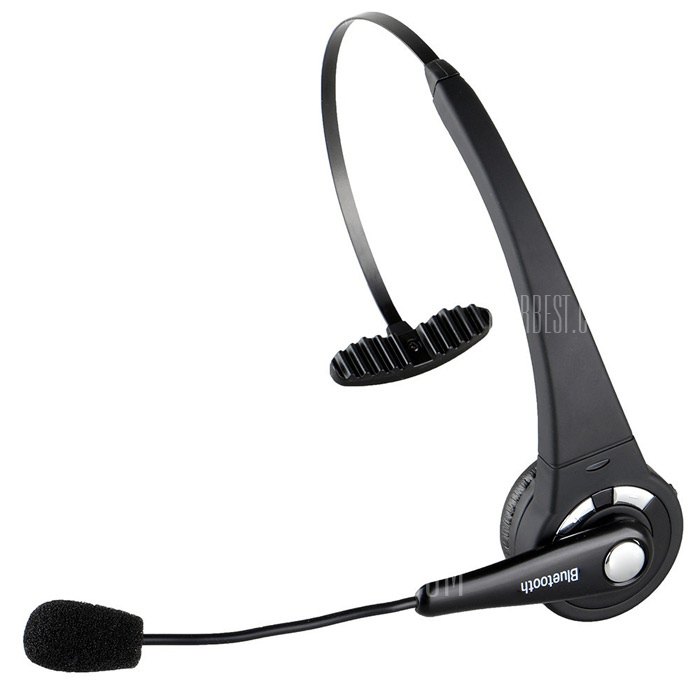
A headset or external mic usually works much better than a laptop’s built-in mic. Built-in mics often pick up motor noise, room echo, and even the robot’s own speaker audio. A closer mic (headset) gives cleaner sound, which results in smoother and more predictable servo motion.
Resources: Configure Your Microphone in Windows
If the waveform/level isn’t responding (or the servo movement is weak), you may need to select the correct microphone and adjust the input gain.
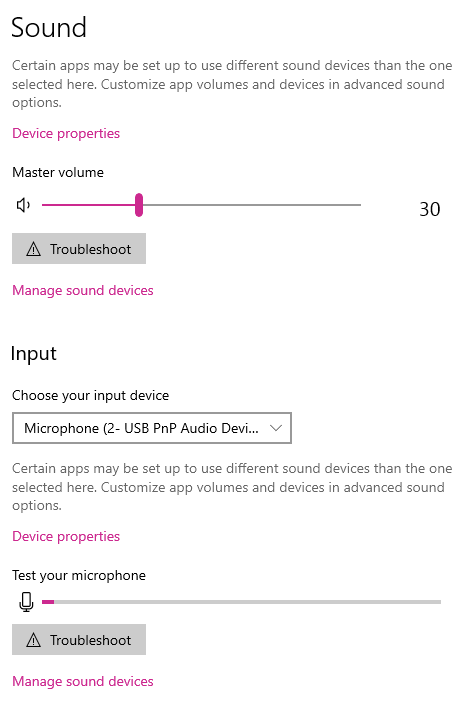
- Right-click the speaker icon in the Windows system tray.
- Select Open Sound settings.
- Under Input, select the microphone you want to use. Speak and confirm the on-screen input meter (VU meter) moves.
- Click Device properties and adjust the Volume slider. (Many users end up around ~78, but your setup may differ.)
- Aim for your normal speaking voice to register around the middle of the input meter—this gives the skill room to detect quiet and loud sounds.
Related Tutorials
Sabertooth+Kagaroo+DC Motors As Servos
Sound Activated Circuits (Leds, Lamps Etc)
Related Questions

Upgrade to ARC Pro
Become a Synthiam ARC Pro subscriber to unleash the power of easy and powerful robot programming
@DJ I was using this skill today and it turns out, in the "Add New Robot Skill" Audio window, there's a skill called "Sound servo (EZB)" that is a duplicate of "Sound servo (PC Mic)".
And No, I don't have it confused with "Sound servo (EZB Playback)", I know that it's a duplicate because if I add the "Sound servo (PC Mic)" to a project, then add "Sound servo (EZB)" I get the following error:
I just wanted to let you know before the next release.
Ah i see that - fixed for next update thanks!