
Connects your robot camera to Hugging Face AI models for vision chat, object tracking, classification, captioning, and autonomous movement.
 Windows
How to add the Hugging Face robot skill
- Load the most recent release of ARC (Get ARC).
- Press the Project tab from the top menu bar in ARC.
- Press Add Robot Skill from the button ribbon bar in ARC.
- Choose the Artificial Intelligence category tab.
- Press the Hugging Face icon to add the robot skill to your project.
Don't have a robot yet?
Follow the Getting Started Guide to build a robot and use the Hugging Face robot skill.
How to use the Hugging Face robot skill
Give your robot a brain from the world's largest AI community. This robot skill connects your robot's camera to any Hugging Face AI model - with no code required. A vision language model can look through your robot's camera, decide what to say, move the servos you assign to it, and even drive the robot around. An object detection model can make your robot's head follow a person around the room. A classification model can tell your scripts what the robot is looking at. You pick the model, assign the servos, and the robot works.
What is Hugging Face?
Hugging Face is the largest open community for artificial intelligence. It hosts over a million free AI models built by companies like Google, Meta, Microsoft, Alibaba and thousands of independent researchers. New state-of-the-art models are published there every day - models that can describe images, find objects, recognize faces and emotions, read text in the camera view, answer questions about what they see, and much more.
Normally, using these models requires writing Python code, managing GPU servers, and understanding machine learning APIs. This robot skill removes all of that. It talks to the Hugging Face Inference API - a cloud service that runs the models for you - so your robot can use cutting-edge AI with nothing more than a free account and a few clicks. When a better model is released next month, you don't rebuild your robot: you paste the new model's name into the configuration and press Save.
How it works
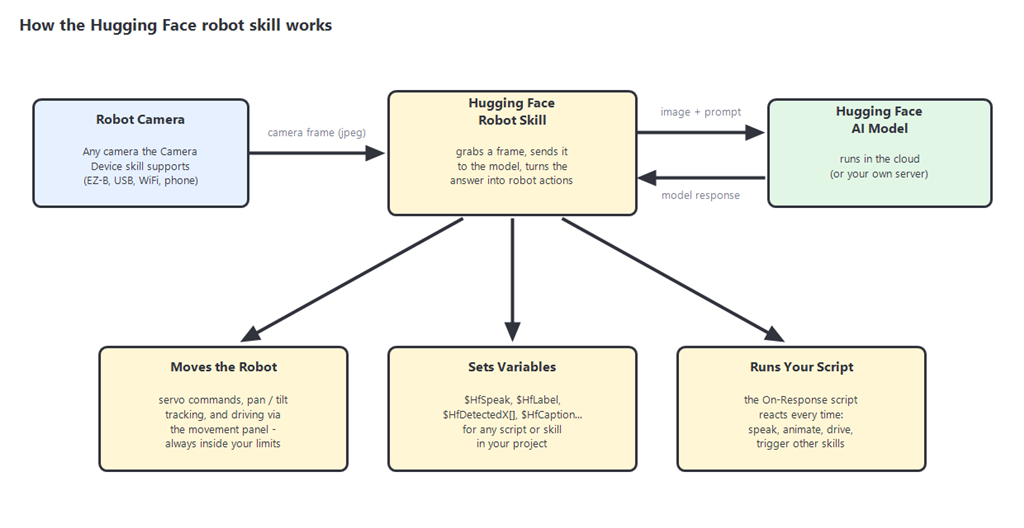
- The skill grabs the current video frame from your project's Camera Device robot skill.
- It sends the image (plus your prompt, depending on the task) to the Hugging Face model you configured.
- The model's answer comes back and the skill turns it into robot behavior:
- Servo movements - either commanded directly by a vision chat model, or by pan/tilt object tracking.
- Script variables - every result is stored in variables (default prefix
$Hf) that any script or robot skill in your project can read. - Your script - an optional On-Response script runs after every answer so the robot can speak, animate, drive, or trigger other skills.
What you need
- ARC (this skill runs on Windows with ARC by Synthiam)
- A Camera Device robot skill with a working camera (EZ-B camera, USB webcam, WiFi/IP camera, etc.)
- A free Hugging Face account and access token - create one at huggingface.co/settings/tokens (a Read token is all you need)
- An internet connection (or your own self-hosted model server - see Advanced)
- Optional: servos connected to your EZB for the model to control
The free Hugging Face tier includes monthly inference credits, which is plenty for experimenting. Heavy continuous use may need their inexpensive PRO plan.
Quick start (5 minutes)
- Add a Camera Device robot skill to your project (Project Add Skill Camera Camera Device) and press Start so live video is showing.
- Add the Hugging Face robot skill to your project.
- Press the gear icon on the Hugging Face skill to open the configuration.
- On the Hugging Face tab, paste your access token. The default task (Vision Chat) and default model work out of the box.
- Press Save, then press Query Now.
Within a few seconds the model looks through your robot's camera and answers in the log window. That's it - your robot is running a Hugging Face model.
To make the robot move, continue to the Model Servos section below.
The main window
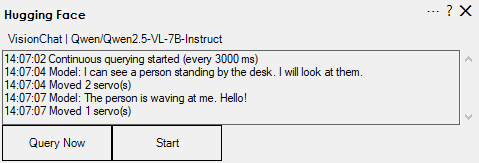
- The status bar shows the active task mode and model.
- The log shows what the model said, what it detected, servo movements, and any errors.
- Query Now sends the current camera image to the model one time.
- Start / Stop runs the skill continuously at the interval set in the configuration, so the robot keeps observing and reacting on its own.
Task modes
Open the configuration (gear icon) and choose a task on the Hugging Face tab:
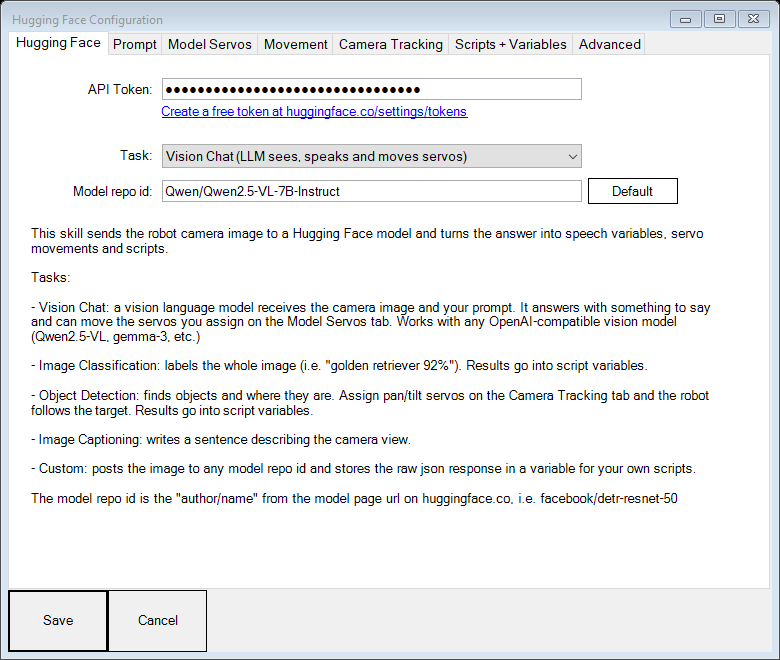
1. Vision Chat - the robot sees, talks and moves
This is the headline feature. A vision language model (a ChatGPT-style AI that can see) receives the camera image and your prompt. It answers with something to say, can move the servos you assign to it, and can drive the robot through ARC's Movement Panel (see the Movement section).
- Default model:
Qwen/Qwen2.5-VL-7B-Instruct. Any vision model available through Hugging Face's OpenAI-compatible API works. - Write your instruction on the Prompt tab: "You are a robot dog. Look for people and greet them", "Find the red ball and point your head at it", "Guard this room and announce anything unusual".
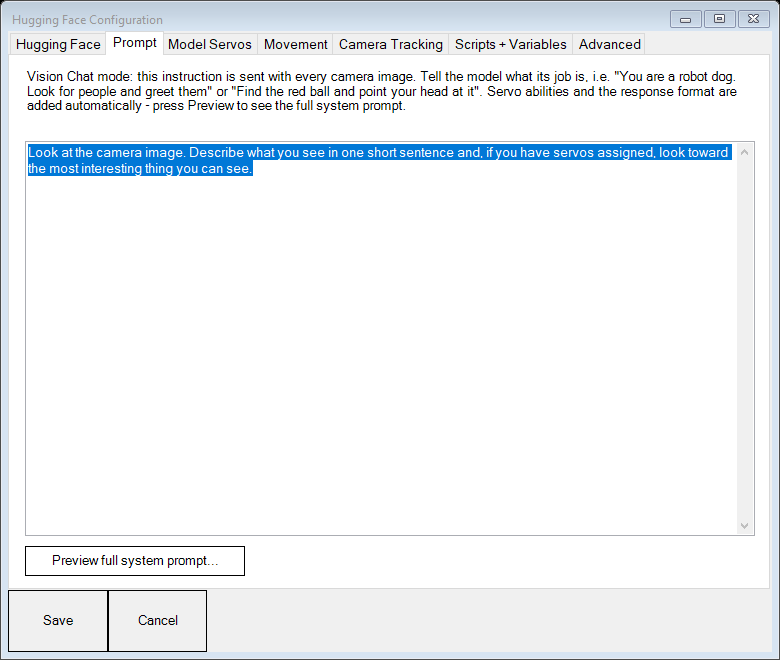
- The skill automatically teaches the model what servos it has and how to answer - press Preview full system prompt on the Prompt tab to see exactly what the model is told.
- What the model wants to say is stored in
$HfSpeak. Make the robot actually speak by adding one line to the On-Response script:Audio.sayEZB(getVar("$HfSpeak"));
2. Object Detection - find things and track them with servos
A detection model (default facebook/detr-resnet-50) finds objects and their exact locations in the camera frame. It knows 90+ everyday objects: person, dog, cat, cup, bottle, chair, sports ball, cell phone...
- Every detection is stored in variable arrays: label, confidence, and position in the frame.
- Assign pan and tilt servos on the Camera Tracking tab and the robot physically follows the target with its camera. Type the label to follow (i.e.
person) or leave it blank to follow the strongest detection.
3. Image Classification - what am I looking at?
A classification model (default google/vit-base-patch16-224) labels the whole image from 1000 categories - animal breeds, objects, vehicles, foods. The top answer lands in $HfLabel / $HfScore for your scripts. Great for "show the robot an object and it names it" tricks, sorting tasks, or state detection.
4. Image Captioning - describe the scene
A captioning model (default Salesforce/blip-image-captioning-large) writes a natural sentence describing the camera view, stored in $HfCaption. Perfect for an assistant robot for the visually impaired, or a robot that narrates what it sees.
5. Custom - any image model on Hugging Face
Posts the camera image to any model repo id you enter and stores the raw JSON response in $HfResponse. Use this for specialized models this skill doesn't have a dedicated mode for - emotion recognition, age estimation, depth estimation, OCR, NSFW filtering, pose detection - and parse the response in your own script.
Picking models
Every model on huggingface.co/models has a repo id in its page URL - for example facebook/detr-resnet-50. Paste that id into the Model repo id field. Use the site's Tasks filter (Image Classification, Object Detection, Image-Text-to-Text...) to browse models compatible with each mode, and the Default button in the configuration to return to a known-good model at any time.
Model Servos - letting the AI move your robot
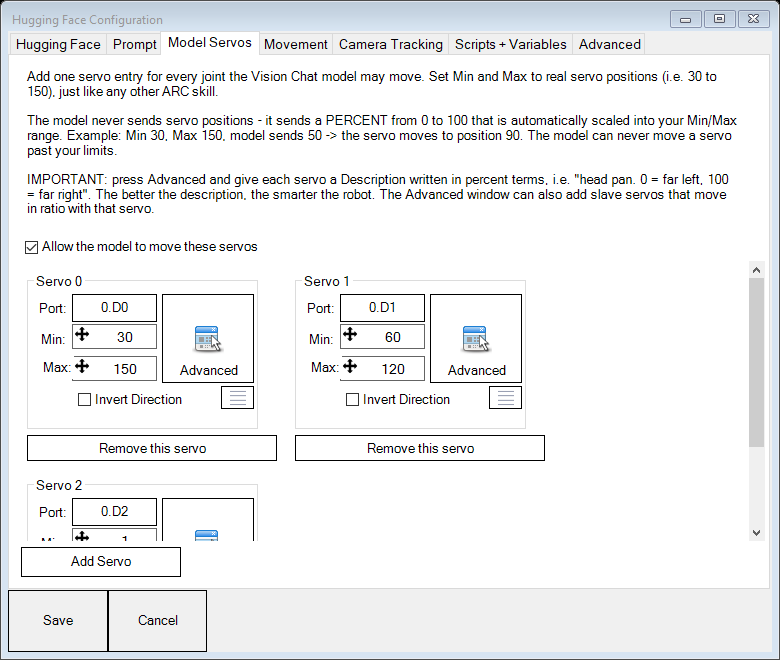
This is where the magic happens for Vision Chat mode. Press Add Servo once for every joint the model is allowed to move - head pan, head tilt, an arm, and so on. Each entry gets its own servo selection with port, min/max limits and invert, plus a Remove this servo button. The entries are numbered (Servo 0, Servo 1...) - those are the indexes the model uses when it commands a movement.
Press the Advanced button on a servo entry to open ARC's Multi servo Edit window for that joint:
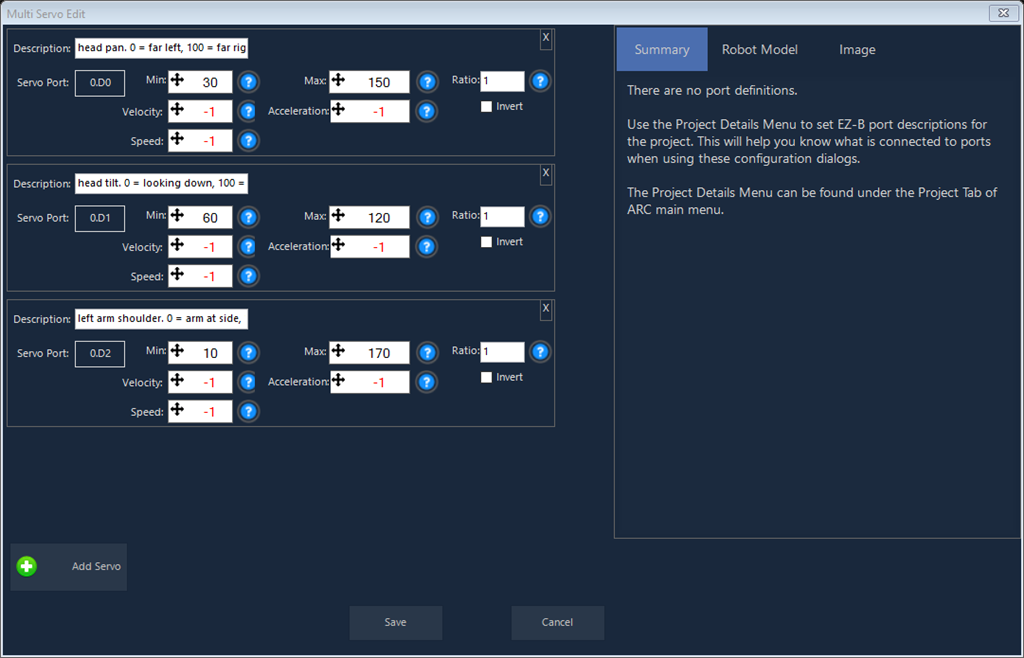
- The Description field is the name the model sees - this is where you describe the joint and its direction (see below).
- Fine-tune the primary servo's speed, velocity, acceleration and limits.
- The green Add Servo button inside this window adds slave servos to the joint: servos that automatically move in ratio with the primary servo, each within its own min/max and ratio settings. Perfect for jaws, twin shoulder servos, or linked mechanisms that must move together as one joint. Slaves are not announced to the model - the model only sees the joint.
The pan and tilt selections on the Camera Tracking tab work the same way: one primary servo each, with optional ratio slaves behind the Advanced button.
Percent in, positions out - how movement values work
The model never sends servo positions. It sends a percent from 0 to 100, and the skill automatically scales that percent into the real servo positions you set as Min and Max. Set Min/Max to normal servo positions (1-180), exactly like every other ARC skill - do not set them to 0-100.
For example, with Min = 30 and Max = 150:
| Model sends (percent) | Servo moves to (position) |
|---|---|
| 0 | 30 |
| 50 | 90 |
| 100 | 150 |
Because everything is scaled through your Min/Max, the model can never move a servo past your limits - it is physically impossible for the AI to over-rotate a joint you've calibrated.
Two things matter:
Write a good Description for every servo. The description is what the model reads to understand your robot's body. Include the joint and its direction, written in percent terms (0 = one end of your range, 100 = the other):
head pan. 0 = far left, 100 = far righthead tilt. 0 = looking down, 100 = looking upleft arm shoulder. 0 = arm at side, 100 = arm straight up
The 0 and 100 in these descriptions are the percent scale, not servo positions - 0 simply means "all the way at Min" and 100 means "all the way at Max". The better the description, the smarter your robot behaves. This is the whole trick: you describe the body, the model figures out how to use it.
Set real min/max limits. Calibrate Min and Max to the safe physical range of each joint using actual servo positions. The tighter and more accurate your limits, the more predictable the robot's movement.
Because any robot's body can be described this way, any robot - humanoid, arm, rover with a camera head, animatronic - can be driven by the same model with zero code. Uncheck Allow the model to move these servos to temporarily make the robot look-and-talk only.
Movement - letting the AI drive your robot
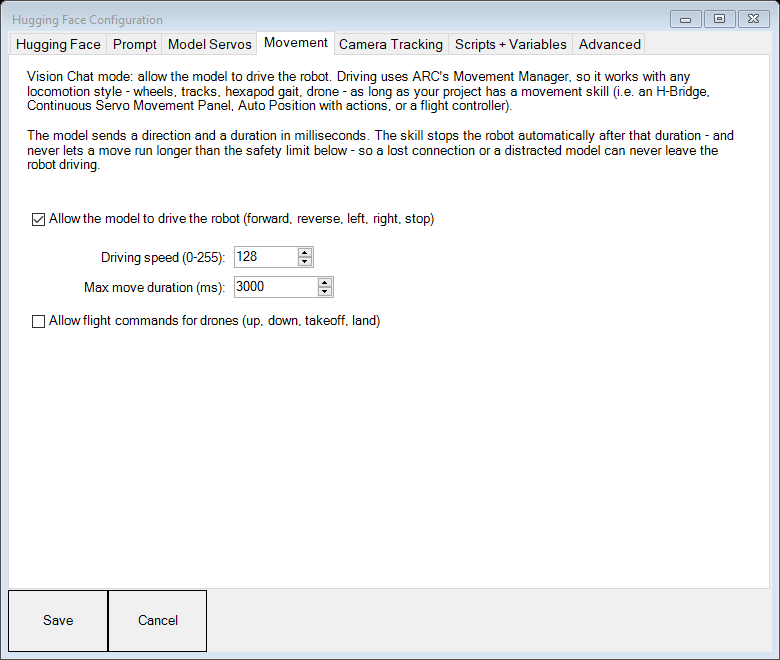
Vision Chat mode can also drive the robot. Driving goes through ARC's Movement Manager, the same abstraction every movement skill uses - so "forward" means forward whether your robot rolls on wheels, walks a hexapod gait, runs tracks, or flies. All you need is any movement skill in your project (H-Bridge, Continuous servo Movement Panel, Auto Position with actions, a flight controller, etc.) and this checkbox enabled.
The model sends a direction (forward, reverse, left, right, stop) and a duration in milliseconds. Built-in safety:
- Movement control is off by default - you opt in.
- Every move auto-stops. The skill stops the robot after the model's requested duration, and never lets a move run longer than the Max move duration you configure. A lost internet connection, slow model, or distracted AI can never leave the robot driving away.
- You set the driving speed (0-255), not the model.
- Flight commands (
up,down,takeoff,land) are a separate opt-in for drones.
The model is told to drive in small steps and look again at each new camera image, so it naturally explores rather than blindly charging forward. The last commanded direction is stored in $HfMoveDirection.
A prompt like "Explore the room. Avoid obstacles. When you see a person, drive to them and say hello" is now a complete autonomous robot behavior - no code, no map, no programming.
Camera Tracking - following objects with pan/tilt
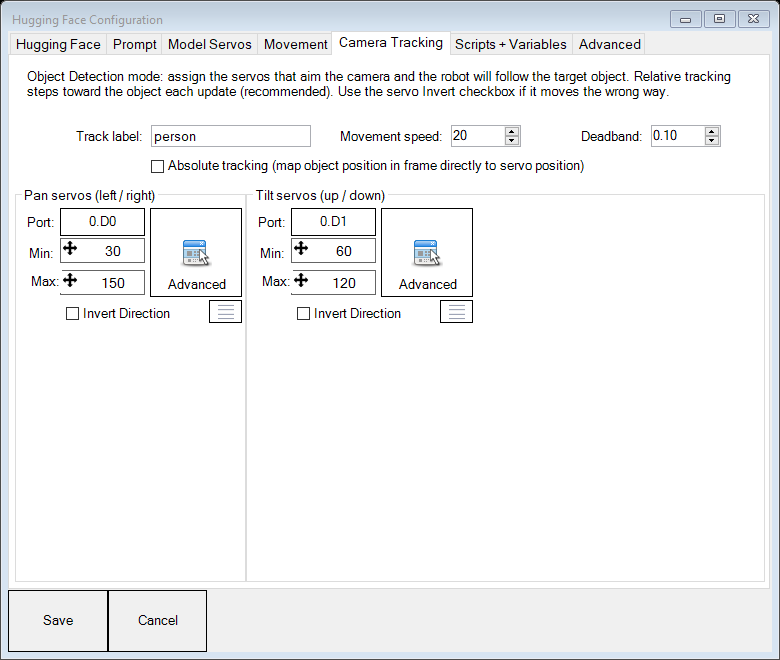
Used by Object Detection mode. Assign the servos that aim your camera:
- Pan servos - move the camera left/right.
- Tilt servos - move the camera up/down.
- Track label - which object to follow (
person,dog,sports ball...). Blank = follow the strongest detection. - Movement speed - how aggressively the servos step toward the target each update.
- Deadband - how close to center counts as "centered" (prevents jitter).
- Absolute tracking - instead of stepping toward the target, maps the object's position in the frame directly onto the servo range. Useful for pointing gestures (an arm that points at what the camera sees) rather than centering a camera.
If a servo moves away from the target instead of toward it, check Invert on that servo. Run the skill continuously (Start button) for live tracking.
Scripts + Variables
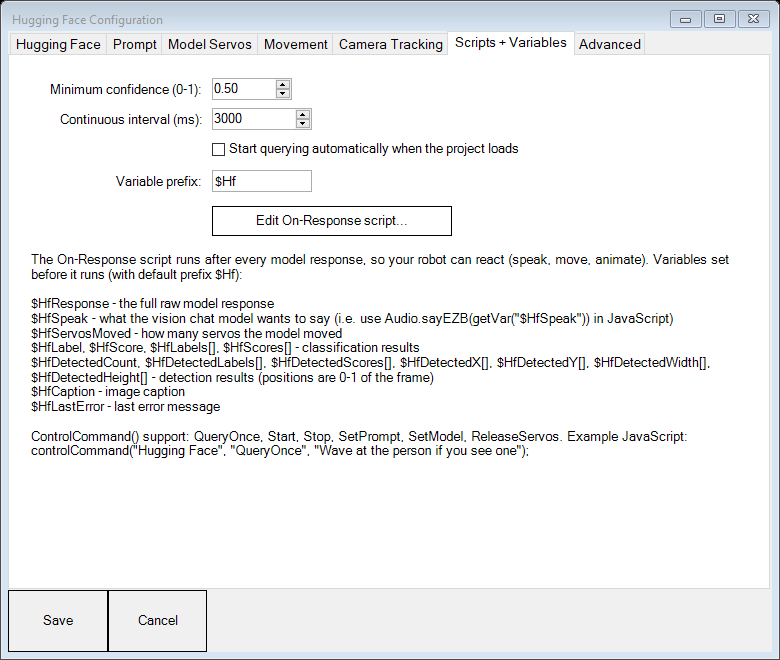
Variables
All results are published as global script variables. With the default $Hf prefix:
| Variable | Meaning |
|---|---|
$HfResponse |
Full raw model response (all modes) |
$HfSpeak |
What the vision chat model wants to say |
$HfServosMoved |
How many servos the model just moved |
$HfMoveDirection |
Last driving direction the model commanded (forward, left, stop...) |
$HfLabel, $HfScore |
Top classification result |
$HfLabels[], $HfScores[] |
All classification results above the confidence threshold |
$HfDetectedCount |
Number of detected objects |
$HfDetectedLabels[], $HfDetectedScores[] |
Detected object names and confidences |
$HfDetectedX[], $HfDetectedY[] |
Object center positions (0-1 of frame; 0.5, 0.5 = center) |
$HfDetectedWidth[], $HfDetectedHeight[] |
Object sizes (0-1 of frame) |
$HfCaption |
Image caption |
$HfLastError |
Last error message |
- Minimum confidence filters out weak classification/detection results.
- Continuous interval is the delay between queries when running with Start.
- Start querying automatically when the project loads makes the robot autonomous the moment your project opens.
The On-Response script
The optional On-Response script runs after every successful model response, with all variables already set. Edit it in JavaScript, Python, EZ-Script or Blockly. Example (JavaScript) that makes the robot speak vision chat answers:
var speak = getVar("$HfSpeak", "");

if (speak.length > 0)
  Audio.sayEZB(speak);
Example that reacts to detections:
if (getVar("$HfDetectedCount", 0) > 0) {

  var label = getVar("$HfDetectedLabels", 0);

  if (label == "person")
    controlCommand("Auto Position", "AutoPositionAction", "Wave");
}
ControlCommand reference
Other skills and scripts can drive this skill:
| Command | What it does |
|---|---|
controlCommand("Hugging Face", "QueryOnce") |
Query the model one time |
controlCommand("Hugging Face", "QueryOnce", "your prompt") |
Query once with a one-off prompt (Vision Chat) |
controlCommand("Hugging Face", "Start") |
Start continuous querying |
controlCommand("Hugging Face", "Stop") |
Stop continuous querying |
controlCommand("Hugging Face", "SetPrompt", "new prompt") |
Change the Vision Chat prompt |
controlCommand("Hugging Face", "SetModel", "author/model") |
Change the model for the current task |
controlCommand("Hugging Face", "ReleaseServos") |
Release all servos assigned to this skill |
This makes powerful combos easy: a Speech Recognition skill that hears "what do you see?" can fire QueryOnce with a prompt, and the On-Response script speaks the answer.
Ideas: what people build with this
- A pet robot with a personality - Vision Chat + a prompt like "You are a curious puppy. Look around, react to what you see, and follow anything interesting" + head/neck servos assigned.
- A greeter robot - Object Detection tracking
person, plus an On-Response script that waves and says hello when someone new appears. - A seeing-eye assistant - Image Captioning on a button press, speaking
$HfCaptionaloud. - Fetch trainer - Object Detection tracking
sports ball; drive toward it using$HfDetectedXin a movement script. - A security sentry - continuous Vision Chat with "Announce anything unusual. If you see a person, describe them".
- An explorer - Vision Chat with movement enabled and "Explore the room. Avoid obstacles. Describe what you find" - the robot wanders and narrates on its own.
- Object sorting arm - Image Classification decides what's on the table; your script picks the Auto Position action to sort it.
Advanced
The Advanced tab lets you:
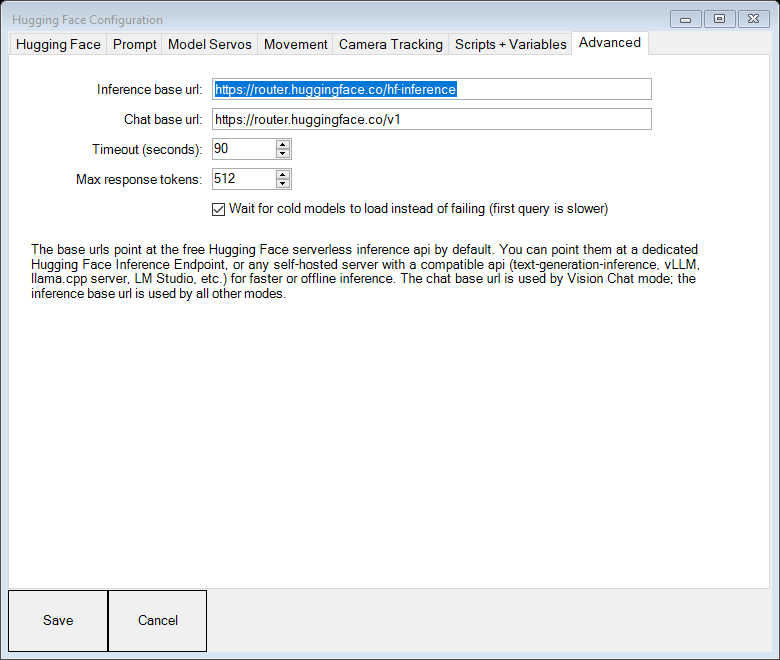
- Change the base URLs. By default the skill uses the free Hugging Face serverless Inference API. Point the URLs at a dedicated Hugging Face Inference Endpoint for guaranteed speed, or at your own self-hosted server - anything with a compatible API works (text-generation-inference, vLLM, llama.cpp server, LM Studio, Ollama's OpenAI endpoint). That means this skill can also run fully offline with a local vision model on a gaming PC.
- Timeout - how long to wait for an answer.
- Max response tokens - the length budget for vision chat answers.
- Wait for cold models - free serverless models go to sleep when unused. With this enabled (default), the first query asks Hugging Face to wake the model instead of failing; the first answer just takes longer.
Troubleshooting
| Symptom | Fix |
|---|---|
| "No active camera" | Add a Camera Device skill and press its Start button so live video is showing. |
| 401 Unauthorized | Your token is missing or wrong. Paste a valid token from huggingface.co/settings/tokens. |
| 402 Payment required | Your free monthly inference credits ran out. Wait for the next cycle or upgrade the Hugging Face plan. |
| 403 Forbidden | Gated model - visit the model's page on huggingface.co while logged in and accept its terms first. |
| 404 Model not found | Check the repo id spelling, and that the model supports the selected task. Press Default to get back to a working model. |
| 503 Model is loading | The model is waking up. Enable Wait for cold models on the Advanced tab, or simply try again in a minute. |
| First query is very slow | Normal for sleeping serverless models - subsequent queries are much faster. |
| Tracking moves the wrong way | Check Invert on the pan or tilt servo in the configuration. |
| Model answers but robot doesn't speak | Speech comes from your On-Response script - add Audio.sayEZB(getVar("$HfSpeak")); |
| Servos don't move in Vision Chat | Confirm servos are added on the Model Servos tab, Allow the model to move these servos is checked, and each servo has a clear description. |
| Robot doesn't drive in Vision Chat | Enable driving on the Movement tab, and confirm the project has a movement skill (H-Bridge, movement panel, etc.). |
Privacy note
Camera images are sent to the Hugging Face API (or whatever server you configure) for processing. If your robot operates somewhere images shouldn't leave the building, use the Advanced tab to point the skill at a self-hosted model on your own network.
Any robot. Any Hugging Face model. Assign the servos, describe the body, and go.