

Real-time 3D servo visualization with motion trails, interactive camera controls and clear trail for ARC debugging and analysis.
How to add the Servo Sketch 3D robot skill
- Load the most recent release of ARC (Get ARC).
- Press the Project tab from the top menu bar in ARC.
- Press Add Robot Skill from the button ribbon bar in ARC.
- Choose the Graphs category tab.
- Press the Servo Sketch 3D icon to add the robot skill to your project.
Don't have a robot yet?
Follow the Getting Started Guide to build a robot and use the Servo Sketch 3D robot skill.
How to use the Servo Sketch 3D robot skill
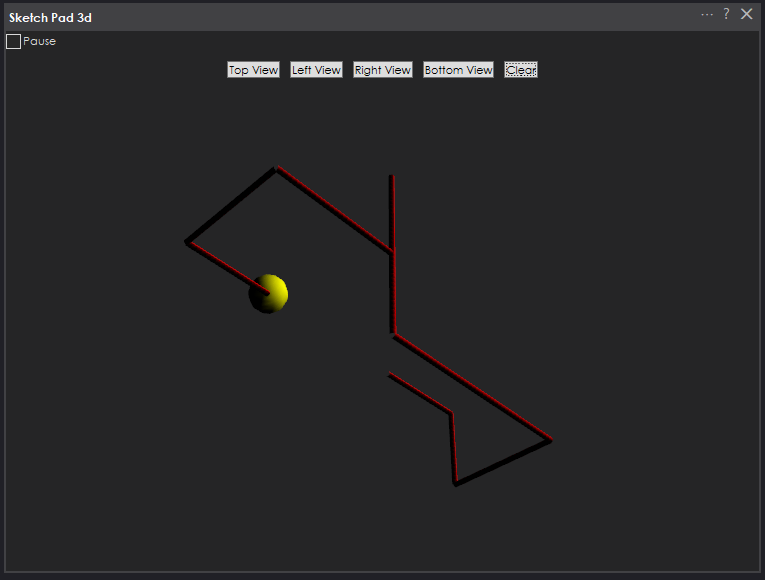
This servo 3D Tracker is an innovative robot skill for Synthiam ARC that visualizes your robot's servo positions in real-time within a dynamic 3D environment. This skill tracks the current positions of your servos and leaves a visual trail of their movements, giving you a clear picture of how your robot is operating.
Key Features
Real-Time 3D Visualization
The servo positions are mapped into a 3D space and displayed as a small red dot. This allows you to see where each servo is instantly at any given moment.Dynamic Trail Tracking
As the servos move, a trail of white lines (rendered as thin cylinders) is drawn between consecutive positions. This trail helps you visualize the path taken over time.Interactive Camera Controls Rotate, zoom, and pan the 3d environment to examine the servo sketch closely.
Clear Trail Functionality
A dedicated Clear button allows you to reset the servo trail and start fresh, making it easier to monitor new movements.
3D Interactivity
- Rotate (Orbit): Left-click and drag to rotate the camera around the servo tracking area.
- Pan: Right-click and drag to shift the view smoothly.
- Zoom: Use the mouse wheel to zoom in and out, giving you complete control over your perspective.
- Preset Views: Smooth transitions to top, bottom, left, or right views with animated camera movement. Or use the provided control commands.
How It Works
Mapping servo Data:
The servos' positions selected in the config menu are mapped to a normalized 3D coordinate system, ensuring that movements are accurately represented regardless of the servo's raw range.Interactive Controls:
Intuitive mouse controls allow for effortless rotation, panning, and zooming. Animated transitions for preset views enhance the user experience by smoothly moving the camera to standard angles.Trail Visualization:
As the servo moves, each new position is added to a history. Thin white cylinders connect these positions to form a continuous trail, providing a visual record of the servo's motion.
Benefits
Enhanced Debugging & Analysis:
Easily monitor and analyze servo behavior, which can be invaluable for troubleshooting and optimizing robot performance.User-Friendly Interaction:
The combination of real-time visualization, interactive controls, and smooth animations makes exploring your robot’s movements engaging and intuitive.
Configuration Screen
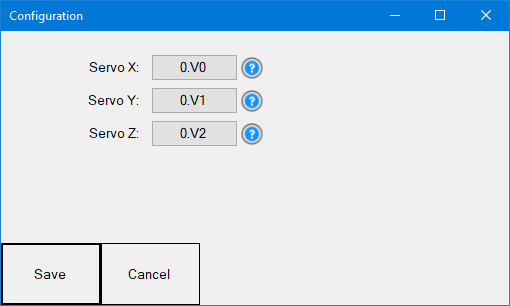
Note: the servos must always be on EZB Index #0
Control Commands for the Servo Sketch 3D robot skill
There are Control Commands available for this robot skill which allows the skill to be controlled programmatically from scripts or other robot skills. These commands enable you to automate actions, respond to sensor inputs, and integrate the robot skill with other systems or custom interfaces. If you're new to the concept of Control Commands, we have a comprehensive manual available here that explains how to use them, provides examples to get you started and make the most of this powerful feature.
Control Command ManualcontrolCommand("Servo Sketch 3d", "Clear") // Clear the current scene
controlCommand("Servo Sketch 3d", "TopView") // Move the camera to look at the scene from the top
controlCommand("Servo Sketch 3d", "BottomView") // Move the camera to look at the scene from the bottom
controlCommand("Servo Sketch 3d", "LeftView") // Move the camera to look at the scene from the Left
controlCommand("Servo Sketch 3d", "RightView") // Move the camera to look at the scene from the Right
controlCommand("Servo Sketch 3d", "PauseOn") // Pause the plotting of positions
controlCommand("Servo Sketch 3d", "PauseOff") // Un-pause the plotting of positions
controlCommand("Servo Sketch 3d", "GetPause") // Return the value of the pause checkbox (Returns Boolean [true or false])
Related Questions
Sketch Pad Program For Servos
Scaling Servo Sketch 3D

Upgrade to ARC Pro
Don't limit your robot's potential – subscribe to ARC Pro and transform it into a dynamic, intelligent machine.
This will be a very useful skill.