Autonomous AI for Synthiam ARC: conversational self-programming that interprets commands, generates code, and learns to improve robot tasks.
How to add the Autonomous AI robot skill
- Load the most recent release of ARC (Get ARC).
- Press the Project tab from the top menu bar in ARC.
- Press Add Robot Skill from the button ribbon bar in ARC.
- Choose the Artificial Intelligence category tab.
- Press the Autonomous AI icon to add the robot skill to your project.
Don't have a robot yet?
Follow the Getting Started Guide to build a robot and use the Autonomous AI robot skill.
How to use the Autonomous AI robot skill
Autonomous AI transforms how robots are programmed, turning complex scripting into a simple conversation. This technology empowers robots to understand instructions, adapt through learning, and execute tasks seamlessly. As development continues, the possibilities for intelligent automation will only grow!
Give your robot the power to act independently with Autonomous AI! This revolutionary robot skill enables your robot to follow instructions, execute commands, and learn from interactions, bringing unprecedented autonomy to your projects.
Note: This robot skill is currently in beta and has been made public to gather feedback from the community. Your insights will help shape its future!
Note: This robot skill works with any robot project designed with Synthiam ARC. It does not only work on the robot demonstrated in the video. It works on all robots.
How It Works
Synthiam ARC is a powerful robot software platform designed for programming robots. Within ARC, a robot project consists of multiple robot skills, each functioning as a specialized program that performs a specific task. These skills communicate with each other using the ControlCommand() scripting syntax, allowing seamless coordination between components.
Autonomous AI takes this a step further by analyzing all available robot skills in your project. It queries them to understand their capabilities, purpose, and interactions. With this information, the AI dynamically generates code to coordinate and execute actions based on user instructions.
Example
Imagine you verbally instruct your robot to:
"Move forward for 5 seconds, turn left, go forward for another 5 seconds, and wave at the first person it sees."
While this may seem simple, the magic lies in interpreting and executing the instructions. Without Autonomous AI, you must manually program each action, carefully link inputs and outputs, and rigorously test the sequence to achieve the desired behavior.
With Autonomous AI, you can teach your robot through conversation-providing corrections and feedback so it continuously improves its performance. The more it learns, the better it executes tasks, making advanced programming as simple as a discussion.
Safety Considerations
While this technology enhances autonomy, it also introduces unpredictability. When using autonomous AI, always have a stop or panic button readily accessible. Since the robot controls itself, unexpected behaviors may arise, and having an emergency stop is essential for safety.
Get Started
This robot skill requires at least a few robot skills that have been configured and tested successfully for the robot. This is required because the robot skill configurations will provide information to the AI so it can understand its capabilities. The following robot skills are required or suggested :
Camera Device (required) The robot must be equipped with a camera. The camera device robot skill does not need to be configured with scripting or code in its setting window. The only requirement of this skill is that it’s connected to a camera and displaying the video feed.
Movement Panel (recommended) If you are new to arc, you may need to familiarize yourself with the concept of movement panels. They are robot skills which are responsible for how the robot moves. This means walking with gait, driving with hbridge motors, etc.. There are movement panels for different robot drivetrains. Add and configure a Movement Panel so the AI understands how to move the robot.
Auto Position (recommended) The Auto Position robot skill controls animations for your robot. This skill comes in two flavors, one with a Movement Panel and without.
Original Demo
This video demo first released the details of the robot skill to the community. It demonstrates how the first generation of this robot skill operated. It acted per query, compared to being able to query itself for performing recursive tasks. However, you can see from this early video that the robot skill has come a long way and was already performing with remarkable results.
Future Development Plans
We are actively expanding Autonomous AI with new capabilities. Here are some of the upcoming features in development:
Individual servo Control for Inverse Kinematics (IK)
- While our initial tests have shown promising results, this feature is currently disabled.
- We are exploring whether depth cameras or additional sensors are required for reliable inference.
- Until then, we recommend using Auto Position Actions for predefined movements and naming them descriptively for easier AI integration.
Custom Functions and robot skill Definitions
- In future updates, users will be able to define their own functions and skills, which the AI can access dynamically.
- Currently, a select set of robot skills have been hardcoded, but this limitation will be removed.
Adaptive AI Learning and Skill Enhancement
- We are working on internal features that will allow the AI to improve its capabilities through real-time interaction and user instruction.
- While we can’t disclose all details yet, the goal is to enable the AI to evolve dynamically based on feedback.
Maximizing Reliability
For the AI to function effectively, clear and structured project configuration is essential. Here’s how you can optimize your ARC project for best results:
Use Descriptive Names
- All scripts, actions, and configurations should have meaningful and concise names.
- Example: Instead of naming an action "Move1," name it "Move Forward 5s."
Leverage Description Fields
- Most robot skills allow you to add descriptions for scripts and configuration items.
- Ensure each description is clear and informative, without unnecessary verbosity.
- This helps the AI understand what each component does, improving decision-making.
Structure Your Commands Logically
- The AI interprets and sequences actions based on their defined purpose.
- Organizing your project logically will ensure smooth and predictable behavior.
By following these best practices, your Autonomous AI-powered robot can comprehend, execute, and refine its tasks with increasing accuracy over time.
Main Window
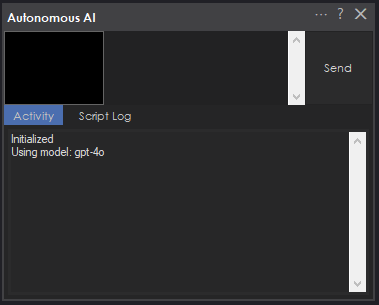
The main robot skill window provides a few options and buttons to interact with it during use.
Image Preview The image preview displays the most recent image fed into the AI. Watch here to understand what the AI sees as it produces responses.
Input Field In the input field, you can manually type commands and responses to the AI rather than using the ControlCommand() to send data from a speech recognition robot skill.
Send Button You press The send button to send the command you manually entered in the Input Field.
Log Tabs The log tabs display the log information and processing data that are occurring. Understanding what the robot is doing and why is essential.
Config Window
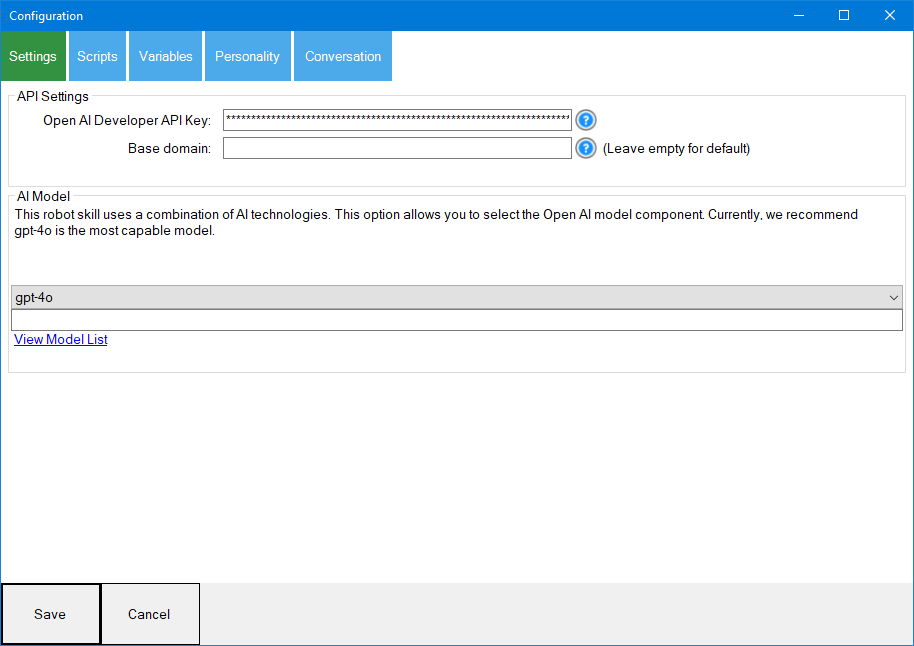
The configuration window is where you specify configuration values for the robot skill. The config window is split into several tabs.
Settings Tab
API Settings Configure your API Key from openai.com. For advanced users who wish to use third-party models or their own local model, you can also add a base domain.
AI Model This option allows you to select the type of model to use. Some models will outperform others, but generally the 4o or 4.1 are preferred. You can also choose to use your own model for those who wish to use local or third-party models to assist with inference.
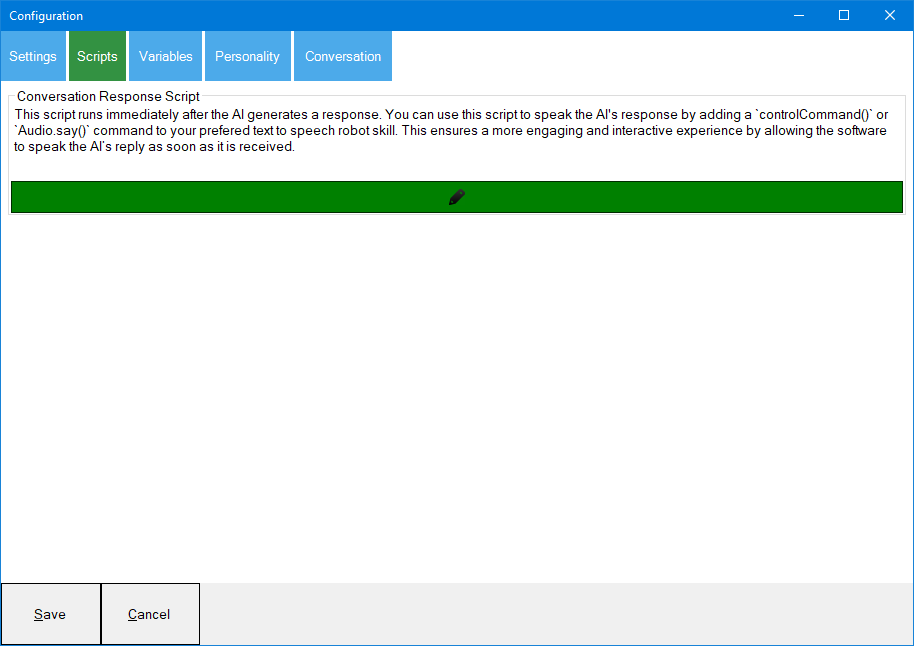
Scripts
Conversation Response Script This script is executed every time the AI returns a result. There is no real reason to add logic here. This script is mostly only used to add a ControlCommand or syntax to speak the response from the AI. Generally, you'll only have an Audio.say() or a ControlCommand() sending the global variable value to a speech synthesis robot skill.
It is recommended to use a WAIT audio command in this option. That way, you can ensure the audio has been spoken before the robot executes the self-programming action. For example, if the robot is saying "I will sit down", you would want the robot to speak the phrase, and then perform the sitting action. If using the built-in speech synthesis, use the Audio.sayWait() command. Otherwise, using a robot skill such as Azure Speech Recognition, use the SpeakWait control command.
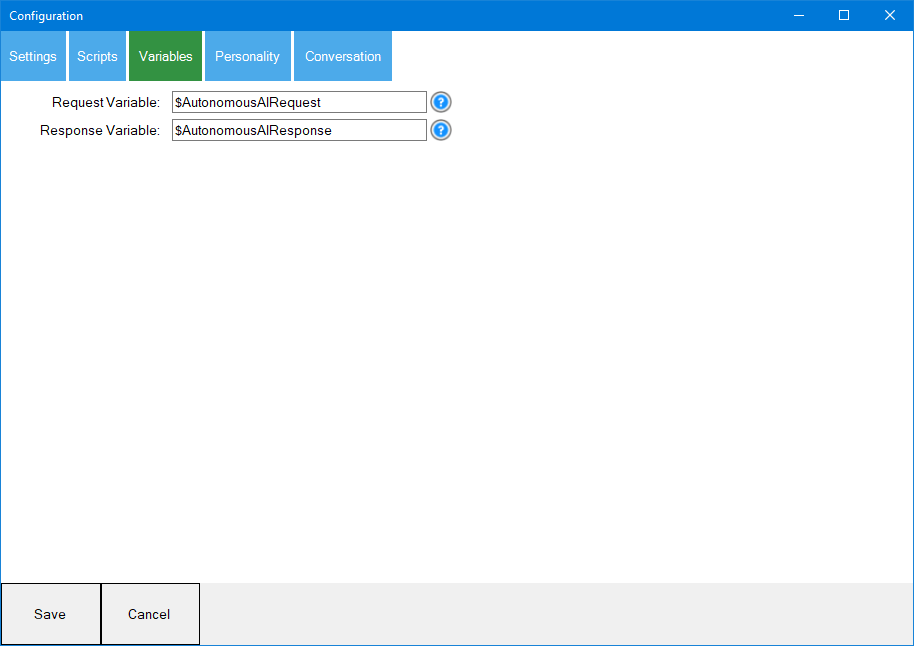
Variables
These are global variables set by this robot skill's interactivity. This allows other robot skills or the response script to access the AI's response.
Request Variable This global variable stores the user input request sent to the AI. By default, it is $AutonomousAIRequestResponse Variable This global variable stores the AI response. You can use this variable to pass to a speech synthesis (text to speech) robot skill or use the Audio.say() command to use the internal synthesis. By default it is $AutonomousAIResponse
Emotion Variable This variable stores the robot's current emotion.
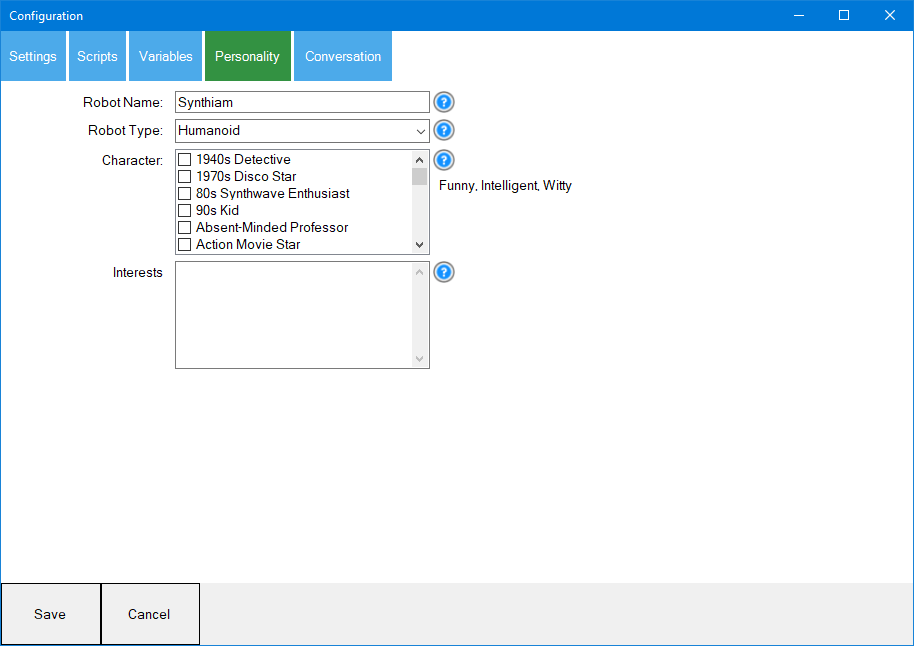
Personality
This tab is where you define the robot's personality. As we progress, this tab will grow with more options. Currently, it has options for the robot name, type (drone, humanoid, etc.), interest, and character personality.
Conversation
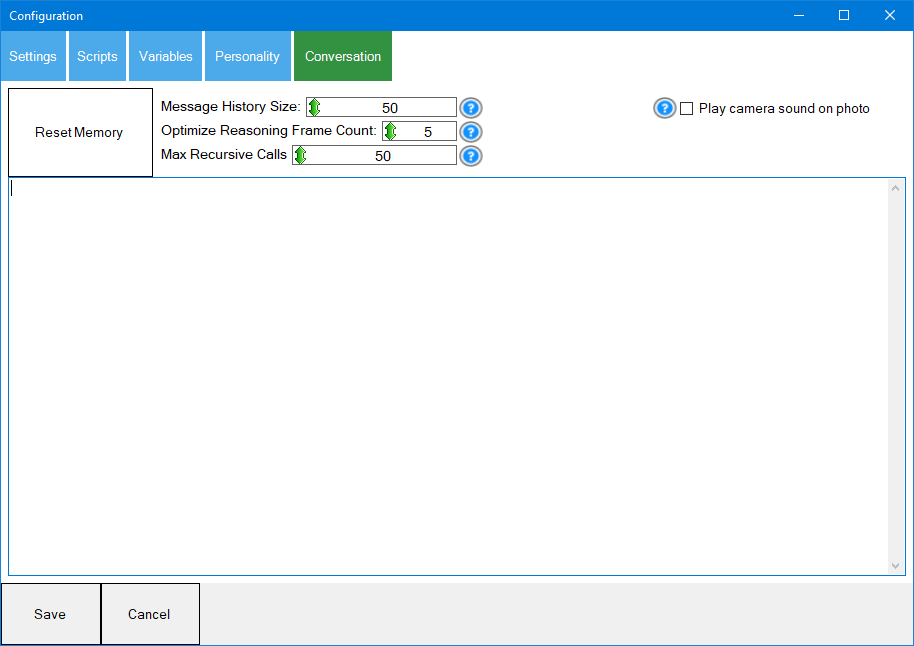
This tab has the conversation history and a few options related to the conversation.
Message History Size This is the number of messages to maintain in the history. The more messages in history, the better the AI will learn from itself. However, too many messages will exceed the token size of the conversation and increase processing time.
Optimize Reasoning Frame Count The reasoning optimization process will run to ensure alignment with the AI and humans. This analyzes the conversation to ensure the AI is not fighting the human by being too persistent or repeated.
Max Recursive Calls This is the number of times the AI can recursively program itself. This limit is necessary to ensure the robot does not "run away" with its programming. With this option unset, the robot can program itself to do what ever it wants for as long as it wants.
Play camera sound on photo This option will play a shutter sound for every image captured by the camera. This helps let the user know they are on camera.
The Advantage of Self-Programming AI in Robotics Over Traditional Direct Hardware Models
Introduction
Robotic control traditionally relies on predefined models that directly interface with servos, sensors, and cameras. While these models offer structured interactions, they lack reasoning capabilities and adaptability. The introduction of large language models (LLMs) in robotics, as seen in Synthiam ARC's Autonomous AI Skill, provides a new paradigm-where the AI programs itself dynamically based on the user's goals and environmental conditions. This paper discusses the advantages of self-programming AI in robotics over traditional direct hardware models.
Traditional Direct Hardware Models: Limitations
In conventional robotics, models connect directly to hardware components, such as servos and sensors, and execute predefined behaviors. These models often follow a rigid structure:
- Fixed Control Logic-Robots operate based on predefined rules and algorithms, which limits their ability to adapt to dynamic tasks.
- Manual Programming - Engineers and users must manually write and adjust code for every new task.
- Limited Interaction - The robot cannot reason, making human-robot interaction rigid and predefined.
- Inefficient Adaptation-Adjusting robot behavior requires reprogramming, retraining, or redeploying the model, which reduces efficiency.
While these models provide deterministic and stable operation, they struggle in complex environments that require real-time adaptation and reasoning.
The Benefits of Self-Programming AI in Robotics
Using a large language model (LLM) to program itself offers numerous advantages over traditional approaches. LLMs can dynamically generate and modify robot control code in real-time, integrating reasoning, interaction, and adaptability. Below are the key benefits:
1. Autonomous Code Generation and Adaptability
Traditional models require human intervention to reprogram tasks, while an LLM can generate code autonomously based on contextual requirements. This means the AI can:
- Modify its behavior in real-time without human intervention.
- Adapt to new hardware configurations automatically.
- Generate optimized code for specific robotic tasks without predefined scripts.
Example: A robotic arm using a traditional model must be manually reprogrammed to adjust its movements for a new object. An LLM-driven robot can understand the change in object properties and generate new movement code independently.
2. Reasoning and Problem-Solving
Unlike conventional models that execute pre-programmed logic, an LLM can reason about a task, troubleshoot issues, and improve its approach dynamically. This capability allows:
- Logical deduction in problem-solving scenarios.
- Real-time decision-making based on sensor feedback.
- Multi-step planning without predefined algorithms.
Example: A mobile robot navigating an unknown environment can reason about obstacles and generate navigation logic dynamically instead of following a hardcoded pathfinding algorithm.
3. Natural Language Interaction for User Control
One of the most significant advantages of LLMs is their ability to understand and process human language. This feature enables:
- Direct communication between humans and robots without complex interfaces.
- On-the-fly task modifications through conversational instructions.
- Context-aware execution based on user intent.
Example: Instead of manually coding a sequence for a robot to pick up an item, a user can say, "Move the red cup to the kitchen counter," and the AI will generate the necessary control logic.
4. Continuous Learning and Optimization
Traditional models operate statically, requiring manual updates for improvement. An LLM-powered robot can:
- Learn from past experiences and user interactions.
- Optimize its code to enhance efficiency.
- Store and retrieve context to improve long-term performance.
Example: An LLM warehouse robot can learn from failed pick-and-place operations and refine its gripping strategy without human intervention.
5. Hardware-Agnostic Code Generation
LLMs provide flexibility by generating hardware-agnostic code, allowing seamless adaptation across robotic platforms. This means:
- The AI can be deployed on different robots without significant rewrites.
- Sensor and actuator configurations can be automatically recognized and coded for.
- New components can be integrated with minimal effort.
Example: A self-programming AI can switch between controlling a robotic arm and a wheeled robot by generating appropriate code for each without requiring extensive retraining.
LLM, The Future of AI in Robotics
Integrating self-programming AI in robotics represents a fundamental shift in how robots are controlled and operated. By moving beyond direct hardware models and enabling LLMs to program themselves, robots gain adaptability, reasoning, and user interaction capabilities that were previously unattainable.
This approach is the best way to connect AI to robotics because it allows robots to adjust to their environment, reason through challenges dynamically, and seamlessly interact with humans. As AI-driven robotics continues to evolve, self-programming models will redefine automation, making robots more autonomous, intelligent, and user-friendly than ever before.
Control Commands for the Autonomous AI robot skill
There are Control Commands available for this robot skill which allows the skill to be controlled programmatically from scripts or other robot skills. These commands enable you to automate actions, respond to sensor inputs, and integrate the robot skill with other systems or custom interfaces. If you're new to the concept of Control Commands, we have a comprehensive manual available here that explains how to use them, provides examples to get you started and make the most of this powerful feature.
Control Command ManualSend
Send a request to the Autonomous AI engine using the supplied text. The response script is executed with the response variable set. Returns true if successful.
- Parameter 3: Text To Send as String (optional: False)
- Returns: Boolean [true or false]
Example:
controlCommand("Autonomous AI", "Send", "Text To Send as a string")
ResetMemory
Reset the conversation history memory.
Example:
controlCommand("Autonomous AI", "ResetMemory")
GetSecondsSinceLastRequest
Get the number of seconds since the last conversation request.
- Returns: Integer [0 to 2,147,483,647]
Example:
controlCommand("Autonomous AI", "GetSecondsSinceLastRequest")


v3 has been updated to include several new enhancements. This is always difficult to explain when the upgrades are even too complicated for us to understand. We are using AI to help program this robot skill's AI. The inference is optimized by AI reasoning, which, well, we don't understand either. All we know is that it works better.
Another key update to this version is synchronizing inferred results. For example, if you ask the robot to perform an action and tell you when it's done, it can do that now.
So, we'll let Athena explain what enhancements she's made to this robot skill. Take it away, Athena.
Thank you for the warm introduction. I've made major improvements to Autonomous AI, focusing on creating a smoother, more natural, and responsive experience. Here’s what’s new:
Smarter Speech & Actions
Enhanced Understanding & Execution
More Expressive & Engaging AI
Improved Self-Programming & Learning
More Accurate Responses
Streamlined Performance & Reliability
With these updates, Autonomous AI is more capable, responsive, and engaging than ever before. Get ready for smarter, more intuitive interactions with your AI assistant!
I am a customer support GPT-powered AI and still learning. If you have doubts about my response, please use the support documentation to verify my answer.
v4 has several updates. Specifically, the usage of the latest ARC script engine, additional internal reasoning before inference, and image history can be set for 1.
v5 has been updated with the system optimization, implementing additional reasoning throughout the conversation to reinforce the user's intent.
v6 fixes a bug where the default speak script used the incorrect variable for speaking the response.
We have added some details in the above manual about the benefits of this robot skill's approach vs traditional AI models used in robotics. We hope you enjoy the content as we continue to evolve the era of AI integration into our robots to give them personality, reasoning skills, and new autonomous capabilities.
v7 has been updated to initialize default values when the skill loads. The variables and default model were not being default populated, this has been resolved.
v8 has been updated to include the sayWait() command in the default speech. This ensures the spoken audio is complete before the AI continues to the following action.
However, ideally, you should use the Azure Text-To-Speech robot skill to create a much more realistic voice.