

Detect audio frequencies via PC microphone (FFT), output a variable and drive servos within configurable min/max ranges with waveform feedback.
How to add the Frequency Detector robot skill
- Load the most recent release of ARC (Get ARC).
- Press the Project tab from the top menu bar in ARC.
- Press Add Robot Skill from the button ribbon bar in ARC.
- Choose the Audio category tab.
- Press the Frequency Detector icon to add the robot skill to your project.
Don't have a robot yet?
Follow the Getting Started Guide to build a robot and use the Frequency Detector robot skill.
How to use the Frequency Detector robot skill
This ARC skill uses the default recording device (i.e. microphone) configured on the Windows PC to detect frequencies. The identified frequency can be assigned to a variable and move servos. A range can be specified to limit the servo movements between Min and Max frequencies.
The type of algorithm used to detect the frequency is called Fast Fourier transform, or FFT for short. Detecting multiple frequencies is heard as noise, which will produce bumpy responses in the data log. Ideally, a single frequency works best. The best sound source that we have used for frequency detection is a Piano. This is because a piano has an Attack and Decay, which is represented by the amplitude of the frequency range.
Main Window
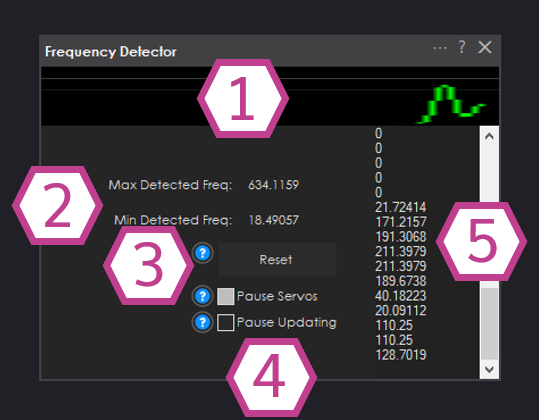
1. Visual Feedback Waveform This visually displays the peaks and valleys of the detected frequency. It also shows you if your default recording device is working properly.
2. Min/Max Detected Frequency Represents the minimum and maximum detected frequency values that have been detected since the skill has been used.
3. Reset Button Resets the Min/Max detected frequency values.
4. Pause Checkboxes These checkboxes will pause the servo movements and the output field values when selected.
5. Frequency Output Field This field displays the detected frequency values in real-time.
Configuration
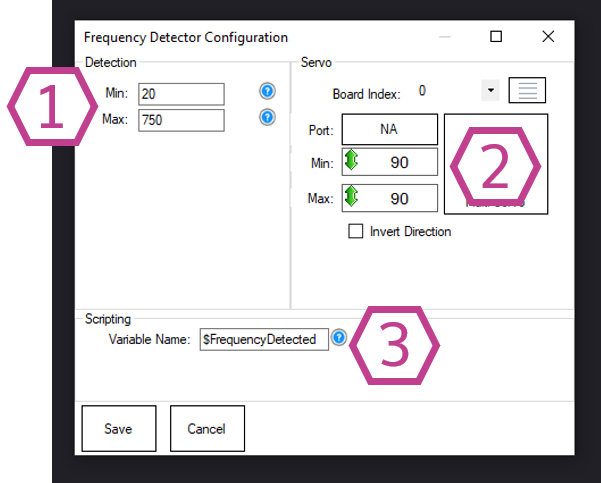
1. Min/Max Detection Values This output displays the peaks and valleys of the detected frequency. It also shows you if your default recording device is working properly.
2. servo Settings You can change the servo port, min/max values, board index, and direction. You can also add multiple relative servos. The servo moves in conjunction with the detected frequency
3. Variable Name Here you can change the variable name for the detected frequency value.
How to Use the Frequency Detector Skill
Add the Frequency Detector skill to your ARC project (Project -> Add Skill -> Audio -> Frequency Detector).
Enable a default recording device and confirm that it's working.
Connect a servo to an EZ-B.
Configure the servo and/or frequency values in the configuration window of the skill.
Ensure the servo is not paused in then Main window, then watch the servo move with the detected frequency.
Code Sample

Here's a little demo game that uses the frequency detector skill. This game uses the PC Microphone to detect frequency. The higher the frequency, the more the servo connected to port D0 will move.
Servo(D0, 1)

$lastMax = 0

:loopForever

  if ($FrequencyDetected > $lastMax)

    print("Detected " + $FrequencyDetected)
    $lastMax = $FrequencyDetected

    Servo(D0, (((GetServo(D0)) + 5)))

    sleep(100)

  endif

goto(loopForever)
