

Radar-style Sharp IR scanner for EZB ADC: sweeps sensor, displays distance dots, logs ADC voltage, and can steer/avoid obstacles via Movement Panel
Compatible with:
 Windows
How to add the Sharp IR Radar robot skill
- Load the most recent release of ARC (Get ARC).
- Press the Project tab from the top menu bar in ARC.
- Press Add Robot Skill from the button ribbon bar in ARC.
- Choose the Infrared Distance category tab.
- Press the Sharp IR Radar icon to add the robot skill to your project.
Don't have a robot yet?
Follow the Getting Started Guide to build a robot and use the Sharp IR Radar robot skill.
How to use the Sharp IR Radar robot skill
Sharp infrared (IR) distance sensors are a great way to determine the distance to an object or wall, using reflected infrared (invisible) light. They offer excellent range and accuracy in an easy-to-use package. Their operation is not affected by soft materials, as ultrasonic sensors are. However, they do have trouble with sunlight interference and black materials that are transparent to IR.When connecting a Sharp IR distance sensor to an EZB's ADC (Analog Digital Converter) port, this skill will sweep the sensor back and forth in a scanning motion to detect objects. For simple collision detection use the Collision skill.
*Note: This skill can be used without a servo attached to the infrared sensor, just set the Servo port to NA.
This skill displays the ADC voltage as a little red dot (between 0 and +5 VDC) on the display if an object is detected, it's similar to an army radar scanner. Optionally, you can use the Config menu to enable a Movement Panel skill. With this option selected, this skill will interact with a movement panel and steer your robot away from obstacles. Another great feature to enable is "Scan only when moving forward". This ensures the scanner and object collision detection is only enabled when the robot is moving.
*Note: Most Sharp IR sensors require a voltage supply of 4.5V to 5.5V. Check your sensor's datasheet. If you use 3.3V to supply a 5V sensor, the readings will be way off. If your EZB I/O Controller of choice doesn't output 5V, use an external 5V regulator.
Main Window
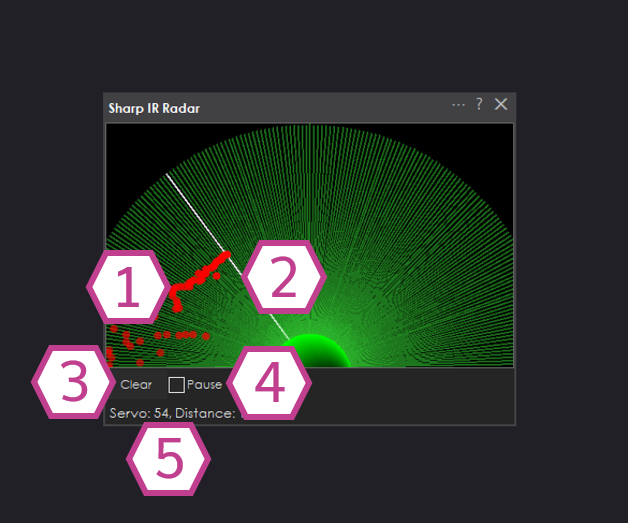
1. Radar Display
This displays red dots to represent a detected wall/object in 180-degree space in front of the infrared sensor. The distance values are between 0-255 that corresponds to the detected distance being sent by the infrared sensor.
2. Sweep Line
This line represents the position that the sweeping servo is in.
3. Clear Button
This button clears the red dots from the Radar display.
4. Pause Checkbox
When checked the infrared sensor readings will pause.
5. Servo and Distance Values
This section displays the values of the infrared sensor and the servo position signal that are being sent.
Settings
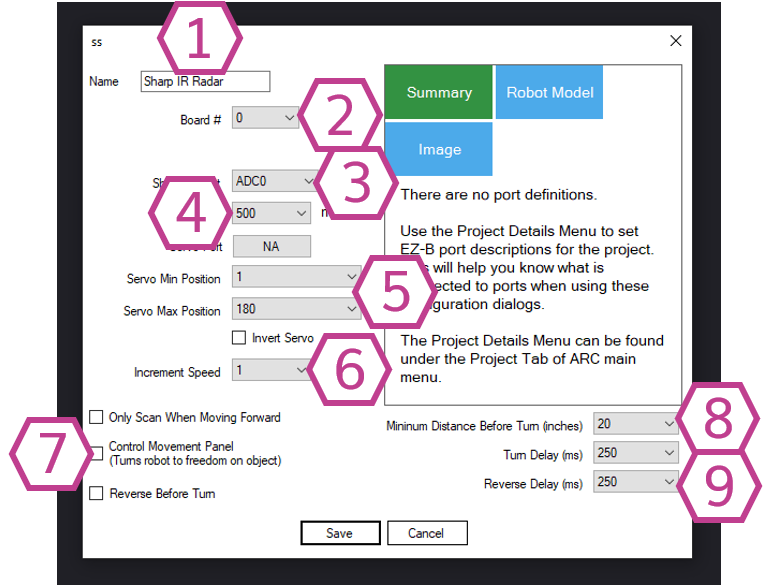
1. Title Field
This field contains the title of the skill. You can change it if you'd like. *Note: Changing the title will also change the title in the controlCommand() associated with this skill.
2. Board Index Drop-down
Select the EZB index number that your infrared sensor is connected to.
3. Port Drop-down
Select your ADC port number.
4. Interval Drop-down
Select the wait time in milliseconds between ADC samples. The range is between 100 to 60000. The default value is 500.
5. Servo Settings
This section sets up the sweeping servo. You can use the drop-downs to select the servo port and the minimum/maximum servo positions. There is also an "invert servo" checkbox which would make the servo sweep the opposite way.
6. Increment Speed Drop-down
This drop-down adjusts the speed of the servo sweep. The range is between 1-36. The default value is 1.
7. Movement Checkboxes
These checkboxes control settings that interact with a movement panel within your ARC project. They enable different features, such as only scanning when the robot is moving forward, controlling the movement panel (automatic obstacle avoidance), and reversing before turning (backup then turn when an object/wall is encountered).
8. Minimum Distance Drop-down
This drop-down selects the infrared distance value to set as the minimum limit before the skill instructs the movement panel to turn the robot. The range is between 1-255. The default value is 20. This drop-down only works in tandem with a movement panel skill and the movement checkboxes must be enabled to use it.
9. Movement Delay Drop-downs
These drop-downs adjust the Turn and Reverse delay values (how long they will activate) in milliseconds. The range is 10-5000 milliseconds. The default value is 250 for both. These drop-downs only work in tandem with a movement panel skill and the movement checkboxes must be enabled to use them.
Wiring Diagram
Sharp Infrared Distance Sensors come in a variety of different types. The differences are usually in terms of range but some can be powered by 3.3V. The majority of the sensors require 5V. If you are powering a Sharp sensor with a voltage over 5V make sure you have a voltage regulator inline with the sensor.
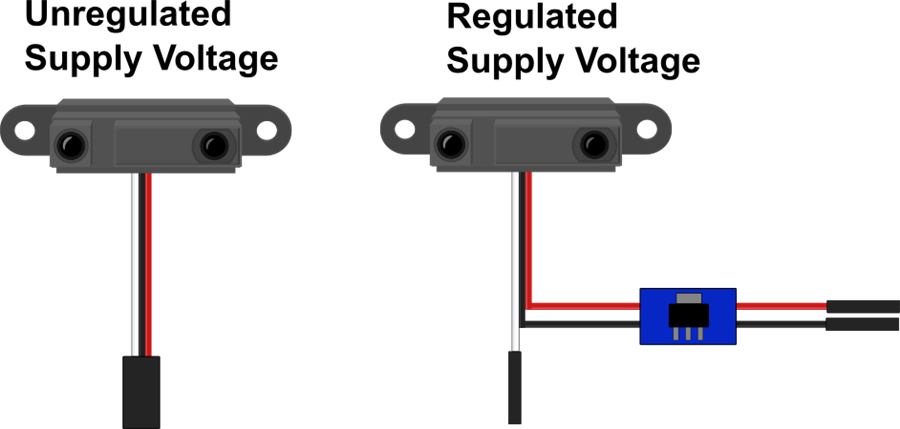
3-wire Wiring (unregulated)
- Ground = Black wire to GND
- Power = Red wire to +5V or +3.3V (Sensor dependent)
- Signal = white wire to ADC pin
- Ground = Black wire from regulator to GND
- Power = Red wire from regulator to Vin (>+5V)
- Signal = white wire to ADC pin
How to use Sharp IR Radar
1) Connect a Sharp IR distance sensor to an EZB. Optionally add a servo to the Sharp sensor as well.
2) Add the Sharp IR Radar skill to your ARC project (Project -> Add Skill -> Infrared Distance -> Sharp IR Radar).
3) In the skill settings select the ADC port that you have the Sharp sensor plugged into.
4) Connect a Robot to EZ-B + Sharp sensor.
5) Add a Movement Panel Skill to your ARC project (Project -> Add Skill -> Movement Panels).
6) Start the Robot on it's movement trajectory and adjust how it will behave with the movement settings inside the Radar Skill.
Video
Requirements
An EZB I/O Controller with analog ports and a infrared distance sensor.

A must have for building robots.