

Telepresence and remote control for any ARC-compatible robot from phone/tablet, combining AI and human operators to perform tasks and train autonomy
How to add the Exosphere robot skill
- Load the most recent release of ARC (Get ARC).
- Press the Project tab from the top menu bar in ARC.
- Press Add Robot Skill from the button ribbon bar in ARC.
- Choose the Remote Control category tab.
- Press the Exosphere icon to add the robot skill to your project.
Don't have a robot yet?
Follow the Getting Started Guide to build a robot and use the Exosphere robot skill.
How to use the Exosphere robot skill
Exosphere is a game-changing robot product that allows telepresence and remote control of any robot. You can use a phone or tablet to remote control your robot. This product gives you the power to help make the world safer and improve business efficiency with telepresence.
Exosphere allows any robot to execute autonomous tasks or have telepresence capabilities in the workplace or at home with human intelligence. Exosphere bridges the gap between robotics, machine learning, and artificial intelligence.
Who Is Exosphere For? A human can remotely control any robot to achieve tasks or become a telepresence host.
The way we think, including moral hesitation, judgment, and responsibility, is being taught to AI algorithms. This is why AI greatly benefits from human interaction. With nearly 3 million robot connections on Synthiam’s platform, robots worldwide are added daily with new tasks when the exosphere is publicly released. These tasks are created for real robots with real problems to solve, getting AI out of the lab and into the real world.
Exosphere can control as much or as little as necessary to help robots achieve their goals, even if that means using human intelligence to fill in the 10% edge cases that robots can’t do.
How Does It Work?
- A robot is instructed to execute a task.
- The task is submitted to Exosphere as a contract request.
- AI/ML and humans provide a confidence bid to win the contract.
- If AI/ML can’t control the robot to perform a task successfully, a human operator is issued another contract to take over or assist the robot. In turn, training the global AI knowledge base for future task requests.

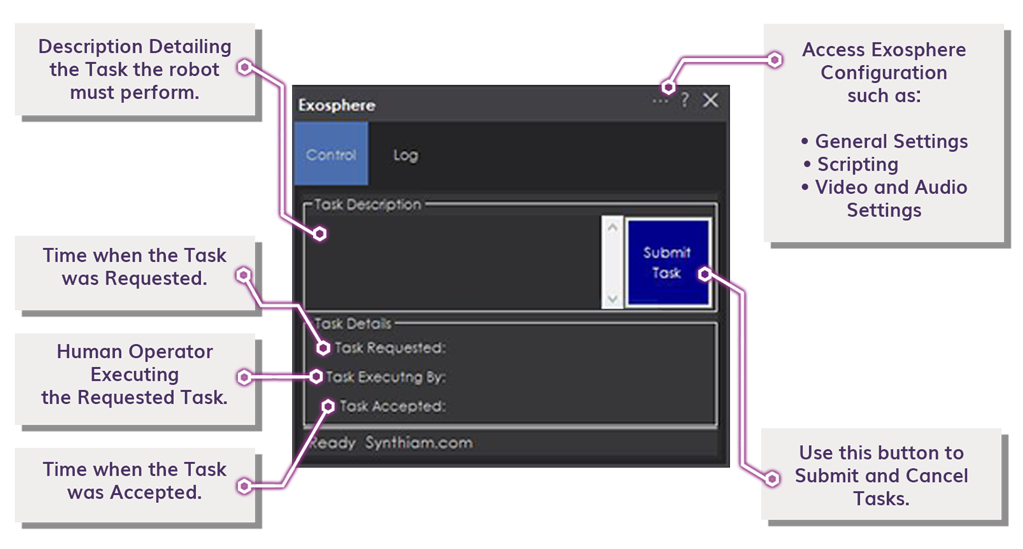
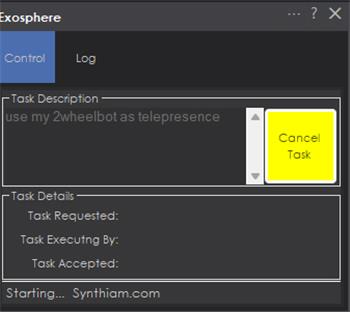
Main Window - Control Tab
1. Control and Log Tabs This selects between the Control and Log sections of the Exosphere Skill main window.
2. Task Description Field Enter the description of the task you are generating and detailed instructions for the user who will accept it.
3. Submit/Cancel Task Button Once the task is submitted, a remote operator will take control of the robot. It is highly recommended that the robot be monitored remotely to avoid hazards to the robot or damage to the environment. Website users will be notified once a task is submitted to the Synthiam servers. You can also use this button for an emergency stop to cancel the task when it's running.
4. Task Details Field Displays the time the task was requested, who picked up the task, and when.
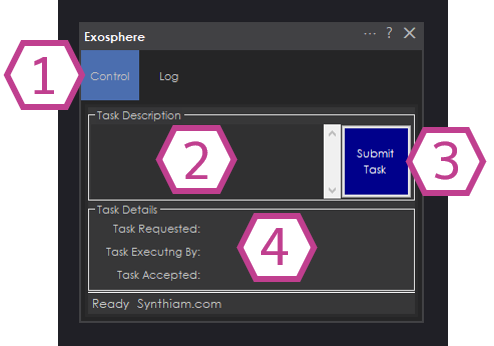
Main Window - Log Tab
1. Log Selection Drop-Down This selects the information level you want to see in the Log Display window: Verbose, Debug, Error, or None.
2. Clear Log Button Clears the Log Display Window.
3. Log Display Window Displays the Log information when errors occur. The Log Selection Drop-down tailors the amount of information.
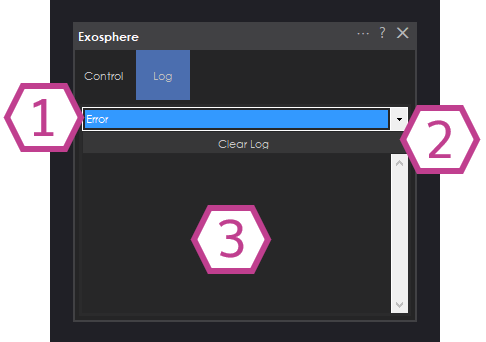
Configuration - General Tab
1. Robot Model and Description Write in your Robot's Make, Model, and Title. Then, add a description of the robot's qualities.
2. Session Password and Minimum Rating Optionally, you can set a password and a minimum rating a user must have to control your robot. Note: These features have not been implemented yet
3. Maximum Joystick Drive Speed Use the drop-down to set the maximum speed of your robot being controlled by the Joystick. If your robot is connected to ARC, you can use the on-screen Joystick to test the speed.
4. Keyboard Drive Speed Use the drop-down to set the maximum speed of your robot being controlled by the Keyboard. If your robot is connected to ARC, you can use the "Test Forward" and "Stop" buttons to test with.
Configuration - Scripts Tab
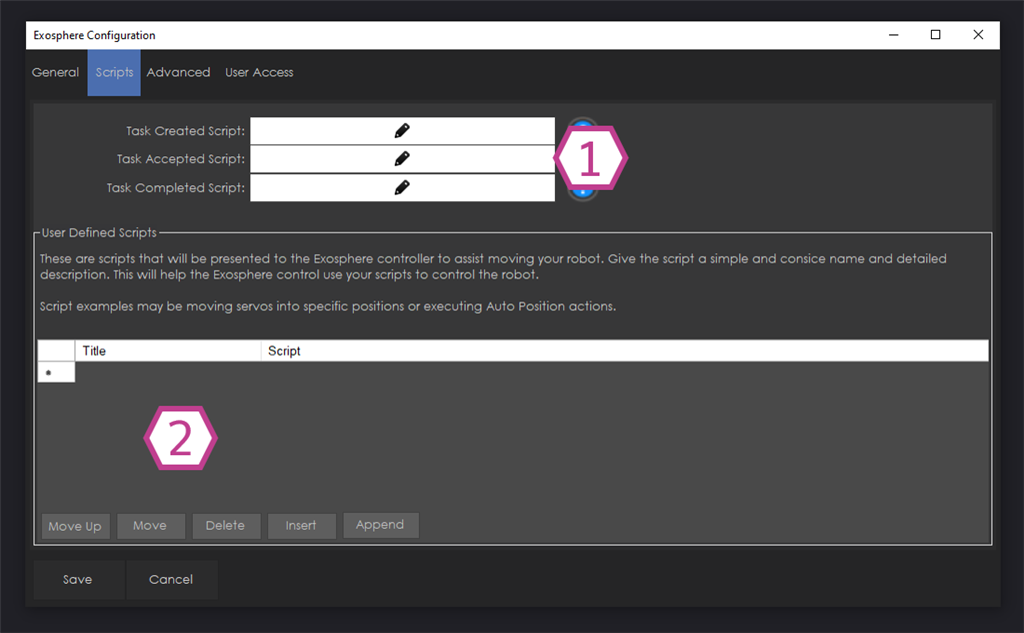
1. Task Created, Accepted, and Completed Scripts This section allows you to add scripts that will execute when the following conditions are met: your task is created, accepted, or completed.
There is also a script for remote speaking, which is when the operating types in a phrase are to be spoken. This script will execute to say the words the operator enters if enabled. This feature is enabled on the Advanced tab. You can use this script to use your preferred text-to-speech robot skill engine.
2. User Defined Scripts Add additional scripts to your generated Exosphere task. They will show up as playable scripts on your generated Task in the order you have them added.
Configuration - Advanced Tab
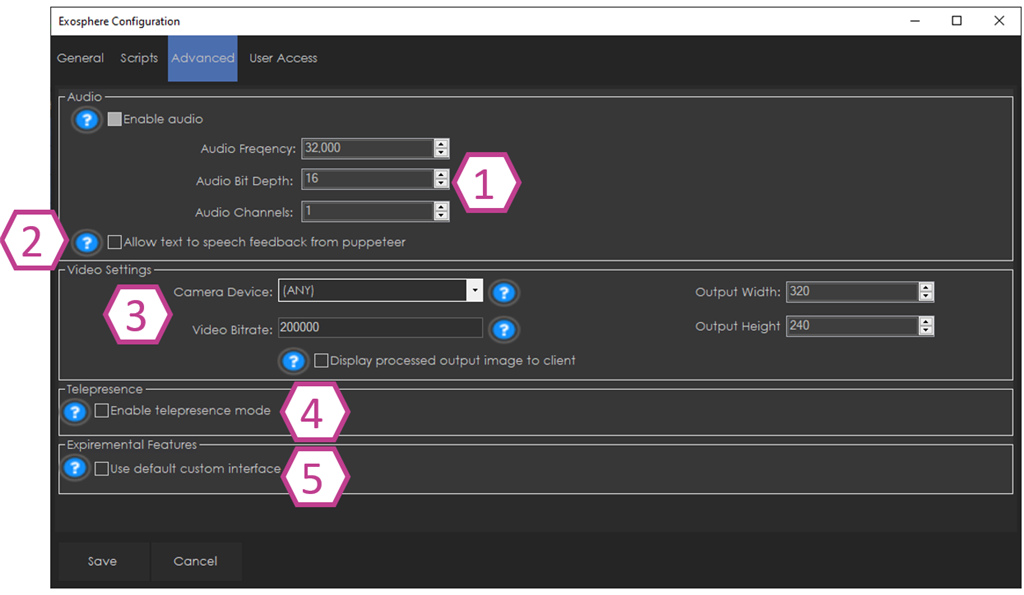
1. Audio If enabled, this section allows the user who accepts your task to hear through your robot's microphone with the settings you configure. This will allow you to communicate with the user in real-time.
2. Text to Speech Check-box Once enabled, the user can write text responses that will be converted to audio. The audio will come out of your robot's speaker.
3. Video Settings You can select an installed video device for the user to use for real-time visual feedback. You can also use the check box to send video tracking information to the user.
4. Telepresence Mode Enabling this allows two-way communication between the remote operator and the robot. The remote operator's camera video and audio will be displayed on the robot on fullscreen. This allows the robot to approach someone and converse with the remote operator. At the end of the session, the "rating" window is not displayed to the remote operator. Click here for a tutorial on configuring a robot for exosphere telepresence.
5. Experimental Features These are internal development features. These features may not work and are not documented.
Configuration - User Access Tab
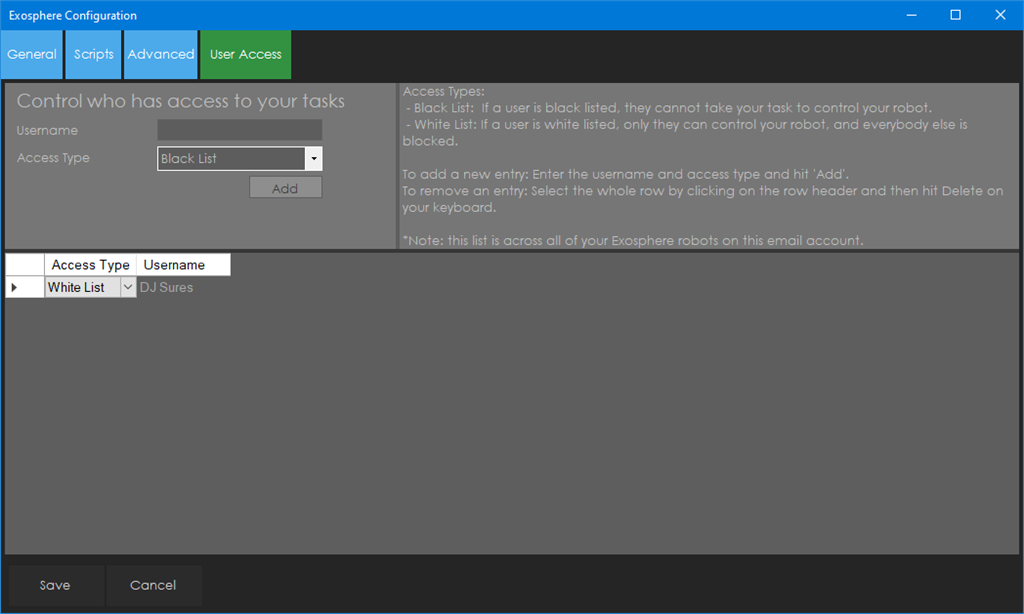
1. Username Field This field allows you to write in a username.
2. Access Type Once the add button is pressed, the username inputted will be added to your Access list and assigned to the selected access type (in the drop-down).
3. Access List This window displays the users you have added and their access type.
How to Use the Exosphere Skill
Add the Camera device skill to your ARC project (Project -> Add Skill -> Camera -> Camera Device).
Add a Movement Panel skill to your ARC project that matches your robot (Project -> Add Skill -> Movement Panels).
Add the Exosphere skill to your ARC project (Project -> Add Skill -> Machine Learning -> Exosphere).
Add a brief description of your task to the task description field in the Exosphere skill main window.
Click the Submit Task button. The task is now on the Synthiam servers and is awaiting a user's pickup.
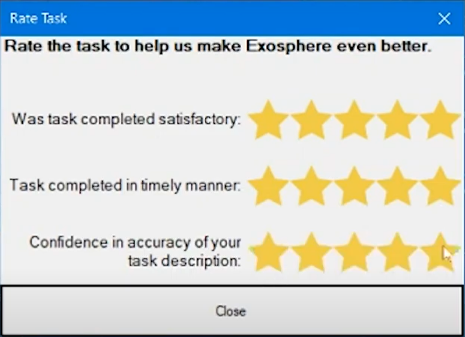
Once the task is completed. Rate the user in three areas on how well the task was completed. 5 stars = the best job. This will help advance the machine learning database with reinforcement learning.
Compatibility
With pandemics like COVID-19, Exosphere needed compatibility with existing robots to leverage their ability with human operators while training the knowledge base for future autonomous behaviors. Exosphere was designed as a web service & skill to allow connections from existing robots or control software, such as ROS or ARC. However, it only takes minutes to add any robot to Exosphere with Synthiam’s ARC software. As per the Synthiam way, we’ll add many tutorials demonstrating how to add various robots to Exosphere using ARC.
Control Commands for the Exosphere robot skill
There are Control Commands available for this robot skill which allows the skill to be controlled programmatically from scripts or other robot skills. These commands enable you to automate actions, respond to sensor inputs, and integrate the robot skill with other systems or custom interfaces. If you're new to the concept of Control Commands, we have a comprehensive manual available here that explains how to use them, provides examples to get you started and make the most of this powerful feature.
Control Command ManualSetOutputOriginal
Set the camera output to the original video stream.
Example:
controlCommand("Exosphere", "SetOutputOriginal")
SetOutputProcessed
Set the camera output to the processed video stream.
Example:
controlCommand("Exosphere", "SetOutputProcessed")
ToggleOutput
Toggle the video stream output between original and processed.
Example:
controlCommand("Exosphere", "ToggleOutput")
RequestTask
Request a new task to be posted.
- Parameter 3: Task Description as String (optional: False)
Example:
controlCommand("Exosphere", "RequestTask", "Task Description as a string")
CloseTask
Close the current task.
Example:
controlCommand("Exosphere", "CloseTask")
GetTaskState
Return the state of the task. NoTask = 0, Starting = 1, WaitingForPuppeteer = 2, InProgressByPuppeteer = 3, Closing = 4.
- Returns: Integer [-2,147,483,648 to 2,147,483,647]
Example:
controlCommand("Exosphere", "GetTaskState")
Related Tutorials
Related Questions
Connection Error Exosphere
Roli Rover Exosphere Compatibility

Upgrade to ARC Pro
ARC Pro is your passport to a world of endless possibilities in robot programming, waiting for you to explore.
nounASTRONOMY the outermost region of a planet's atmosphere.
Looks like Synthiam is going to space. Can we all come ?
.....Machine learning....now you have my attention..........
so what do we do with this?
Maybe they are trying to tell us something. like get lost ie. lost in space.
??Cloud based machine learning?? My guess. Eventually every object known to man will be cataloged and easy for machines to know what they are "looking at" plus all the relevant description/use of that object i.e proper use/s.
The Matrix...but instead of Neo, its a robot.."I want to learn jiu jitsu"
I wonder if we have to worry about agent smith. aka agent Sures.
"Shall we play a game?" Wargames
what was that video? and who is agent smith?