Remote Access Service
The Remote Access Service enables mobile clients to access the desktop of the PC running ARC. This unique client/server system routes audio between the client and server, allowing you to use the microphone on your mobile device as a remote mic for the ARC PC and the speaker on the remote device as a remote speaker for the ARC PC. Additionally, it provides screen-sharing functionality similar to that of a remote desktop.
Index
- Why Use Remote Access Service?
- Terminology
- Downloads
- Network Configurations
- Using the Remote Access Client
- Audio Redirection Setup Instructions
- Enabling Remote Access Server in ARC
- Screen Scaling
- Diagnosing Remote Access Server
- Security Recommendation
Why Use Remote Access Service?
- If your robot has an SBC onboard, allow for remote control without 3rd party applications such as VNC or Remote Desktop.
- In educational institutions, devices like Chromebooks, tablets, or iPads can now provide the full ARC experience.
Terminology
- Remote Access Service (RAS): Used to describe the client/server as a whole.
- Remote Access Service Server (RASS): Describes the server feature within ARC that accepts client connections for desktop and media sharing.
- Remote Access Service Client (RASC): An application that runs on a client device, such as a Chromebook or Android device, that establishes a connection to a RASS (Remote Access Service Server).
Downloads
The RASC (Remote Access Service Client) is currently only available for Android devices through Google Play. We recommend using this app on a device with a large screen, mouse, and keyboard, such as a Chromebook.
Network Configurations
Your robot will require a dedicated PC, which can be as cost-effective as an SBC. The SBC will need one of the following network configurations:
- Single WiFi & Ethernet: The robot operates in Adhoc mode, with the SBC connecting to the robot's WiFi and the Internet via Ethernet. The Remote Access client can connect to the WiFi or Ethernet network (generally Ethernet).
- Double WiFi: Similar to the above, the SBC uses two WiFi interfaces—one for ad hoc mode with the robot and another for internet access. The Remote Access client typically connects to the interface with internet access.
- Single WiFi: This is used when the robot doesn’t rely on WiFi (e.g., Arduino via USB) or its WiFi operates in Client mode, connecting to the local network. The SBC and Remote Access client connect to this local network.
Using the Remote Access Client
The Remote Access Service Client (RASC) runs on mobile devices like Android or Chromebooks. Ideally, this would be run on a device with a large screen, mouse, and physical keyboard, such as a Chromebook. This cost-effective configuration provides the resolution, screen size, and input devices most compatible with a Windows PC. Using a touchscreen-only device, such as a phone, could result in a poor experience for most tasks.
Server Selection Screen
The main screen lets you input the IP address, port, and password. Additionally, any remote access servers on your network will broadcast and appear on the list below. Selecting one still requires you to enter the password.
Press the CONNECT button to connect to the specified Remote Access Server.
Remote Control Screen
This screen mirrors the ARC PC’s monitor. Clicking or touching the screen simulates mouse clicks on the ARC PC. On devices like Chromebooks, the mouse integrates seamlessly for intuitive use.
Audio Redirection
The Remote Access Server redirects audio between the client and the server. For example:
- The client device’s microphone audio is sent to the ARC PC as its mic input in real time.
- All audio from the ARC PC’s speaker is played through the client device's speaker.
Audio Redirection Setup Instructions
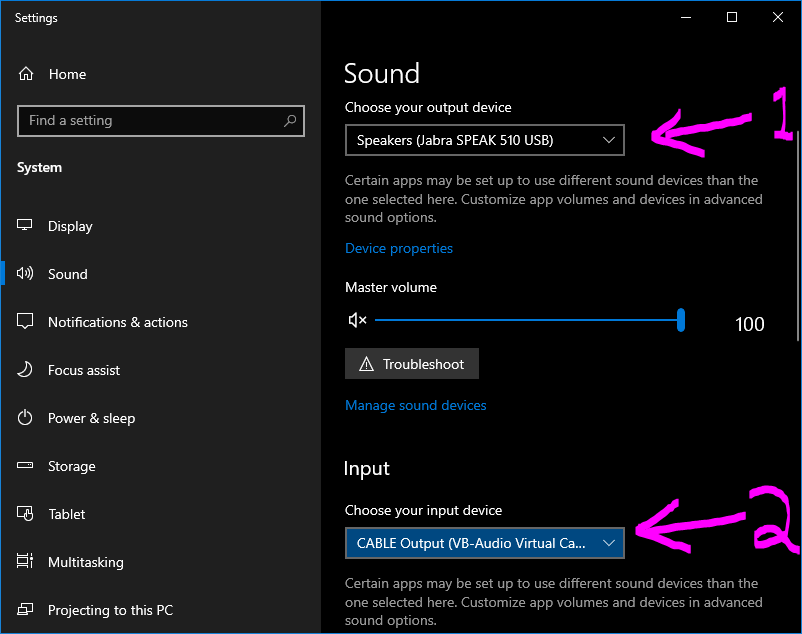
The redirection of Mic audio uses the virtual cable software VB-Cable. This application installs a driver to allow audio routing between inputs and outputs. This software is necessary for the RAS Client to stream mic data into the ARC PC. The screenshot below demonstrates a standard configuration of your Windows Sound Settings after completing the instructions.
- The output device (#1) is configured for your speakers and NOT the "CABLE (VB-Audio)"
- The input device (#2) is configured for "CABLE Output (VB-Audio Virtual Cable)"

- Install the VB-Cable Virtual Audio Device Driver. [Download]
- Right-click the speaker icon in the ARC PC taskbar to access sound settings.
- Select the Cable Output (VB-Cable Virtual Cable) as the default input device.
- Note: Leave the output device set to the PC’s default speaker.
- To prevent sound duplication, mute the volume on the ARC PC.
Enabling Remote Access Server in ARC

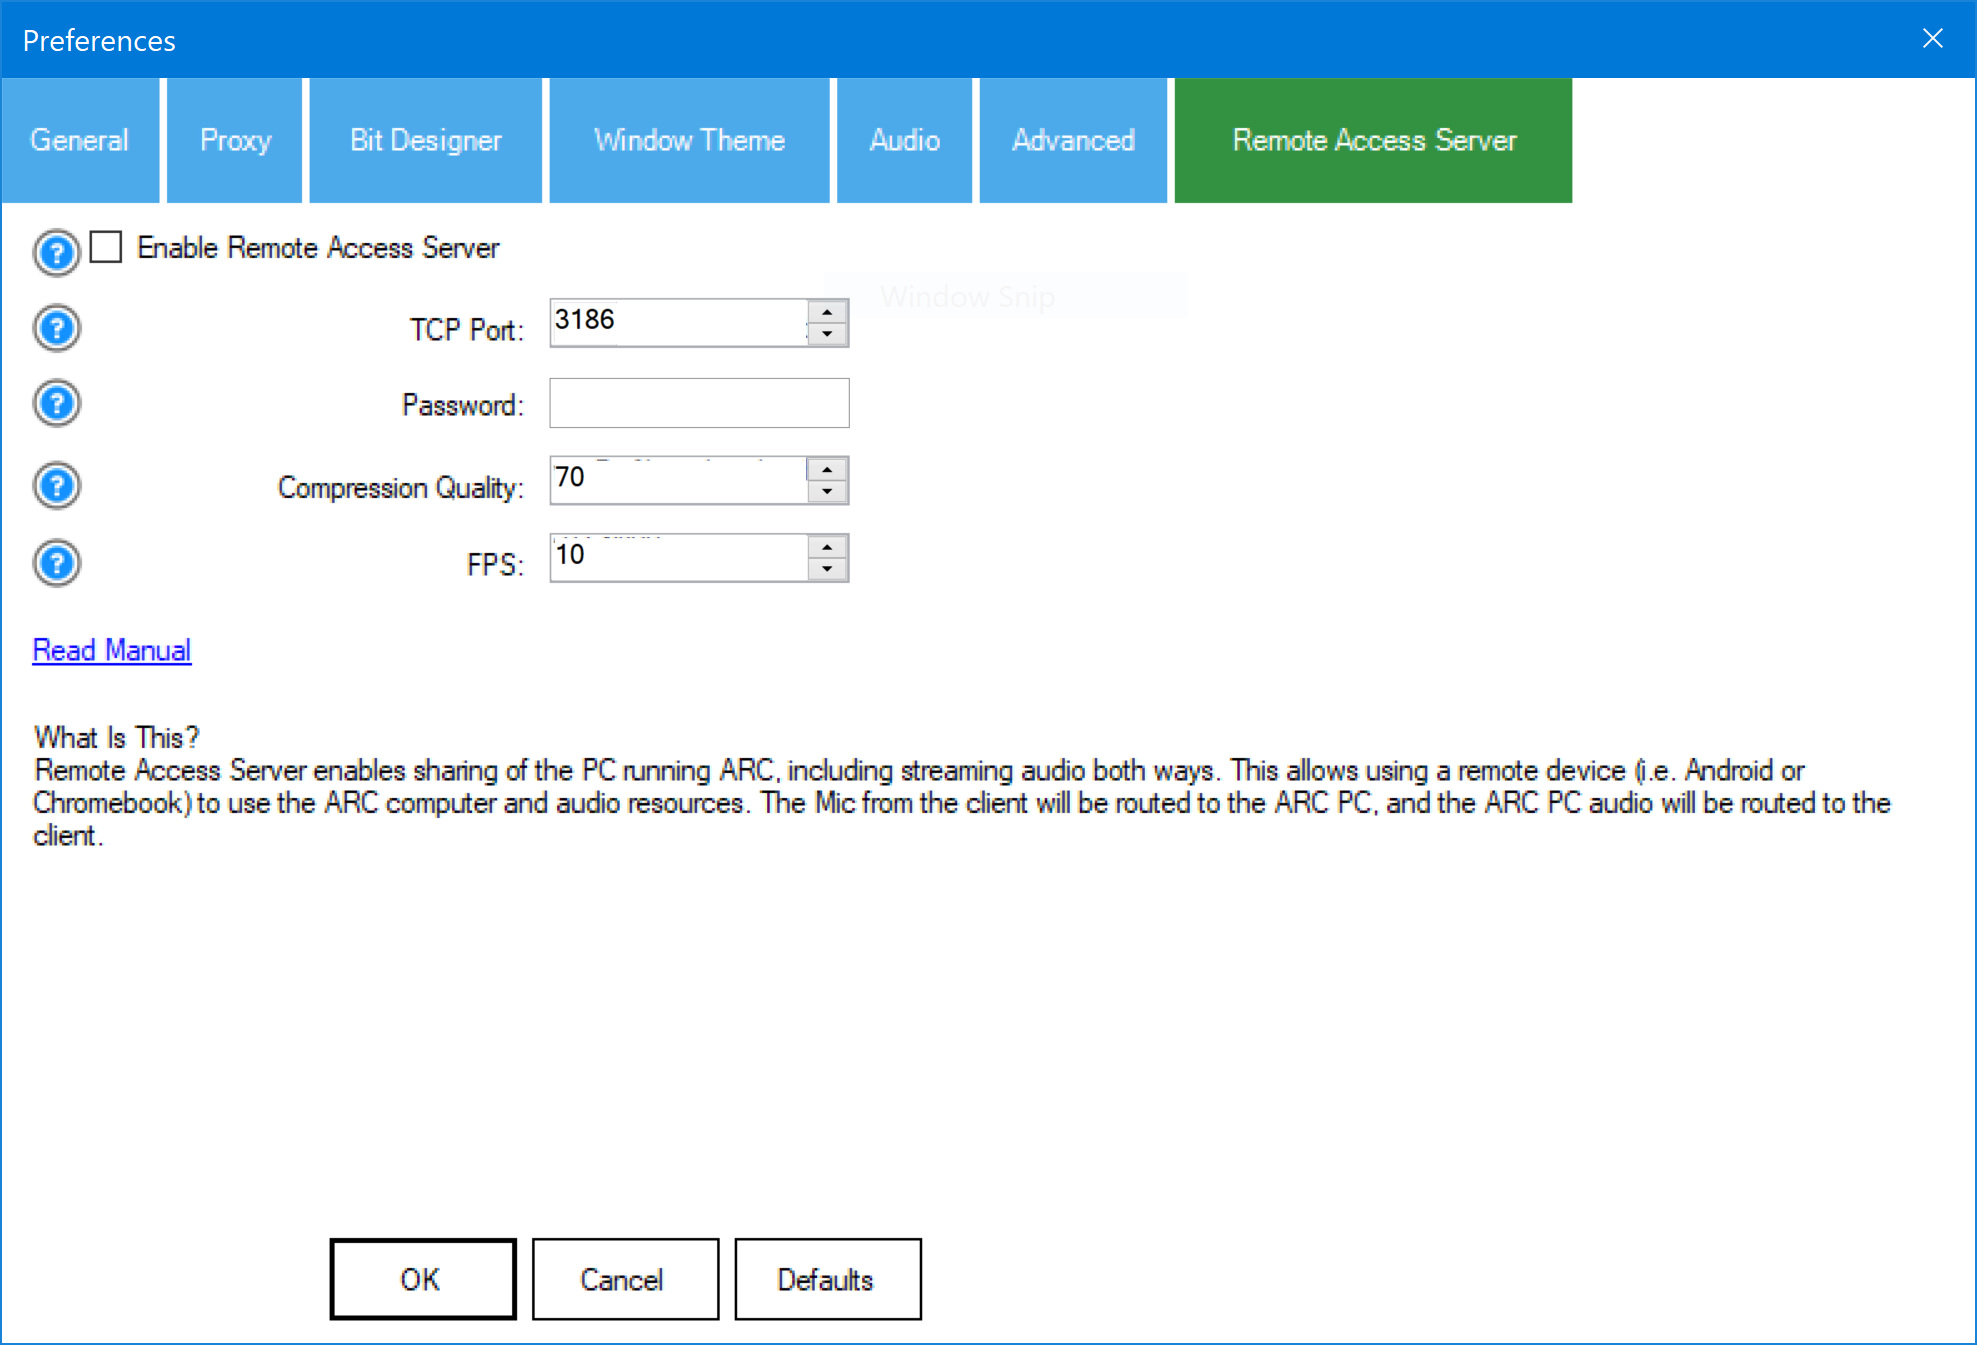
- From the ARC top menu, select the Options tab.
- Click the Preferences button to open the preferences popup window.
- Select the Remote Access tab to view the server settings.
- Check the Enable box to activate the server.
- Enter a memorable password.
- Leave other values at their defaults until you are familiar with their functionality.
- Click OK to save your settings.
Screen Scaling
There are two types of screen capturing methods built into the RASS (Remote Access Server Service):
DirectX Mode
This is the fastest mode, which uses around 1% of CPU on an i7 and is ideal for robots with dedicated computers. The display scaling must be set to 100%, and this mode will be automatically used.
BitBlt Compatibility Mode
This mode is designed for computers that are not dedicated to a robot and have display scaling other than 100%. Expect around 3% CPU usage on an i7 cpu. It uses slightly more CPU but ensures compatibility with different scaling settings.
Automatic Selection of Screen Capture Method
The Remote Access Service (RAS) will automatically choose the most appropriate screen capture method based on your display settings. Ideally, for the best performance, a remote-controlled computer should have its screen scaling set to 100%. You can verify this in your display settings.
If this computer is not a dedicated robot PC, you may prefer to keep the scaling set to a higher value for better visibility. In this case, the BitBlt compatibility mode will be used automatically.
How to Check Your Screen Capture Mode
You can determine which screen capture method is being used by checking the ARC Debug Log when RASS starts. The log will display the detected scaling factor and the screen capture method in use.
Example: 100% Scaling (DirectX)
2025/01/30 17:30:16 -05:00     RAS: Scaling factor is 1%
2025/01/30 17:30:16 -05:00     RAS: Using DirectX for fast screen capture.
2025/01/30 17:30:16 -05:00     RAS: (raServer log) Waiting for client..
2025/01/30 17:30:16 -05:00     RAS: Broadcast Server: Started
Example: 125% Scaling (BitBlt Compatibility)
2025/01/30 17:30:16 -05:00     RAS: Scaling factor is 1.25%
2025/01/30 17:30:16 -05:00     RAS: Using BitBlt compatibility mode for screen capture.
2025/01/30 17:30:16 -05:00     RAS: (raServer log) Waiting for client..
2025/01/30 17:30:16 -05:00     RAS: Broadcast Server: Started
Setting Screen Scaling in Windows
To ensure optimal performance, follow these steps to adjust your screen scaling in Windows:
- Right-click on the desktop and select Display settings.
- Scroll down to the Scale and layout section.
- Under Change the size of text, apps, and other items, select 100% for the best performance.
- If you are not using a dedicated robot PC, you may keep the scaling higher, and the system will automatically use BitBlt mode.
Diagnosing Remote Access Server
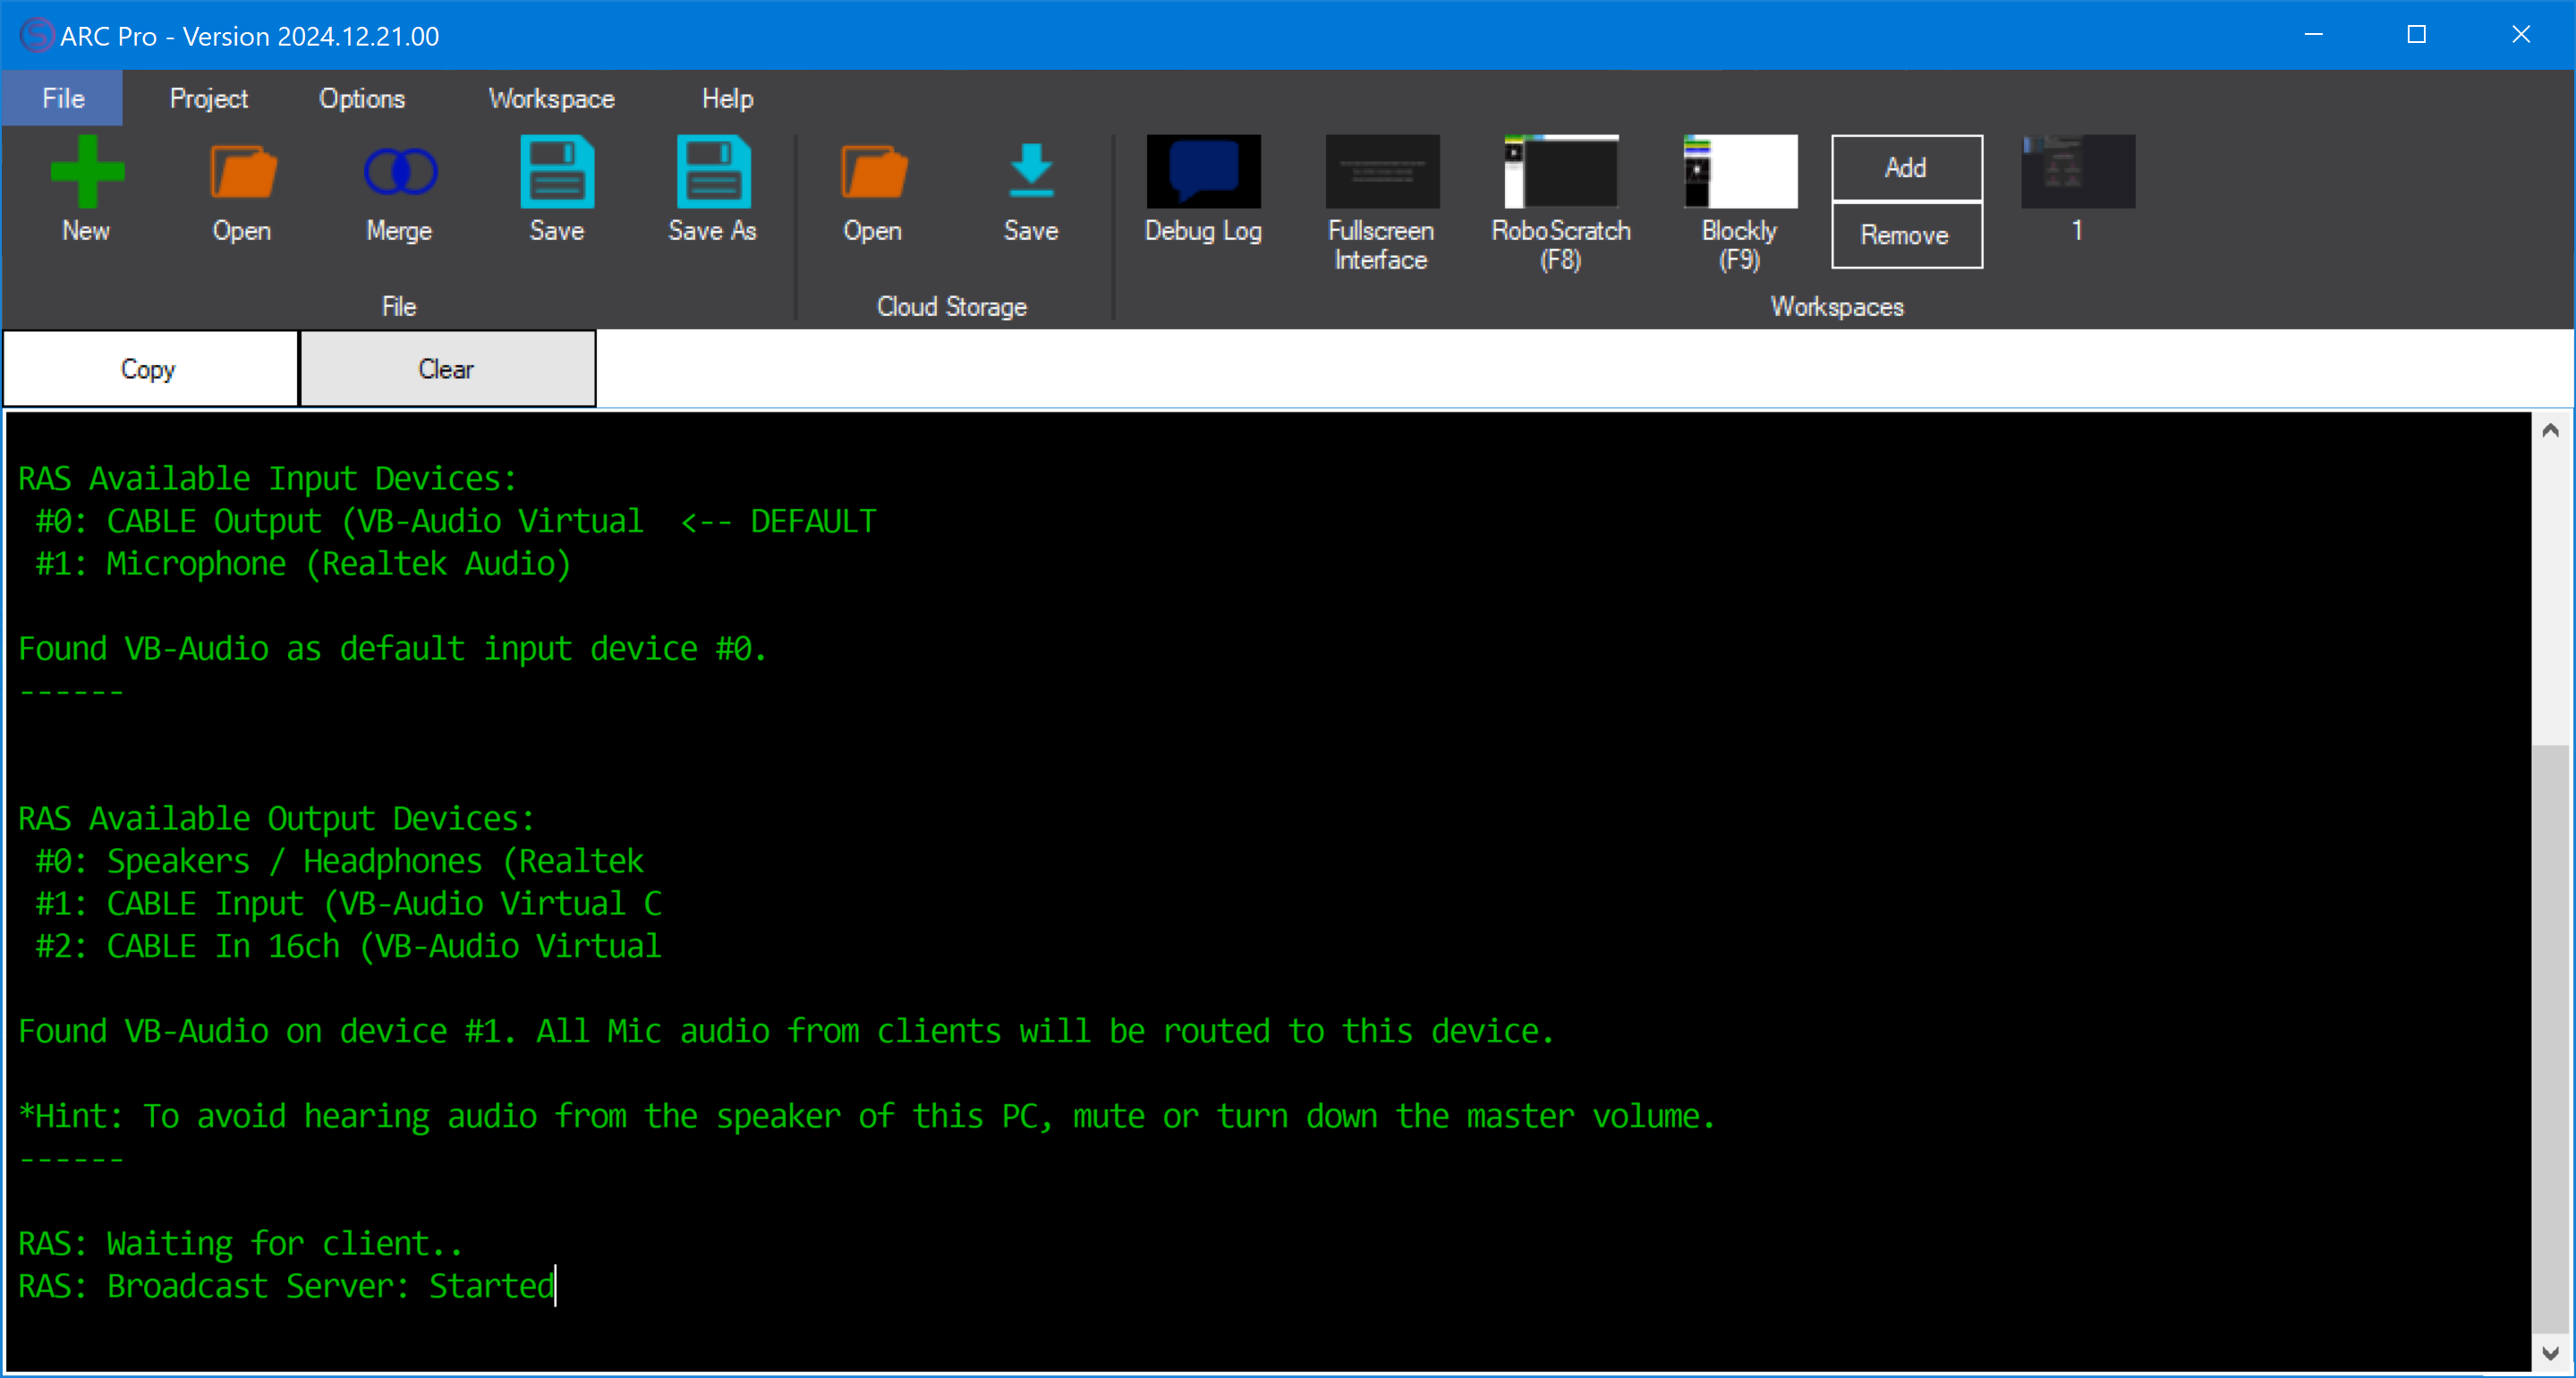
You can verify the server’s status in the ARC Debug Log window. Messages will indicate the Remote Access Server’s activity, including audits of your audio configuration to ensure the VB-Cable virtual device is installed and selected.

The example image above shows a successful configuration. The VB-Cable was discovered as the default input source, and RAS was started correctly.
Security Recommendation
Although the RAS Server is secured with a password, it is strongly advised not to expose the RAS Server port directly to the public internet. This application grants unrestricted access to your Windows ARC PC, including control over its resources and functionality, and should, therefore, be handled with utmost caution. Exposing this server to the public internet significantly increases the risk of unauthorized access, which could compromise your system and sensitive data.
If you require remote access to your ARC PC, we strongly recommend implementing a secure Virtual Private Network (VPN) connection to the ARC PC. A VPN provides an encrypted, private tunnel for data transmission, significantly reducing the risk of external threats. Additionally, ensure that access to the RAS Server is limited to devices within your local private network. This configuration enhances security by preventing unauthorized connections from external networks. By following these best practices, you can ensure a robust and secure environment for accessing and managing your ARC PC.
