

Maps PC audio volume to servos in real time with scalar, min/max, invert & multi-servo options-ideal for syncing robot mouth to sound
How to add the Sound Servo (PC Speaker) robot skill
- Load the most recent release of ARC (Get ARC).
- Press the Project tab from the top menu bar in ARC.
- Press Add Robot Skill from the button ribbon bar in ARC.
- Choose the Audio category tab.
- Press the Sound Servo (PC Speaker) icon to add the robot skill to your project.
Don't have a robot yet?
Follow the Getting Started Guide to build a robot and use the Sound Servo (PC Speaker) robot skill.
How to use the Sound Servo (PC Speaker) robot skill
In simple terms: quiet audio = servo near one end, and loud audio = servo toward the other end. This is commonly used to make a robot mouth “talk” by moving a jaw servo whenever music or speech is playing on the computer.
Beginner setup checklist
- Connect a servo to your EZB/IoTiny (signal pin to a digital port, plus power and ground).
- Make sure ARC is connected to the correct board (Board Index in ARC matches your connection).
- Play some audio on your PC (music, a WAV/MP3, text-to-speech, a YouTube video, etc.).
- Open this skill and verify you see the audio level/waveform responding.
- Adjust Min/Max Position and Scalar so the servo moves naturally.
Main Window
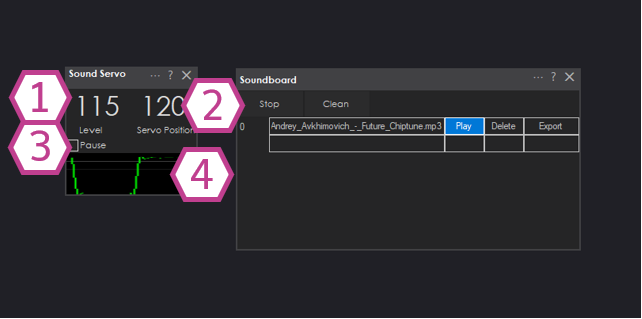
1. Level Value
This is the detected audio loudness coming from your PC’s speaker output. When sound gets louder, this value should increase. If you play audio and this number never changes, ARC is not “hearing” your PC output.
2. Servo Position
This shows the current servo position being sent (between your configured Minimum and Maximum positions). The skill calculates this position by taking the Level Value and multiplying it by the Scalar, then mapping the result into your Min/Max range.
3. Pause Checkbox
When checked, audio capture is paused and the servo will stop reacting to sound changes. Use this to temporarily “freeze” movement while you adjust settings.
4. Audio Waveform
A visual display of your PC’s audio output. If you see the waveform moving, the skill is receiving audio. If it is flat while sound is playing, check your Windows output device/volume.
Settings
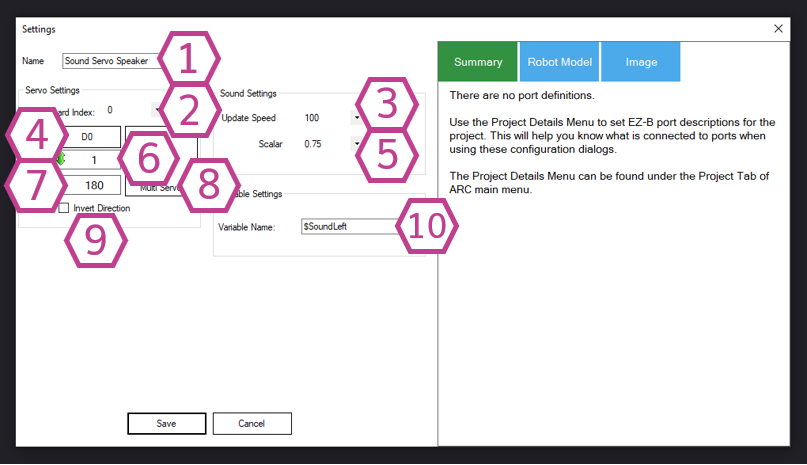
1. Title Field
The name of this skill instance as it appears in ARC. You can rename it to something descriptive like
Mouth Sound Servo.
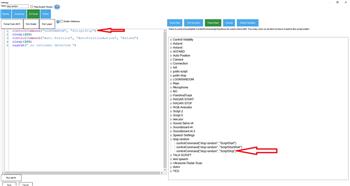
Note: If you use controlCommand() in scripts, renaming changes the title you must reference.
2. Board Index Drop-down
Select which connected controller board the servo is on (for example: EZ-B v4 #0, #1, etc.). If you have only one board connected, this is usually 0.
3. Update Speed Drop-down
How often (in milliseconds) the skill samples the audio level and updates the servo.
Lower number = faster response (smoother/faster mouth movement) but more frequent updates.
Higher number = slower response (less movement, more lag).
The range is 100 to 60000, and the default is 100 ms.
4. Port Drop-down
Choose the digital port where your servo signal wire is connected (for example D0, D1, etc.). If the wrong port is selected, the servo won’t move (or a different servo may move).
5. Scalar Drop-down
The multiplier that increases or decreases how strongly the servo reacts to sound. Range: 0.25 to 9.75 (default 1.5).
- If the servo barely moves: increase the Scalar.
- If the servo “slams” to the ends too easily: decrease the Scalar.
6. Minimum Position Adjust
Sets the servo position used for the “quiet” end of the movement (the lowest audio levels).
Left-click to adjust using the control. Right-click to type a number.
Example for a mouth: Min might be the “mouth closed” position.
7. Maximum Position Adjust
Sets the servo position used for the “loud” end of the movement (the highest audio levels).
Left-click to adjust using the control. Right-click to type a number.
Example for a mouth: Max might be the “mouth open” position.
8. Multi Servo Edit Window
Lets you select additional servos that will mirror the movement of the “master” servo.
This is useful if you want multiple parts to move together (for example: two jaw servos, or a mouth plus cheeks).
Tip: If you need servos to move differently (not mirrored), add multiple instances of this skill and configure each one separately.
9. Invert Direction Checkbox
Reverses the direction of the servo movement.
Use this if the servo moves opposite of what you expect (for example, it closes when it should open).
Example: If 180 normally moves left, with invert enabled 180 will move right.
10. Variable Field
The ARC variable name that will store the detected audio output level. This allows you to use the sound level in scripts or other skills (for example, display it, log it, or trigger actions when it exceeds a value).
Practical tuning tips (mouth/jaw example)
- Set Minimum Position to where the mouth is comfortably closed (no strain).
- Set Maximum Position to where the mouth is open but not binding.
- Play speech or music and watch the Level Value.
- Adjust Scalar until the mouth opens and closes naturally.
- If the movement is backwards, enable Invert Direction.
- If movement feels “laggy,” lower the Update Speed value (faster updates).
Related Questions
Two Robot Heads Talking To Each Other
Sound Servo To XL-320 On Darwin Mini

Sound Servo Lag And Mouth Twitch On ESP32

Upgrade to ARC Pro
Your robot can be more than a simple automated machine with the power of ARC Pro!
The variable is called "$SoundLeft". Is there a $SoundRight? I would like to split my sound track so that I can have my robot monitor the left track for the voice (and thus have the mouth open) and the right track for the music.
Thomas Messerschmidt Creator of Simone the A.I. Fembot