

Picture-in-picture camera overlay: superimpose one camera onto another; configure source/destination, position, size, border, processed frames, and swap
How to add the Picture In Picture robot skill
- Load the most recent release of ARC (Get ARC).
- Press the Project tab from the top menu bar in ARC.
- Press Add Robot Skill from the button ribbon bar in ARC.
- Choose the Camera category tab.
- Press the Picture In Picture icon to add the robot skill to your project.
Don't have a robot yet?
Follow the Getting Started Guide to build a robot and use the Picture In Picture robot skill.
How to use the Picture In Picture robot skill
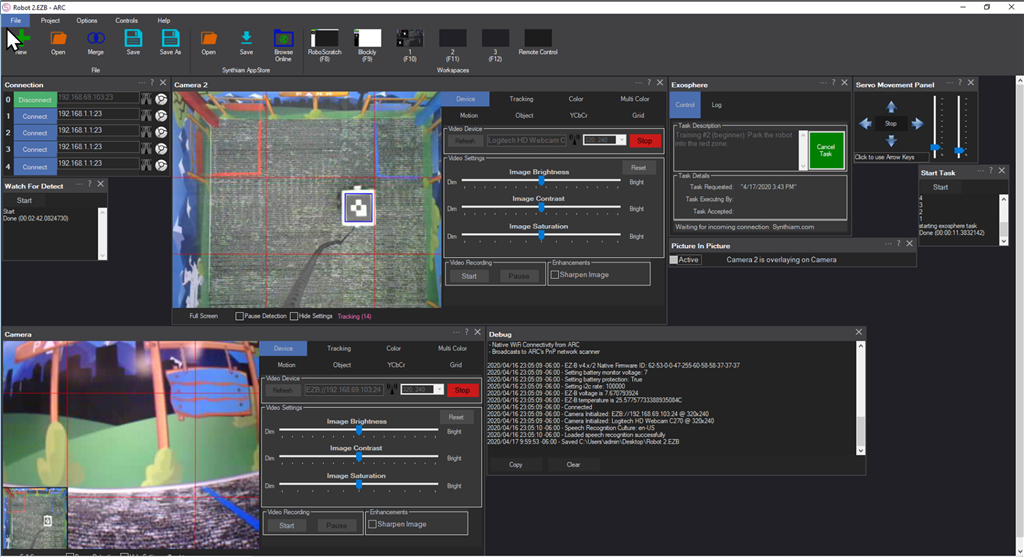
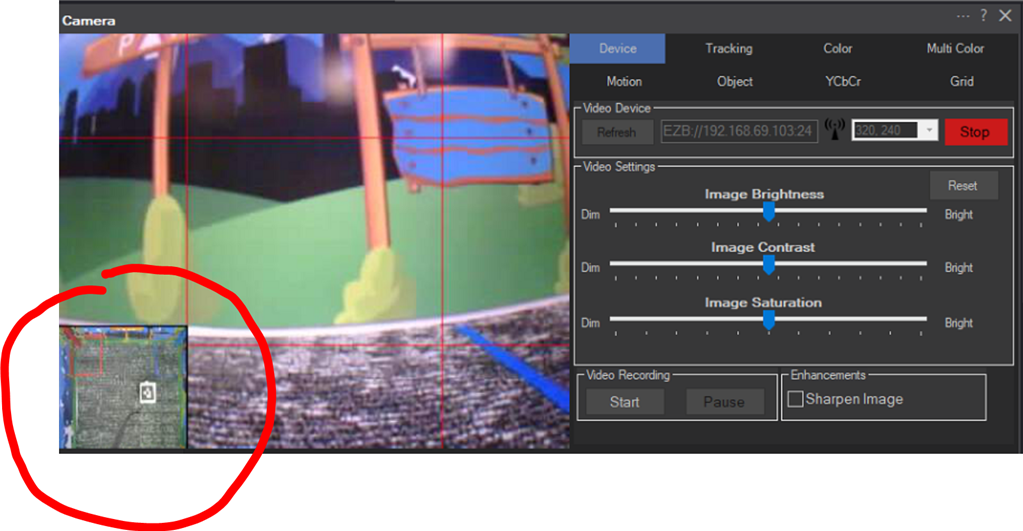
This skill superimposes one camera's video stream over another. It is commonly used for picture-in-picture, camera overlays, secondary viewpoints, or debug/monitor feeds while keeping a single camera device as the visible output.
The destination camera device is always the render target. Even when using swap functionality, the destination camera control does not change.
Main Window

1. Active Checkbox
When enabled, the Picture-in-Picture skill begins intercepting camera frames and drawing the configured overlay.
- When checked, the skill starts listening to both the Source and Destination camera devices.
- When unchecked, all hooks are removed and the camera devices return to normal operation.
- This checkbox is equivalent to issuing the START or STOP control commands.
The label text below the checkbox dynamically updates to describe which camera is acting as the background and which camera is overlaid.
Configuration
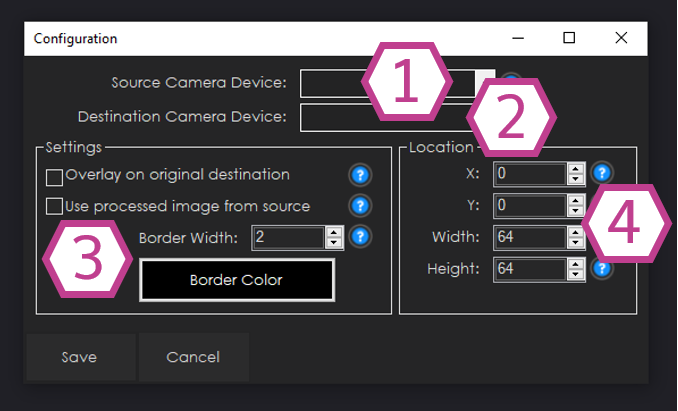
1. Source Camera Device
Selects the camera whose video stream will be used as the overlay (or background when swapped).
- This camera is copied into an internal buffer for drawing.
- The source camera never becomes the visible camera control.
- You may choose whether the original or processed image from this camera is used.
2. Destination Camera Device
Selects the camera device that will remain the render target.
- All drawing occurs directly onto this camera’s video output.
- This prevents the visible camera from "changing" when swapping roles.
- Both original and processed destination frames are supported.
3. Settings
This section controls how and when the overlay is drawn.
Display on Original Image
- When enabled, drawing occurs on the destination camera’s original frame.
- When disabled, drawing occurs on the destination camera’s processed frame.
- Useful when chaining additional image processing skills.
Use Source Processed Image
- When enabled, the source camera’s processed output is used.
- When disabled, the source camera’s original image is used.
- Allows overlays such as edge detection, object tracking, or filters.
Border Width
- Adds a rectangular border behind the overlay.
- A width of
0disables the border entirely.
Border Color
- Sets the ARGB color used for the overlay border.
- The border is drawn before the overlay image itself.
4. Location
Controls the position and size of the overlay image.
X / Y define the top-left position of the overlay.
(0,0)is the top-left corner of the destination frame.
Width / Height define the overlay size.
Values are applied in destination-camera pixel coordinates.
This allows precise placement for corner insets, full-screen overlays, or custom layouts.
How to Use the Picture-in-Picture Skill
Add a Camera Device skill to your ARC project
Project Add Skill Camera Camera DeviceAdd the Picture in Picture skill
Project Add Skill Camera Picture in PictureConnect at least two camera devices using Camera Device skills.
Open the Configuration menu of the Picture-in-Picture skill.
- Select a Source Camera Device
- Select a Destination Camera Device
Adjust the overlay settings, border, and location.
Enable the Active checkbox in the main window.
- The overlay will immediately appear on the destination camera output.
(Optional) Use the SWAP ControlCommand to reverse roles without changing the visible camera.
Requirements
- Two installed and connected Camera Device skills
- Cameras may be USB, IP, or virtual cameras supported by ARC
Notes & Best Practices
- Overlay performance depends on camera resolution and frame rate.
- Large overlays or full-screen swaps benefit from hardware acceleration.
- If using multiple image-processing skills, choose carefully whether to draw on original or processed frames.
- This skill is thread-safe and supports dynamic start/stop, swap, and configuration changes during runtime.
Control Commands for the Picture In Picture robot skill
There are Control Commands available for this robot skill which allows the skill to be controlled programmatically from scripts or other robot skills. These commands enable you to automate actions, respond to sensor inputs, and integrate the robot skill with other systems or custom interfaces. If you're new to the concept of Control Commands, we have a comprehensive manual available here that explains how to use them, provides examples to get you started and make the most of this powerful feature.
Control Command ManualStart
Start the picture-in-picture mode.
Example:
controlCommand("Picture In Picture", "Start")
Stop
Stop the picture in picture mode.
Example:
controlCommand("Picture In Picture", "Stop")
Swap
Swap the picture-in-picture roles while keeping the destination camera as the render target.
Example:
controlCommand("Picture In Picture", "Swap")
Related Questions
Picture In Picture Lag With Tracking
Target Overlay Misaligns After Flip

Upgrade to ARC Pro
Subscribe to ARC Pro, and your robot will become a canvas for your imagination, limited only by your creativity.
Picture In Picture, can you please do a small video example? thanks
I had Picture In Picture, now it is gone with vs 5
EzAng
V8 has been updated with a new ControlCommand SWAP, which allows swapping the source and destination images. The large image will become the small thumbnail and vice versa.