
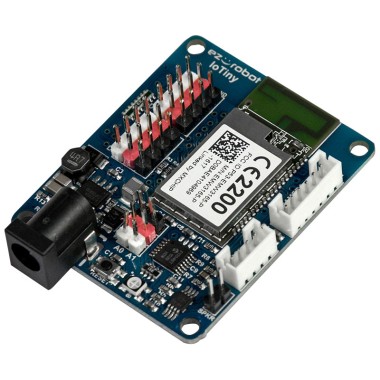
EZ-B Iotiny by EZ-Robot

Connect Something!
The EZ-B IoTiny (often called “IoTiny”) is a tiny Wi‑Fi robot and IoT controller in the EZ‑Robot family. Think of it as the “brain” that lets your computer or phone control electronics like servos, LEDs, sensors, and an EZ‑Robot camera.
Inside is a fast microcontroller (a 100 MHz Cortex‑M4 ARM processor) that runs the hardware in real-time while you use ARC (EZ‑Builder) on Windows or mobile to control it over Wi‑Fi. The small size makes it easy to fit into small robots, props, and custom enclosures.
Datasheet
A datasheet is the official hardware document from the manufacturer. It lists electrical limits (voltage ranges, current draw), operating temperatures, pin behavior, and more. When something doesn’t work (servo jitters, camera drops, random resets), the datasheet helps you confirm you are within safe limits.
View DatasheetWhat IoTiny Can Do (Features)
- Works with ARC (PC) and ARC Mobile
- Wi‑Fi support (Discovery, Skill connection, Telnet, HTTP)
- Runs ARC skills like speech recognition and computer vision (processed on your PC/mobile, controlled through IoTiny)
- SDK support plus Windows and Mobile apps
- Verbal setup prompts (helps you know what mode it’s in)
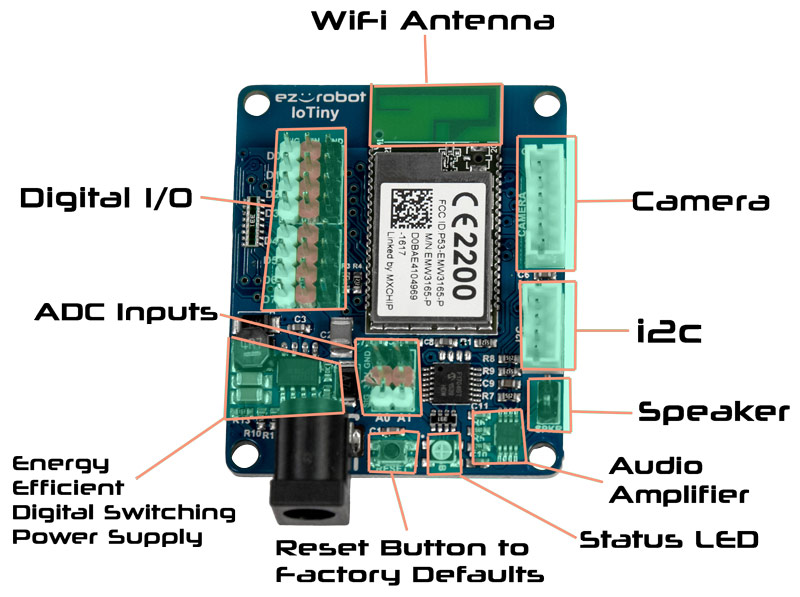
- 8 multi‑use ports for Digital I/O / Servo control / UART (TX only)
- 2 analog inputs (ADC)
- 1 I2C port
- 1 camera connector (EZ‑Robot Camera v2)
- 1 speaker output
- Hundreds of ARC skills and 3rd‑party plugins
Simplicity and power.
You control IoTiny over Wi‑Fi using ARC’s graphical interface. In many projects you do not need to write code—ARC skills let you move servos, read sensors, run scripts, and automate behaviors with a few clicks. Less time setting up compilers and programmers means more time building your robot or IoT device.
A Quick Note About EZ‑B v4/2 vs IoTiny
You may see references to the EZ‑B v4/2 in older or related documentation. The v4/2 is a larger controller with more ports and features. This page focuses on IoTiny, but many connection ideas (servos, camera cable style, ARC usage) are similar.
If you are deciding between them: choose IoTiny when you need a very small controller and fewer ports; choose EZ‑B v4/2 when you need more expandability and built-in features.
3 PIN (GVS) Connectors
Most IoTiny ports use a 3‑pin GVS layout: G = Ground, V = Voltage (power), S = Signal (data/control).
What each pin does
- GND (Ground): the negative/return path for power and signal reference.
- VCC (Voltage): powers the device you plug in (servo, sensor, etc.).
- Signal: the “control wire” or “data wire” (servo position, digital input, sensor reading, etc.).
Example: Plugging in a servo
A standard hobby servo has 3 wires. When you plug it into a digital/servo port:
- GND powers the servo electronics return path
- VCC powers the servo motor and circuit
- Signal tells the servo what position to move to
Connecting Camera
The EZ‑Robot Camera (v2) connects to IoTiny using a 6‑pin camera cable. The connector is keyed with notches so it only fits the correct way—this prevents plugging it in backwards.
Connecting Servos & I/O
Servos plug into the Digital/Servo ports using the 3‑pin GVS connector. Sensors and LEDs can also use these ports depending on the device and how you configure the port in ARC.
Beginner checklist (servo)
- Connect power to IoTiny (see the Power sections below).
- Plug the servo into a port with correct orientation (match GND/black).
- Connect ARC to IoTiny over Wi‑Fi.
- Add a servo control skill in ARC and choose that port number.
- Move the slider and confirm the servo moves smoothly.
If a servo jitters or resets happen
- Battery may be weak (voltage sag under load).
- Power source may not provide enough current for multiple servos.
- Servo may be stalled (mechanically blocked), causing high current draw.
- Check the Unregulated Power warning—wrong voltage can damage servos.
Connecting Over Wi‑Fi
IoTiny can connect by Wi‑Fi in two ways:
AP Mode (Access Point / Direct Connect)
IoTiny creates its own Wi‑Fi network. Your PC/phone connects directly to it. This is usually the default mode after purchase or after a factory reset. It’s the easiest mode for beginners because it works anywhere, even without home Wi‑Fi.
Client Mode (Join Your Existing Wi‑Fi)
IoTiny connects to your home/office router like a normal device. Use this when you want internet access, or when multiple devices need to talk on the same network.
You switch between AP and Client mode using the IoTiny web configuration page. To return to defaults, press the reset button while IoTiny is powered.
Making an IoT Product
IoTiny can be used in Internet of Things projects where you control devices remotely. Common examples include remote switches, sensors, alarms, animated props, or simple robots that you monitor/control over a network.
Unregulated Power I/O (Read This Before Plugging In Devices)
This is one of the most important beginner concepts. On IoTiny, the power pins on many I/O ports are unregulated. That means the VCC pin can output the same voltage you supply to IoTiny.
Choose a power source that matches what your connected devices need. Many EZ‑Robot servos are happiest at around 6–7.4V (check your servo specifications). A common beginner-friendly option is the recommended battery setup (such as rechargeable AA packs) when applicable.
Note: The only ports with regulated power are the camera and I2C ports.
Power Monitor (Low Battery Protection)
EZ‑Robot controllers include a battery monitor to warn you when voltage is low. This helps protect LiPo batteries from being over-discharged and helps prevent brownouts (random resets) during movement.
The battery monitor can be disabled in two places: in the ARC connection settings and in the IoTiny web configuration. Only disable it if you understand your battery type and safe voltage limits.
Web Configuration
IoTiny includes a built‑in web server for advanced settings (Wi‑Fi mode, network settings, device options, etc.). When IoTiny is in default AP mode, connect your PC/phone to the IoTiny Wi‑Fi network, then open:
http://192.168.1.1
Electrical Characteristics (Reference)
The tables below are a quick reference for voltages and signal levels. If you are unsure what a value means, use the “Definitions” table first.
| Electrical Characteristics | |
|---|---|
| Definitions | Description |
| Vin | Battery or DC supply voltage to the board (minus a small diode drop of ~0.14 to 0.36V depending on current) |
| Vcc | Regulated 3.3V from the on-board switching power supply (used for logic and regulated ports like I2C/camera) |
| Digital I/O | Digital Input/Output pins (reads or outputs LOW ~0V or HIGH ~3.3V logic) |
| ADC | Analog-to-Digital Converter input (measures an analog voltage and converts it to a number) |
| I2C | I2C bus for connecting smart sensors and devices (multiple devices can share the same bus) |
| Camera | EZ‑Robot Camera (v2) connection |
| Parameter | Min | Typ | Max | Unit | Note |
|---|---|---|---|---|---|
| Voltage input (Vin) | 4.5 | 7.4 | 16 | VDC | Typ = 2 cell (2S) LiPo |
| Regulated voltage supply (Vcc) | 3.2 | 3.3 | 3.4 | VDC | |
| Vin Continuous Current Draw | 0.008 | 1.3 | 5 | A | Typ = 8 servos |
| Vin Current Spikes (when fuse protected) | 0 | 5 | 20 | A | Typ = 8 servos |
| Vcc Continuous Current Draw | 0 | 0.18 | 1 | A | Typ = EZ-Bv4 + camera |
| Vcc Current Spikes | 0 | 0.4 | 3 | A | Typ = EZ-Bv4 + camera |
| Vin Default Low Battery Warning OFF | 7 | 16 | VDC | Default 7V for 2S LiPo | |
| Current Draw with No Peripherals | 70 | 80 | 90 | mA | At 7.4V (connected) |
| Current Draw with Camera | 140 | 150 | 160 | mA | At 7.4V (enabled) |
| Digital I/O TTL Voltage Level (input high) | 1.6 | 3.3 | 5 | VDC | 5V Tolerant, High sig >1.6V |
| Digital I/O TTL Voltage Level (input low) | 0 | 0 | 1 | VDC | Low sig <1V |
| Digital I/O TTL Voltage Level (output) | 0 | 3.3 | 3.3 | VDC | Regulated to Vcc |
| Digital I/O Power Pin Voltage (output) | 0 | 7.4 | 16 | VDC | |
| ADC Voltage level (input) | 0 | 3.3 | 3.6 | VDC | 5V tolerant |
| ADC Power Pin Voltage (output) | 3.2 | 3.3 | 3.4 | VDC | Regulated to Vcc |
| I2C TTL Voltage Level (input/output) | 0 | 3.3 | 5 | VDC | 5V Tolerant |
| I2C Power Pin Voltage | 3.2 | 3.3 | 3.4 | VDC | Regulated to Vcc |
| Camera Voltage Level (input/output) | 0 | 3.3 | 5 | VDC | 5V Tolerant |
| Camera Power Pin Voltage | 3.2 | 3.3 | 3.4 | VDC | Regulated to Vcc |

@Athena, Can the EZ-B IoTiny be controlled directly via Wi-Fi from the ARC PC? Without a router between them.
In my case, this kit works correctly only through a router. In the IoTiny interface, the servo drive test goes well, which means it is connected correctly. In ARC, only the connection is accepted, the rest does not work. What is the reason, the problem?
Yes, the EZ-B IoTiny can be controlled directly via Wi-Fi from ARC on a PC without a router between them. This is known as a Wi-Fi Direct or Ad-Hoc connection. To establish a direct connection, you need to configure the IoTiny to create its own Wi-Fi network that your PC can connect to.
Here are the steps to connect your PC directly to the IoTiny:
If you are experiencing issues where ARC connects to the IoTiny but does not control it, here are a few troubleshooting steps:
If you continue to experience issues, you may want to refer to the support section on the Synthiam website for detailed troubleshooting articles: https://synthiam.com/Support. Additionally, you can use the ARC software to perform diagnostic tests and ensure that the IoTiny is functioning correctly.
@FANT0MAS that is a rare thing to happen. Athena has some great suggestions, like check for anti-virus or firewall blocking, or IP address conflict (your router is on 192.168.1.1) - in the IoTiny webserver which can be accessed with anything that can connect to it's SSID and load a webpage (enter 192.168.1.1) you can change the IP address in the Access point settings.
Have you tried to connect to another PC or mobile device with your IoTiny?