

Stops robot movement (no steering) when an EZB-connected ultrasonic sensor detects an object within a set range; integrates with scripting and paused polling.
 Hardware Info
How to add the Ultrasonic Collision Detection robot skill
- Load the most recent release of ARC (Get ARC).
- Press the Project tab from the top menu bar in ARC.
- Press Add Robot Skill from the button ribbon bar in ARC.
- Choose the Ultrasonic category tab.
- Press the Ultrasonic Collision Detection icon to add the robot skill to your project.
Don't have a robot yet?
Follow the Getting Started Guide to build a robot and use the Ultrasonic Collision Detection robot skill.
How to use the Ultrasonic Collision Detection robot skill
Ultrasonic sensors measure distance using sonar (sound navigation and ranging). The sensor sends out a high‑frequency “ping” and listens for the echo. The time it takes for the echo to return is converted into a distance reading—similar to how bats and dolphins “see” with sound.
Ultrasonic sensors usually work well in bright sunlight and on dark/black objects (where many infrared sensors struggle).
Soft, fluffy, or angled surfaces (fabric, carpet, curtains, foam, or steep angles) can absorb or deflect the sound, which may cause unstable readings.
When an HC-SR04 (or equivalent) Ultrasonic Distance Sensor is connected to an EZB, the Ultrasonic Collision Detection skill can automatically send a Stop command to a Movement Panel when an object is too close.
How It Works (Beginner Explanation)
- The sensor constantly (or periodically) measures distance.
- The skill compares the measured value to your Minimum Distance setting.
- If the sensor reports an object inside that minimum range, the skill:
- Turns the distance indicator red
- Sends Stop to the configured movement panel(s)
This skill is designed to help prevent collisions when driving forward (or in any direction your movement panel is commanding). It’s especially useful for beginner projects where you want a simple “stop before hitting something” safety behavior.
Scripting Integration (PAUSE + GetPing)
This skill is integrated with ARC scripting. If the PAUSE checkbox is checked, the skill will not continuously poll the sensor. Instead, it updates when your script calls:
GetPing(digitalTriggerPort, digitalEchoPort)Leaving the skill PAUSED lets you keep it in your project without using communication resources all the time. The skill will still update whenever your script calls
GetPing() (as long as the ports match the skill configuration).
Understanding the Distance Value (0–255)
The distance shown by this skill is a value from 0 to 255. It is not displayed directly in centimeters or inches. The reading can vary based on:
- Sensor type/model (HC-SR04 vs. other ultrasonic boards)
- Voltage and wiring
- Surface type and angle (hard flat wall vs. fabric)
- Temperature and environment
Main Window
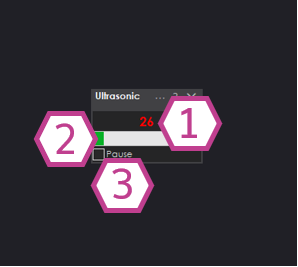
1) Ultrasonic Distance Value
Shows the current sensor reading (0–255). Green means the object is farther than your minimum distance. Red means the object is within your minimum distance and the skill will stop the movement panel.
2) Bar Display
A visual bar representation of the same distance value. This is helpful for quickly seeing changes as you move closer/farther from an object.
3) Pause Checkbox
When checked, the skill stops continuously reading the sensor.
Use this if you only want readings when a script calls GetPing().
Settings
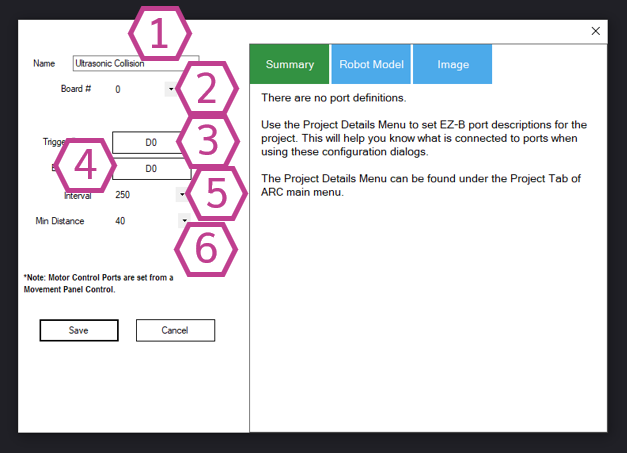
Note: Renaming also changes the name used by
ControlCommand() for this skill.
Note (3‑wire sensors): If your ultrasonic sensor combines Trigger and Echo into one signal wire, the Echo port must be set to the same digital port as Trigger.
- Lower number = faster updates, more responsive stopping
- Higher number = fewer reads, less communication usage
Beginner tip: Start with the default, then test slowly. Increase the minimum distance if your robot doesn’t stop early enough.
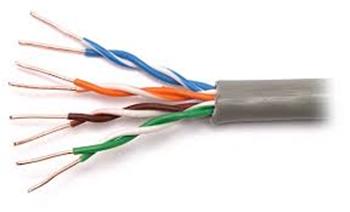
Wiring Diagram
Ultrasonic distance sensors commonly come in two wiring styles: 3‑wire (Trigger/Echo combined) and 4‑wire (Trigger and Echo separate). Some include a voltage regulator.
If your ultrasonic sensor has a regulator, it usually needs +6V or higher on the power input. If it does not have a regulator, it usually needs +5V. Always verify your specific sensor’s requirements.
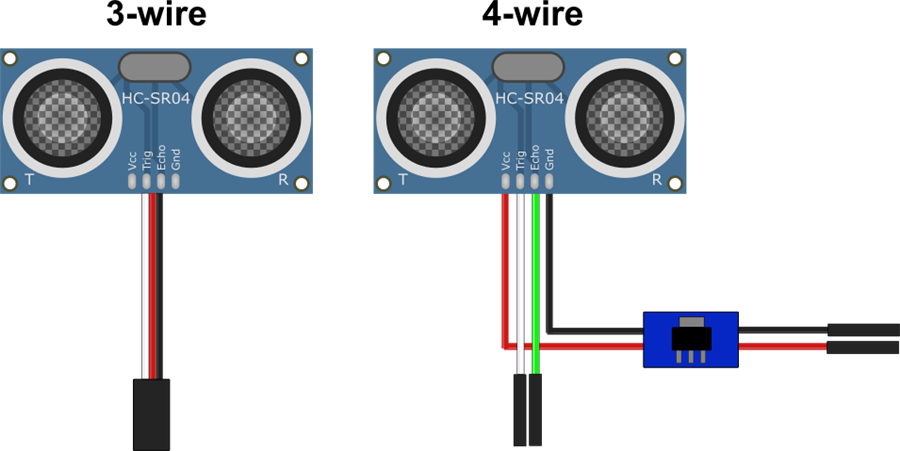
- Ground: Black wire to GND
- Power: Red wire to Vin
- Trigger/Echo: White wire to a Digital port
- Ground: Black wire from regulator to GND
- Power: Red wire from regulator to Vin
- Trigger: White wire to a Digital port
- Echo: Green wire to a second Digital port
Fix: False Positives / Resolution Improvement
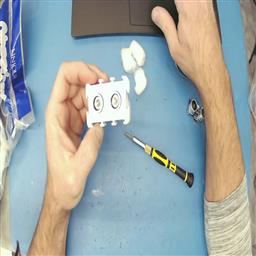
If you use an EZ-Robot ultrasonic distance sensor, you may see occasional false positives caused by the ping echoing inside the sensor casing (resonance). A simple fix is to place a few cotton balls inside the case around the sensors to reduce the internal echo.
Tech Detail Video
Resources
Synthiam provides an ultrasonic hardware reference design here.
Related Tutorials
Related Robots
Related Questions
Wire Length For The EZB Ultrasonic Sensor
How Do I... Not Be Hopelessly Lost?
Ultrasonic Radar Panel Bot Keeps Doing Circles

Upgrade to ARC Pro
Unlock the true power of automation and robotics by becoming a proud subscriber of Synthiam ARC Pro.