
Auto-release servos after inactivity: set EZB board/ports, choose 1-60s delay, add/remove ports, pause and view status.
Compatible with:
 Windows
How to add the Auto Release robot skill
- Load the most recent release of ARC (Get ARC).
- Press the Project tab from the top menu bar in ARC.
- Press Add Robot Skill from the button ribbon bar in ARC.
- Choose the Servo category tab.
- Press the Auto Release icon to add the robot skill to your project.
Don't have a robot yet?
Follow the Getting Started Guide to build a robot and use the Auto Release robot skill.
How to use the Auto Release robot skill
The Auto Release skill helps protect your servos and reduce power draw by automatically “releasing” (turning off the servo signal) after a set amount of time since the servo was last moved.
Beginner note: A servo normally “holds” its position by continuously receiving a control signal. When a servo is released, it stops holding position and may move freely if
something pushes it (gravity, your hand, a load, etc.).
This skill is especially useful for quick, repetitive movements (for example: waving, tapping, wagging, scanning) where you don’t need the servo to keep holding a position between moves.
Main Window
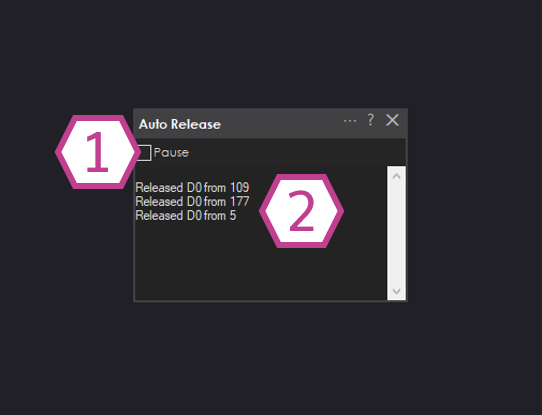
- 1. Pause Checkbox
-
Temporarily stops the Auto Release skill from releasing any servos.
- Checked (Paused): The skill does nothing (no ports will auto-release).
- Unchecked: The skill is active and will release ports after the configured time.
- 2. Status Display
-
Shows activity for the ports being monitored, including:
- Which board index and port are being handled
- The last position the servo moved to before it was released
Settings
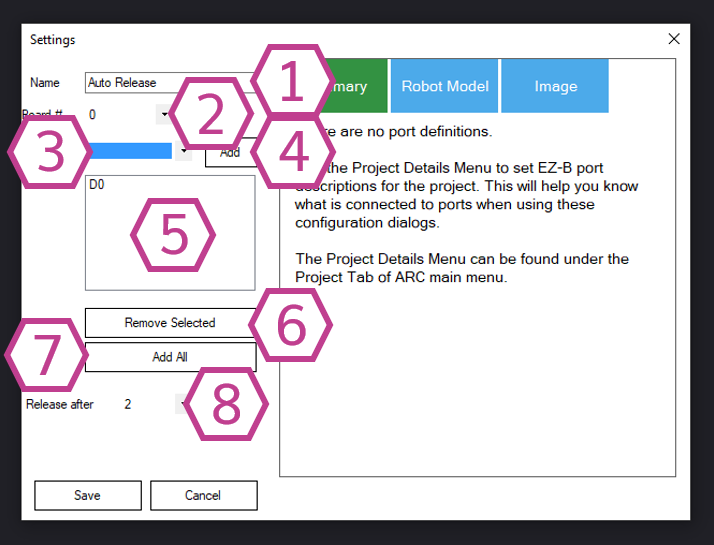
- 1. Title Field
-
The name of this skill instance in your ARC project. You can rename it to match what it controls (example: Auto Release - Arm).
Changing the title also changes the name used in
controlCommand()for this skill. - 2. Board Index Drop-down
-
Select which controller your servo is connected to (example: EZB Index 0, EZB Index 1, etc.).
If you only have one EZB connected, it is commonly index 0. - 3. Port Selection Drop-down
- Choose the specific servo port (pin) where your servo is plugged in (example: D0, D1, D2… depending on your board).
- 4. Add Button
-
Adds the selected board index + port into the Port List so Auto Release will monitor it.
Nothing will auto-release until you add ports to the list. - 5. Port List
- Shows all ports currently managed by this skill. Any servo movement on these ports will start (or restart) the release timer.
- 6. Remove Selected Button
- Removes the highlighted port from the list, so it will no longer be auto-released.
- 7. Add All Button
-
Adds all available ports to the list (including virtual ports).
Tip: Only add the ports you truly want to auto-release. If you add ports that must hold position (like a neck, arm, or gripper holding an object), the robot may “go limp” on those joints after the timer expires.
- 8. Release After (seconds) Drop-down
-
Sets how long ARC should wait after the last movement before releasing the servo signal.
- Range: 1 to 60 seconds
- Default: 2 seconds
How to Use Auto Release (Step-by-Step)
-
Add the skill to your project:
Project → Add Skill → Servo → Auto Release - Open the skill’s Settings and select the correct Board Index (the controller your servo is plugged into).
- Select the servo Port you want to auto-release.
- Click Add. Confirm the port now appears in the Port List.
- Set Release After (seconds) to how long you want the servo to hold before releasing (start with 2–5 seconds if you are unsure).
- Move the servo using any method (Servo control skill, scripts, Auto Position, etc.). After the configured time passes with no further movement, the servo will automatically release.
Beginner Tips & Common Mistakes
When Auto Release is helpful
- Reducing servo heat during repetitive motion
- Lowering battery/power usage
- Preventing “servo buzz” when holding isn’t required
When you should be careful
- Arms/grippers that must hold an object
- Joints that will drop due to gravity (heavy limbs)
- Any mechanism where losing holding torque could cause damage
Troubleshooting quick check: If nothing is releasing, confirm the skill is not paused, the correct board index and port are in the
Port List, and that the servo is actually being moved on that same port.