
3D Avatar JD simulator with bidirectional servo sync, action sequencing, $SIM_ scripting, EZ-B emulator support and pose/movement visualization
How to add the Avatar JD robot skill
- Load the most recent release of ARC (Get ARC).
- Press the Project tab from the top menu bar in ARC.
- Press Add Robot Skill from the button ribbon bar in ARC.
- Choose the Remote Control category tab.
- Press the Avatar JD icon to add the robot skill to your project.
Don't have a robot yet?
Follow the Getting Started Guide to build a robot and use the Avatar JD robot skill.
How to use the Avatar JD robot skill
Avatar JD is a Virtual 3D simulator of JD the Humanoid Robot. You can move this Avatar JD to move your real JD Robot. Also, when you move your real robot Avatar JD will move as well
(Version 9: Internal coding changes: Removed timer and used VariableManager and On servo Movement event to get servo Values and Scripting variables.) (Version 4: Used WPF Element host for smoother animation. Added $SIM_ global variables so you can write scripts to move Avatar JD and interact with the simulation. Added a tiled Floor for him to walk on. You can now move and rotate Avatar JD or you can rotate the world he is in as well as zoom in and out.)
I posted a challenge at the bottom of these instructions for folks who would like to help write some JavaScript to allow Avatar JD walk around and keep track of his location in real space. The initial code I provided allows him to walk in a straight line but needs to be enhanced to allow him to turn and stop.
Note the video below was made with version 3 so does not explain/demo some of the new version 4 features.
Welcome to the Avatar JD Plugin
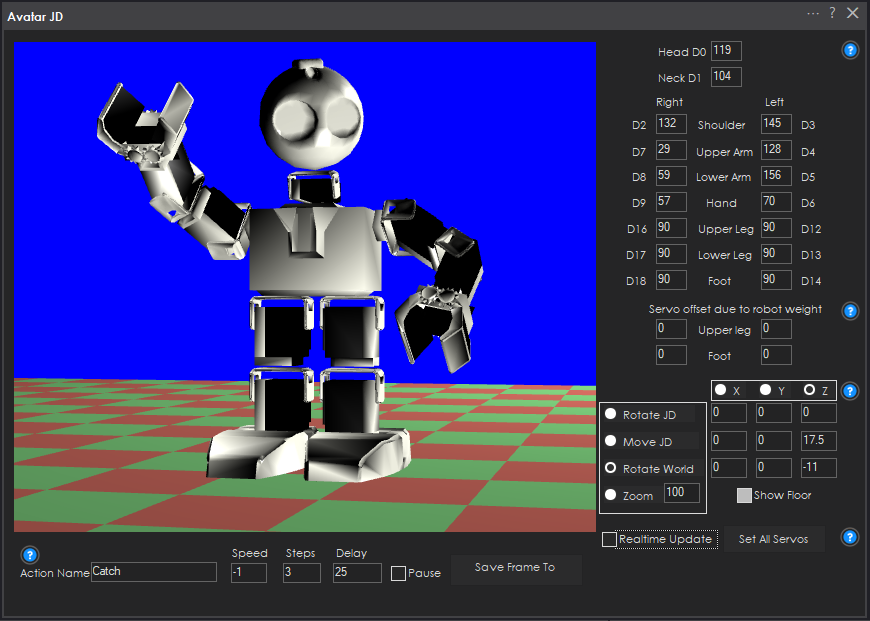
When you connect the real JD robot then Avatar JD’s Servos will all be set to 90. If you don’t have a JD see info lower down on how to connect to the EZ-B emulator.
Moving the servos: You can move this 3D Avatar JD by clicking on a 3D body part servo and dragging the mouse to move your real JD Robot. Drag the body part to the left to decrease the servo value and to the right to increase the servo value. When in real time update mode your Avatar JD will also move as you use the Auto Position control or run other scripts to move your real JD robot. You can also use the keyboard to enter in the servo positions or use the + and - key. The enter key is used to save the value.
Rotate, Move or Zoom: Click on the JD’s Chest and drag the mouse left or right to rotate, or move Avatar JD around within his 3D world. You can also rotate the 3D world to view Avatar JD from different angles. Click on the 2 sets of radio buttons ([X, Y, Z axis] and [Move, Rotate, Rotate World, Zoom]) to determine what happens when you drag on his chest. Or you can click on the specific field that lines up with both radio buttons. For example in the screen shot if you clicked on the field with -11 you are selecting Rotate World in the Z axis. If you don’t want to use the mouse you can just type in the value in the field, or use the + / - keys to increase or decrease the value and followed by enter to set the desired position or rotation. Use Shift minus (underscore character) or * (asterix) to toggle the minus sign on and off. A decimal point can be used to fine tune the value for example if you wanted to move Avatar JD 2.5cm in the X direction.
You can show / hide the tiled floor by clicking on the Show Floor checkbox.
Real time update mode: If you want to move multiple servo's at the same time uncheck real time update mode. Then move or set the desired servos and click on the set all Servos button.
Create action sequences: You can also create Action movement sequences by typing in an action name. You can also optionally adjust the servo speed, number of steps and the delay before moving. You then move your Avatar JD and when in you have the desired position click on Save Frame to Action. You can also click on the Pause checkbox and it will use the delay setting to pause the robot. To play back the action go into the Auto Position control. If the action is not listed, then click on the . . . to open the Auto Position settings and click on save. This will force the Auto Position to update the list of actions.
Using Avatar JD with the emulator: if you don't have a JD Humanoid or your JD is charging you can open up the EZ-B Emulator and set it to EZB_v4_OS_With_Comm_1 and check the Listening checkbox.
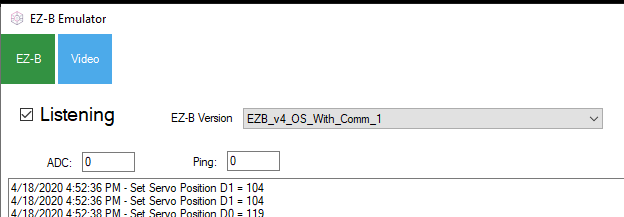
Then in ARC connect to 127.0.0.1:23

This allows you to simulate JD the Humanoid using the EZ-B emulator. You will be able to play action sequences from the Auto Position control or create and run scripts designed for JD the Humanoid.
Keep in mind the 3D Avatar moves like you are holding your real JD Humanoid in the air by the chest. So when you walk JD Humanoid forward the 3D Avatar will not be pushing off the ground to actually move forward. It will just move the servos. Be careful when moving the legs with Avatar JD so that your real JD does not fall over.
The 3D Avatar JD is great to visualize simple movements like moving the head, neck, arms or hands. You may need to click on Rotate World Z axis field and then click on and drag JD’s chest to see all the servo positions from different angles to get a better idea of the pose or to be able to click on servos that are hidden from view. You can also hide the floor if JD’s feet are disappearing from view.
Interacting with the simulation using scripts: With version 4 you can now interact with the simulation using scripts to modify the following global variables. $SIM_AvJD_PositionX, Y, Z - This determines Avatar JD’s location in the simulation and are the same as the move X, Y, Z values. The values line up with the center of JD’s chest. $SIM_AvJD_RotationX, Y, Z - These variables allow you to rotate Avatar JD in the X, Y, and Z axis. $SIM_World_RotationX, Y, Z, - Allows you to view Avatar JD from different angles, it rotates the floor as well. $SIM_ShowFloor can be set to 0 hide the floor, or 1 show the floor.
$SIM_Zoom Allows you to zoom in and out. 50 represents 50% of the original size, 200 would be 200% original size. $SIM_RealTimeUpdate - Turns real time update mode on or off. $SIM_RightUpperLegLoadOffset, $SIM_LeftUpperLegLoadOffset - how much the force of gravity will offset the angle from his upper leg servo. Use when both feet or legs are not level on the floor. It allows you to move the upper leg servo from the weight of JD without changing the upper leg servo values. $SIM_RightFootLoadOffset, $SIM_LeftFootLoadOffset - how much the force of gravity adjusts the foot servo angles by.
You can use these global variables to write a script to make Avatar JD walk or move similar to how he would in the real world.
Here is an example JavaScript code to have him walk in a straight line.
// Walk_Avatar_JD:
// By keeping track of what frame JD is starting and and what frame he is moving to we can calculate how he moves
// The frameTransition amounts are changes to the existing values except for the FootLoadOffset which are absolute amounts
// If you rotate world in the X axis in the Avatar JD simulation to 8.46 or -8.46 you can see the floor as a horizontal line
// When standing with both legs straight the center of JD's body is 17.5 cm above the floor.
// JD rotates around the center of his body so for every 1 degree you rotate his body in the Y axis you
//     move sine(1)*17.5 = 0.305417 cm in the X axis
//     and cosine(1)*17.5 = 0.0026653 cm in the Z axis
// Each tile on the floor is 10 cm by 10 cm.   At x=0, y=0 JD is centered in a tile.
// When in a particular pose you can see where JD's feet are in each square then after you change the pose
//    say from Stop to Walk 1 you can then determine which foot JD would be standing on use that Foot's Load
//    Offset to level that foot on the floor (Unless both feet are on an angle and raising JD upwards)
//     Then move JD back in the X axis to place that foot in the same location and move JD up or down in the
//    Z axis so that same foot is level on the floor.   Using this approach you can determine how much to rotate
//     his body and how much to move him to keep the foot he is balancing in place and how much the force of gravity
//    will offset the angle of each foot servo or the angle from his upper leg servo.
// The Movement of Avatar JD looks a little funny since we are not taking into account each servo transition
//    to get to the ToFrame.   We and are just moving him based on the frame servo position end state.
// Currently the code just handles JD walking forward, however, FromFrame, ToFrame Transitions could be added to handle
//   turning left, right, backwards as well as stop from any Walk 1 to Walk 8 postions.
//   This would keep track of JD's X, Y, Z position while he moves around in the simulation or the real world.

var frameTransition = [

   // FromFrame, ToFrame, RotateX, RotateY, RotateZ, MoveX, MoveY, MoveZ, RightUpperLegLoadOffset, LeftUpperLegLoadOffset, RightFootLoadOffset, LeftFootLoadOffset

   ["Stop",   "Walk 1", 0, -10, 0 , -3 , 0   , 0.1 , 0 , 0, 5, 0],
   ["Walk 1", "Walk 2",-4, 0  , 0 , 0  ,-1.3 ,-0.2 , 4 , 0, 5, 0],
   ["Walk 2", "Walk 3", 6, 10 , -5, 3  , -1.5, -0.4,-11,-6, 0, 1],
   ["Walk 3", "Walk 4", 0, 10 , 0 , 2.8,-1.1 , 0.5 ,-2 ,0 , 0,-4],
   ["Walk 4", "Walk 5", 0, -3 , 0, -1  ,-1   , 0   ,0  ,0 , 0,-8],
   ["Walk 5", "Walk 6", 0, 0  , 0 , 0.2,-1.1 ,-0.6 ,0  ,-3, 0,-8],
   ["Walk 6", "Walk 7",-8, -2 , 3 ,-0.7,-0.4 ,-0.1 ,8  ,5 , 4, 4],
   ["Walk 7", "Walk 8", 6, -15, 1 ,-4.3,-0.8 , 0.8 ,-5 ,5 , 5,-1],
   ["Walk 8", "Walk 1", 0,  0 , 1 ,0   ,-0.8 , 0   ,0  ,0 , 5, 0]

];

var len = frameTransition.length;

// Constant to convert from degress to radians to be used to calculate the x and y distance
//    depending on what angle $SIM_AvJD_RotationZ is at.
var degreesToRadians = Math.PI / 180;

// Get the current frame
var fromFrame = getVar("$AutoPositionFrame");
var workToDo = true;
var toFrame = "";

// Loop until the "STAND" frame, or the users stops the script, and check the from and to Frame combinations
//      Once a match is found rotate and move Avitar JD
while (workToDo) {
  // Get the current frame
   toFrame = getVar("$AutoPositionFrame");

   // If the Frame changed
   if (fromFrame != toFrame) {
     print("Frame changed from " + fromFrame + " to " + toFrame);

     //Find Matching From and To Frame
      for (var i = 0;  i < len; i++) {
         if (frameTransition[ i ][0] == fromFrame && frameTransition[ i ][1] == toFrame) {
            // Rotate X
            setVar("$SIM_AvJD_RotationX",getVar("$SIM_AvJD_RotationX") + frameTransition[ i ][2]);
            // Rotate Y
            setVar("$SIM_AvJD_RotationY",getVar("$SIM_AvJD_RotationY") + frameTransition[ i ][3]);
            // Rotate Z
            setVar("$SIM_AvJD_RotationZ",getVar("$SIM_AvJD_RotationZ") + frameTransition[ i ][4]);
            // Move X
            setVar("$SIM_AvJD_PositionX",getVar("$SIM_AvJD_PositionX") +
              frameTransition[ i ][5] * Math.cos(degreesToRadians * getVar("$SIM_AvJD_RotationZ")));
            setVar("$SIM_AvJD_PositionY",getVar("$SIM_AvJD_PositionY") +
              frameTransition[ i ][5] * Math.sin(degreesToRadians * getVar("$SIM_AvJD_RotationZ")));
            // Move Y
            setVar("$SIM_AvJD_PositionY",getVar("$SIM_AvJD_PositionY") +
              frameTransition[ i ][6] * Math.cos(degreesToRadians * getVar("$SIM_AvJD_RotationZ")));
            setVar("$SIM_AvJD_PositionX",getVar("$SIM_AvJD_PositionX") -
              frameTransition[ i ][6] * Math.sin(degreesToRadians * getVar("$SIM_AvJD_RotationZ")));
            // Move Z  - Assumes JD is walking on a flat level surface.
            setVar("$SIM_AvJD_PositionZ",getVar("$SIM_AvJD_PositionZ") + frameTransition[i][7]);
            // Load Offset values are absolute and not relative changes.
            // Right Uppler Leg Load Offset
            setVar("$SIM_RightUpperLegLoadOffset",frameTransition[ i ][8]);
            // Left Uppler Leg Load Offset
            setVar("$SIM_LeftUpperLegLoadOffset",frameTransition[ i ][9]);
            // Right Foot Load Offset
            setVar("$SIM_RightFootLoadOffset",frameTransition[ i ][10]);
            // Left Foot Load Offset
            setVar("$SIM_LeftFootLoadOffset",frameTransition[ i ][11]);
            break;
         }
      }

      // Finished processing the changed frame, and set the fromFrame as the toFrame
      fromFrame = toFrame;
   }

   // stop looking if STAND frame is set.  You can also just stop the script.
   if (toFrame == "STAND") {
      workToDo = false;
   }

}  // End While loop
Challenge: Can you update the code to allow him to turn, walk backwards or stop? Hint: look at the first action frame for turn left and then assume you could be on any of the walk1 to walk8 or stop frames to start. Once complete this code could also be used to keep track of the X, Y coordinates of where the real JD is when he walks around. Please paste your FrameTransition solutions in the comments below so you can share with others.

I tried this, works fine
EzAng
Very cool - I like it a lot! For your next update, keep in mind that it might be appropriate and get more exposure if you specified the plugin to be in a Simulation category
Hi DJ. Glad you liked it. I was not aware that we could create our own categories. Is it just a matter of adding Simulation as the category in the plugin xml file? Will it then move this page/post under the new category? Not sure when I will do the next update, but in the mean time could I just update the plugin.xml to accomplish that. Let me know. This was my first ARC skill plugin and has provided a great new learning experience. It was my first time using c# and Windows Presentation Foundation (WPF) and its associated 3D libraries. I have used many programing langues but am not really proficient at any of them. I also learnt that the ARC skill plugin only supports windows form libraries, and not WPF, so figured out a way to render the 3D image to a bitmap and save to a form PictureBox control. I thought it was worth mentioning in case others would like to include nice 3D graphics into the ARC environment and wondered how I did it. I thought it would be nice to emulate JD's LED eye's but will wait until you save the LED frame RGB values to a public variable as an array. It would be great to emulate some physics or surface detection with a floor so I could make Avatar JD actually walk or at least provide a warning if he was to lose his balance and fall so you don't hurt the real JD Humanoid. However, the complexity to do that is probably way more complicated but I have to admit the challenge intriques me. Maybe someday . . .
Yah, add the category name in the plugin.xml and it will automatically create it for you. Simulation i think is a good one - specially if you're considering adding a few more robot simulations. This might be a good business for you because we're going to allow charging of plugins soon. So you'll be able to allow people to buy the plugins through our technology store. There are A LOT of schools that ez-robot works with, so that'll go a long way with them to have $30 simulations plugins vs $600 robots . Don't tell ezrobot i said that hehe
You can use WPF in ARC. There's a WPF element host that you add to the control. This makes your control a WPF app . Add the Element Host and set it to dock FILL. Voila!
Hi DJ, thanks for the heads up on the Technology Store. I will look at moving it across to a new Simulation category. I can see leaving out the eye's and not being able to walk like the real robot entices folks to still buy the real robot. After all you still have a business to run . Simulations can also open up a whole new business opportunity for schools with a budget or who are constrained on how many robots they can buy.
Thanks for pointing out the WPF interoperability ElementHost. I have to take a look at that. There were some things I could not do which it might have been helpful if I could have had the WPF canvas. I was originally going to put the server values as labels on the 3D image but have them always face the viewer. In the end I think the way I presented it was much clearer anyways. The lesson is that I probably should have posted a question to ask about it.
. Simulations can also open up a whole new business opportunity for schools with a budget or who are constrained on how many robots they can buy.
Thanks for pointing out the WPF interoperability ElementHost. I have to take a look at that. There were some things I could not do which it might have been helpful if I could have had the WPF canvas. I was originally going to put the server values as labels on the 3D image but have them always face the viewer. In the end I think the way I presented it was much clearer anyways. The lesson is that I probably should have posted a question to ask about it.
This was a good example so we can have the plugin tutorial updated to include adding WPF components.
Hello @goldenbot
Really cool plug-in, I tried it out yesterday and was very impressed! Definitely a great idea for simulation.
I'm not sure if you are open to ideas yet but I had a couple to share with you:
Could you have the servo values initialize at 90 degrees? When they initialized at 1 JD appeared as a blob, which confused me at first
What would you think about adding sliders beside the servo values (1-180 degrees)? I feel like this could really add to the speed at which you could create the frames. My mouse movements are faster than my keyboard skills
Jeremie - did you connect to an EZ-B or emulator when testing?