

Real-time servo position input via Arduino ADC over I2C; supports Nano (6 channels) or Mega (16), configurable I2C address and scalable chaining.
How to add the PWM Servo Feedback (I2c) robot skill
- Load the most recent release of ARC (Get ARC).
- Press the Project tab from the top menu bar in ARC.
- Press Add Robot Skill from the button ribbon bar in ARC.
- Choose the Servo category tab.
- Press the PWM Servo Feedback (I2c) icon to add the robot skill to your project.
Don't have a robot yet?
Follow the Getting Started Guide to build a robot and use the PWM Servo Feedback (I2c) robot skill.
How to use the PWM Servo Feedback (I2c) robot skill
Receive servo positions in real-time over an Arduino and its ADC ports. This control connects to an Arduino over I2C and receives the values of the ADC ports. The Arduino requires firmware to be programmed, which can be downloaded below. Depending on your Arduino version, the code can be modified for the number of ports.
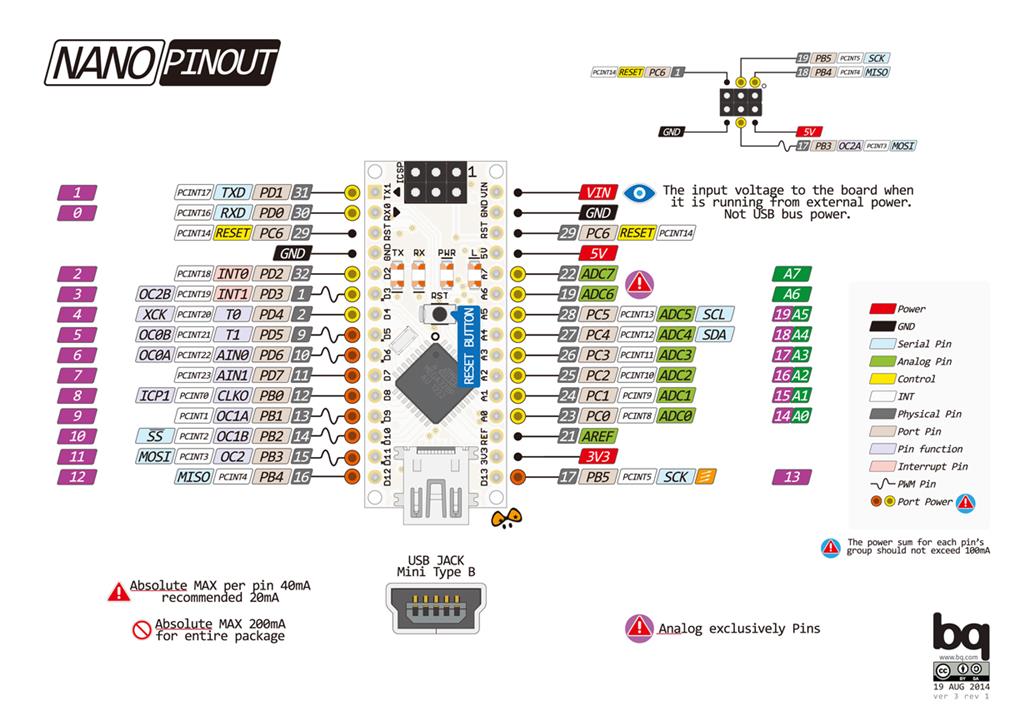
The Arduino code available here is for the Arduino Nano, a tiny little Arduino that nicely fits next to an EZ-B or IoTiny. It connects to the EZ-B via I2C using its A4 and A5 ports. As you can see from the image below, the I2C ports of the Nano use the A4 and A5 ports. Those ports have to be connected to an EZ-B (whether another Arduino, EZ-B v4, or IoTiny).
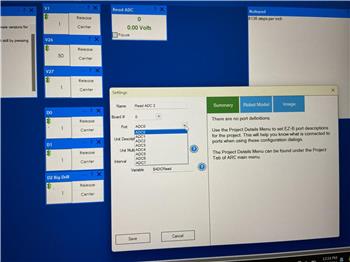
 . The Firmware I2C address can be edited and changed. The plugin also has a place to change the I2C address in the configuration.
Here is the firmware for the Arduino: I2C_Analog_Read.zip
Upload that firmware and make any edits as necessary. It is documented quite well, so it should be an easy modification to work with various Arduino boards, such as Mega. I believe the Uno and Nano have similar pinouts but a different number of ADC ports.
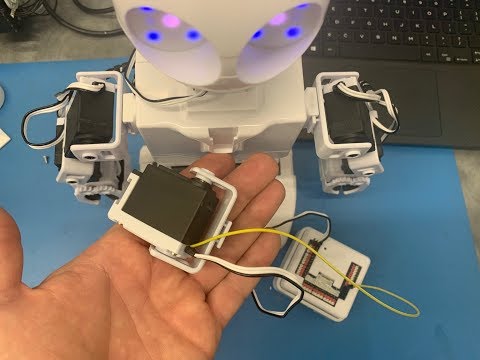
The servos connecting to the Arduino's ADC ports must be modified to have a wire attached. That is documented in the video below.
This video has the ADC version of this plugin being demonstrated. You can see the results if you want to read servo positions.
Related Hack Events
PWM Servo Position Feedback (Read Servo Position)

Robot As Puppet To Control Another Robot By Reading Servo...
Related Questions

Upgrade to ARC Pro
With Synthiam ARC Pro, you're not just programming a robot; you're shaping the future of automation, one innovative idea at a time.
You can also do this with a basic script, 2 JDs with just 2 ezb4 and the "Map" script command (and hacked servos of course}.... I did this with a remote controlled robotic arm like a crude version of the ones you see remote robotic arm surgeons using. I built a frame that I wore that had pots in my shoulder, elbow, wrist and hand joints that translated to movements to control a robotic arm.. Yes I realize this is a demo showcasing additional hardware aka an arduino in this case with (and make ARC more valuable might I add) ARC which is a bonus... So saying that when are we going to have to pay for ARC?....:)
My plan is you’ll never have to pay for ARC. I don’t see a point in punishing robot builders to use ARC. Specifically with the enhancements we’re working on
Sure will! Well, not 600 adc ports. But I will have 14 in total
Fantastic! Looking forward to it!
Updated to allow manually entering the min and max adc values
Ah sweet there's the manual entering of the values Thanks, Don