
Map EZ-B audio volume to servos; multi-servo mirroring, scalar range control, invert/min-max, waveform feedback to sync mouth motion.
How to add the Sound Servo (EZB) robot skill
- Load the most recent release of ARC (Get ARC).
- Press the Project tab from the top menu bar in ARC.
- Press Add Robot Skill from the button ribbon bar in ARC.
- Choose the Audio category tab.
- Press the Sound Servo (EZB) icon to add the robot skill to your project.
Don't have a robot yet?
Follow the Getting Started Guide to build a robot and use the Sound Servo (EZB) robot skill.
How to use the Sound Servo (EZB) robot skill
A common beginner project is making a robot mouth move while speech or music is playing (lip-sync style).
Before you start (Beginner Checklist)
- Connect your servo to a digital port on your EZ-B (for example: D0, D1, etc.).
- Power your servo correctly: many servos need more current than USB can provide. Use a proper servo power source as recommended for your EZ-B.
- Confirm your EZ-B is connected in ARC and you can manually move the servo using a servo control skill.
- Make sure ARC is playing audio through the EZ-B (for example, ARC speech, sound files, or music routed to EZ-B audio). This skill reacts to the EZ-B audio output level.
How it works (in simple terms)
- The skill continuously measures the audio loudness.
- That loudness becomes a number called the Level Value.
- The level is multiplied by a Scalar (a sensitivity setting).
- The result is mapped into a servo range you choose (Minimum and Maximum positions).
- The servo is commanded to move within that range as the audio gets quieter/louder.
Tip: If the servo barely moves, increase the Scalar or narrow the min/max range. If it slams to the ends or jitters a lot, lower the Scalar or increase the min/max range spacing.
Main Window
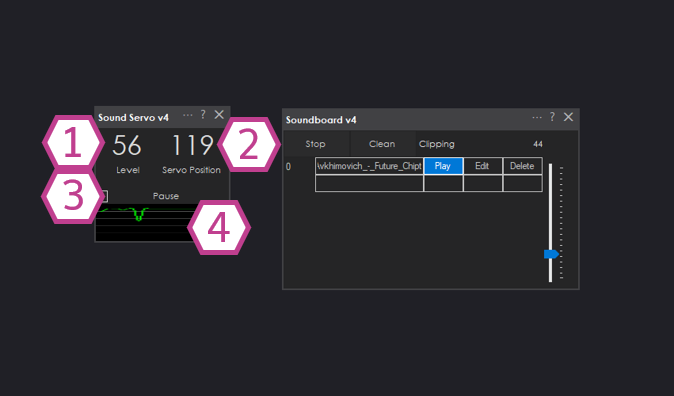
1. Level Value
Shows the detected audio level being sent to the EZ-B. Think of this as “how loud the sound is right now.” Higher numbers generally mean louder audio.
2. Servo Position
Displays the servo position the skill is currently commanding. This value will stay between your Minimum Position and Maximum Position from the Settings.
The position is driven by the Level Value multiplied by the Scalar, then constrained to your min/max range.3. Pause Checkbox
Temporarily stops (pauses) audio level capture and servo updates. Use this while tuning settings so the servo doesn’t keep moving.
4. Audio Waveform
A visual graph of the EZ-B’s audio output. This helps you see if audio is present and whether it is loud or quiet.
Settings
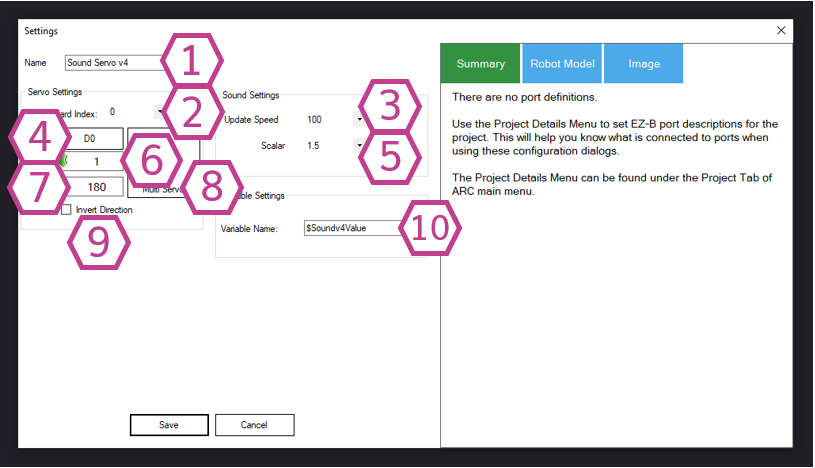
1. Title Field
The name of this skill as it appears in your ARC project. You may rename it to something like “Mouth Servo” or “Speaker Jaw”.
Note: Renaming also changes the name used when referencing this skill withcontrolCommand().
2. Board Index Drop-down
Select which EZ-B you are using. If you only have one EZ-B connected, this is usually 0. If you have multiple boards, choose the one the servo is physically connected to.
3. Update Speed Drop-down
How often the skill samples the audio level and updates the servo (in milliseconds). Lower values update more frequently (more responsive), higher values update less often (smoother/less CPU).
Range: 100 to 60000 ms. Default: 100 ms.4. Port Drop-down
Choose the digital port where the master servo is connected (example: D0). This is the primary servo that follows the audio level.
5. Scalar Drop-down (Sensitivity)
Multiplies the detected audio level to create bigger or smaller servo movement. This is the main “sensitivity” control.
Range: 0.25 to 9.75. Default: 1.5.- Increase Scalar if the servo barely moves.
- Decrease Scalar if the servo hits min/max too easily or seems overly jumpy.
6. Minimum Position Adjust
Sets the lowest servo position the skill is allowed to send. For a mouth, this is usually the “mouth closed” position.
Left-click to adjust with the control. Right-click to type a value.7. Maximum Position Adjust
Sets the highest servo position the skill is allowed to send. For a mouth, this is usually the “mouth open” position.
Left-click to adjust with the control. Right-click to type a value.8. Multi Servo Edit Window
Lets you add additional servos that will mirror the master servo. This is useful if you have multiple mouth parts, a jaw plus cheeks, or want several servos to react together.
If you need different movement ranges for different servos, you can also add multiple instances of this skill and configure each one separately.9. Invert Direction Checkbox
Reverses the servo direction. Enable this if the servo moves the “wrong way” (for example, it closes when it should open).
Example: Without invert, 180 might move left; with invert, 180 moves right.10. Variable Field
The name of the ARC variable that stores the detected audio output level. You can use this variable in other scripts or skills (for example, triggering an action when audio gets loud).
Quick setup example (Robot Mouth)
- Choose the correct Board Index and Port for your mouth servo.
- Set Minimum to the mouth closed position and Maximum to the mouth open position.
- Play some speech/audio in ARC.
- Adjust Scalar until the mouth opens naturally with louder parts and relaxes with quieter parts.
- If the movement is backwards, enable Invert Direction.
Related Questions

Audio, Servo Movement Panels Are Only On Connection 0 ?

Sound Servo Sync Issues

Sound Servo Lag And Mouth Twitch On ESP32

Upgrade to ARC Pro
ARC Pro will give you immediate updates and new features needed to unleash your robot's potential!
How would you use this to generate a PWM signal to control the intensity of an LED for when a robot talks and his mouth is just an LED?
The servo is a pwm variable voltage. Simply select the port and change the servo position range from 1 to 180
otherwise, you can write a script to loop and modify pwm commands manually
also, probably makes most sense to use the Talk servo skill