
Smoothly ramps PWM servos on EZB D0-D23 via Vx-to-Dx mapping for natural, gradual motion without snapping.
How to add the PWM Servo Ramping robot skill
- Load the most recent release of ARC (Get ARC).
- Press the Project tab from the top menu bar in ARC.
- Press Add Robot Skill from the button ribbon bar in ARC.
- Choose the Servo category tab.
- Press the PWM Servo Ramping icon to add the robot skill to your project.
Don't have a robot yet?
Follow the Getting Started Guide to build a robot and use the PWM Servo Ramping robot skill.
How to use the PWM Servo Ramping robot skill
This robot skill adds smooth acceleration/deceleration ("ramping") to standard PWM servos connected to digital ports D0-D23 on an EZB. PWM servos move at full speed by default and cannot ramp on their own. This skill drives a physical PWM servo on your behalf, advancing it toward each new target a few units per tick so motion looks smooth instead of snapping instantly.
You map Vx ports to Dx ports. When you command to move a virtual servo port (V0-V99), the matching Dx port moves using a ramped sequence of position.
What is servo ramping?
A normal PWM servo receives a target position and slews to it as fast as its mechanical limits allow. There is no built-in acceleration curve. When you tell a PWM servo to move from position 1 to position 180, it will jerk to 180 immediately. That looks unnatural on robot joints, eyes, neck mechanisms, animatronic mouths, and any motion where you want easing in and out rather than a hard snap.
Servo ramping fills in the intermediate positions over time:
Direct move (no ramping):
  90 ------------------------> 150
  (instantaneous jump)

Ramped move:
  90 -> 95 -> 100 -> 110 -> 125 -> 140 -> 148 -> 150
  (a sequence of writes spaced over many milliseconds)
The higher the acceleration value, the smaller each step is, and the longer the motion takes to reach the target.
When to use this skill
Use this skill when all of the following are true:
- You have one or more servos connected to PWM ports (
D0-D23) on an EZB. - The EZB or servo does not support hardware acceleration.
- You want smooth motion instead of instant jumps.
Typical use cases:
- Animatronic head/eye motion.
- Robot arms or grippers using hobby-grade PWM servos.
- Pan/tilt assemblies where snap motion is undesirable.
- Any scene where the visual quality of the motion matters more than reaching the target as fast as possible.
When NOT to use this skill
This skill is not needed if you are using:
- Smart servos with built-in acceleration support (e.g. Dynamixel, LewanSoul/Hiwonder bus servos, certain digital serial servos). These servos handle acceleration internally; passing acceleration to them is already smooth.
- EZB controllers that handle acceleration on the firmware/SDK side. Some EZB controllers honor the
Accelerationfield on their servo move command and produce the ramp themselves. Adding this skill on top of that produces duplicate ramping and degraded motion.
Always check your hardware's documentation first. If acceleration is already supported, send acceleration values directly to the real port and skip this skill entirely.
How it works
- You create one or more mappings in the skill's configuration: each mapping pairs a virtual port (
Vx) to a physical PWM port (Dx) on a specific EZB index. - Your scripts, joysticks, sliders, or other robot skills move the virtual port (
Vx), not the physical PWM port directly. - This skill subscribes to ARC's servo move event, sees the virtual port move, looks up the matching physical port, and starts ramping the physical port toward the new target.
- If a new movement command for the same
Vxarrives mid-ramp, the ramp "restarts" from the servo's current position toward the new target without snapping. This means the servo always moves continuously, never jumping when a new target is requested.
The skill runs a single background loop that advances every active ramp on every tick. The step size each ramp takes per tick depends on the acceleration value that came in with the movement command.
Configuration
Open the configuration dialog with the gear/config button in the title bar.
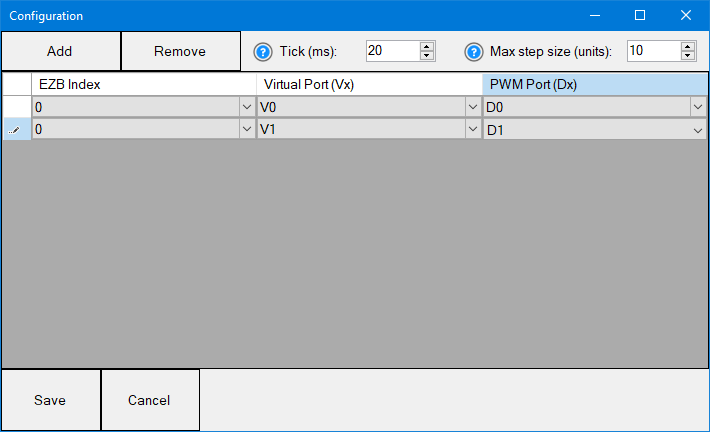
The dialog has three things to configure:
- The list of Servo Mappings that pair a
Vxvirtual port to aDxPWM port. - The Tick (ms) value that controls how often the ramp loop updates servos.
- The Max Step Size value that controls how fast the fastest ramp setting moves.
All three are saved into your ARC project file when you press Save, and applied immediately to the running skill.
Servo Mappings (the grid)
Each row in the grid maps one virtual port to one physical PWM port on a specific EZB. The grid is the heart of the skill - without at least one mapping, nothing ramps.
| Column | Meaning |
|---|---|
| EZB Index | Which EZB slot the servo lives on. The dropdown lists every slot ARC currently supports (0 - N). |
| Virtual Port | The Vx port your scripts/controls will command (V0-V99). This is the port you write to. |
| PWM Port | The Dx port the physical servo is wired to (D0-D23). This is the port that actually moves. |
Use Add to append a new row. Each new row defaults to EZB Index 0, V0, D0 - change those to match your hardware. Use Remove to delete the selected row(s) (click a row's header to select it; Ctrl/Shift-click for multiple).
Press Save to commit. Press Cancel to throw away all edits - the original mappings come back unchanged.
Rules of thumb for mappings:
- One
Vxshould appear at most once per EZB. Two ramps for the same Vx will fight each other.- Don't map a
Dxthat anything else in your project writes to directly. The ramp loop must be the only writer to a mapped PWM port.- You can map many
Vx->Dxpairs. Each ramps independently in the single shared loop.
Tick (ms) - the ramp loop refresh rate
This is how often the background ramp loop runs. Each tick, the loop wakes up, looks at every active ramp, advances each one by one step toward its target, writes those new positions to the EZB, then goes back to sleep until the next tick.
Default: 20 ms (50 ticks per second).
- Lower values (e.g. 10-15 ms) - Smoother motion because the servo updates more often, but every tick generates EZB bus traffic. On wireless EZBs or busy projects this can cause network stutter, dropped updates, or noticeably slow responsiveness in other skills.
- Higher values (e.g. 30-50 ms) - Cheaper on bus traffic. Motion can start to look like discrete steps instead of a smooth slew, especially with a small MaxStepSize.
- Very high values (100+ ms) - Not recommended for ramping; the servo will visibly tick from position to position.
Choosing a value: start at the default. Lower it only if you can see stepping at slow speeds. Raise it only if you notice the EZB getting slow elsewhere when ramps are running.
Max Step Size (units) - the speed dial for the fastest ramp
This is the biggest jump (in servo units) that a ramp will ever take in one tick. It's the ceiling on how aggressive the fastest ramping setting is.
Default: 10 units per tick.
The actual per-tick step depends on the Acceleration value attached to the move command:
stepSize = max(1, MaxStepSize + 1 - min(MaxStepSize, Acceleration))
Reading that formula in plain English:
Acceleration = 1step =MaxStepSizeunits per tick (fastest ramp)Acceleration = 2step =MaxStepSize - 1units per tick- ... and so on ...
Acceleration = MaxStepSizestep =1unit per tick (slowest ramp)Acceleration > MaxStepSizestill1unit per tick (clamped)
So MaxStepSize controls two things at once:
- How big the steps are at the fastest setting.
- How many distinct speeds the user has available (because acceleration values from 1 to MaxStepSize each give a different step size).
Putting Tick and MaxStepSize together
The total time to complete a ramp depends on all three of: how far the servo has to travel, the Acceleration value, and these two settings. The formula is:
total time (ms) = (distance in units / stepSize) * TickMs
Where stepSize comes from the formula above. Some concrete examples with TickMs = 20, MaxStepSize = 10, moving a servo 100 units:
| Acceleration | Step per tick | Ticks needed | Total time |
|---|---|---|---|
| 0 (no ramp) | - | - | instant |
| 1 (fastest) | 10 | 10 | 200 ms |
| 2 | 9 | ~12 | 220 ms |
| 5 | 6 | ~17 | 340 ms |
| 10 | 1 | 100 | 2000 ms |
| 20 (clamped) | 1 | 100 | 2000 ms |
Same example but with MaxStepSize = 20:
| Acceleration | Step per tick | Total time for 100-unit move |
|---|---|---|
| 1 | 20 | 100 ms |
| 5 | 16 | 125 ms |
| 10 | 11 | 180 ms |
| 20 | 1 | 2000 ms |
Notice how raising MaxStepSize makes the fastest setting (Acceleration=1) much quicker without changing the slowest setting (Acceleration=MaxStepSize, still 1 unit/tick).
Practical tuning guide
You want very smooth, slow ramps:
- Lower
TickMsto 10-15 ms. - Keep
MaxStepSizearound 5-10. - Use higher
Accelerationvalues (5 to MaxStepSize) on your move commands.
You want fast, snappy ramps that still smooth out the jerk:
- Keep
TickMsat 20 ms. - Raise
MaxStepSizeto 20-30. - Use low
Accelerationvalues (1-3) on your move commands.
You want a mix - some servos slow and dramatic, others quick:
- Leave
TickMsandMaxStepSizeat the defaults. - Vary the
Accelerationvalue per servo, per command. Higher value = slower ramp for that one motion.
The motion is fine but other parts of ARC slow down when ramps run:
- Raise
TickMsto 30-40 ms. - Reduce the number of simultaneously-ramping servos if you can (combine moves or sequence them).
Setting the Acceleration value
This skill only ramps when something tells it to ramp by sending an acceleration value with the movement command. Acceleration is a per-command parameter, not a per-servo property of this skill.
| Acceleration value | Behavior |
|---|---|
-1 |
Ignored. The command is treated as "no acceleration specified" and the skill does nothing. The original movement still passes through to whatever the SDK would normally do for the virtual port. |
0 |
No ramping. The skill writes the target directly to the PWM port and drops any in-progress ramp. Use this when you want an immediate jump. |
1 |
Fastest ramp (largest step size per tick). |
2 to MaxStepSize |
Progressively slower / smoother ramps. |
Greater than MaxStepSize |
Slowest possible ramp (1 unit per tick). |
There are two common ways to send an acceleration value with a move:
1. Through the GUI (Advanced settings on a movement control)
Most servo-driving robot skills (servo panel, auto position, joystick, slider, etc.) expose an Advanced section in their configuration where you can set:
- Speed
- Velocity
- Acceleration
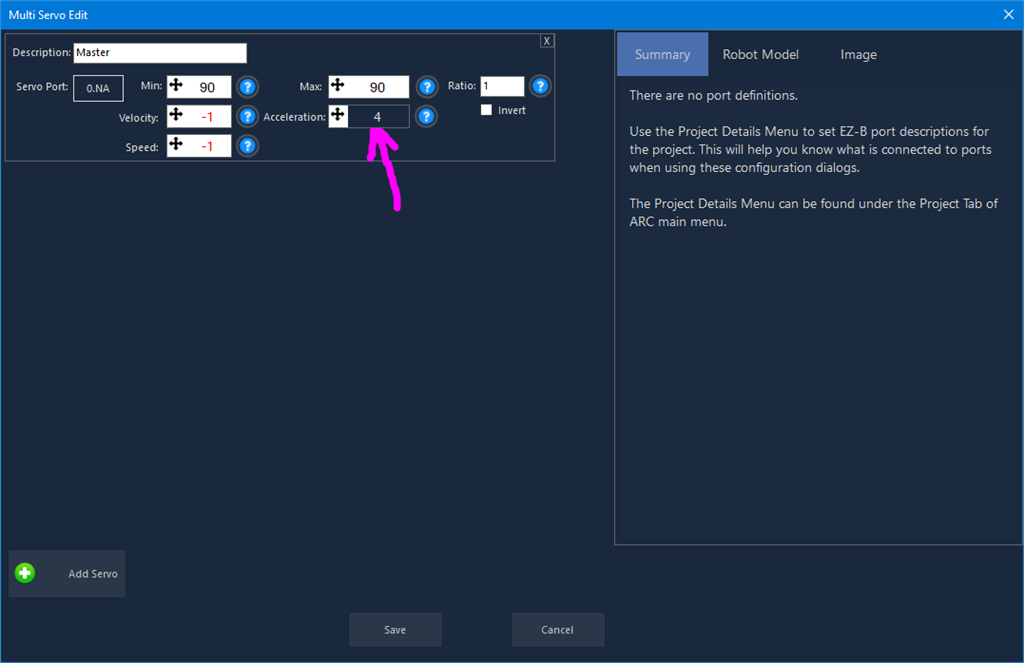
When that control issues a movement to a Vx port, those values travel with the command and arrive in the event this skill listens to. Set Acceleration to a positive number (typically 1-20) and the skill will ramp the matching PWM port on every move issued by that control.
Different robot skills expose the Advanced section differently. Look for a configuration tab or fly-out labeled "Advanced", "Servo settings", or similar that exposes Acceleration alongside Speed.
2. Through scripting
You can also set the acceleration on a virtual port from any ARC script (JavaScript, Python, Blockly, etc.) before issuing a movement. The exact name depends on the scripting language, but in C#/JavaScript-style scripting it is:
Servo.SetAcceleration(Vx, accelerationValue, [ezbIndex])
The value persists on the port until you change it again, so you typically set it once during initialization and then move the servo normally:
// Configure once
Servo.SetAcceleration(V0, 5);     // Ramp V0 with acceleration 5 (medium)
Servo.SetAcceleration(V1, 1);     // Ramp V1 quickly

// Then move normally
Servo.SetPosition(V0, 150);       // V0 ramps to 150 over time
Servo.SetPosition(V1, 90);        // V1 ramps to 90 quickly
Refer to the ARC scripting reference for the exact Servo.SetAcceleration / Servo.GetAcceleration signatures available in your chosen scripting language. The ezbIndex parameter is optional and defaults to the first EZB.
Why use a virtual port instead of just commanding the PWM port?
Because ARC's standard servo movement commands on a PWM port write directly to the port with no ramping logic in between. There is no place to hook a ramp into a raw D0 write. The virtual port pattern gives this skill a place to intercept the movement: your control or script commands a Vx, this skill sees the event, and only the skill writes to the Dx. From the rest of ARC's perspective, the PWM port is being driven manually by a custom skill - exactly what we want.
This also means you should not drive the mapped Dx port directly from other controls or scripts while ramping is enabled. Doing so will fight the ramp loop, because the skill expects to be the only writer for any mapped PWM port. If you want a non-ramped move, send an acceleration value of 0 along with the movement on the Vx port - the skill will route the immediate write to the PWM port for you.
Example: ramping an eye servo
You have a PWM servo on D2 of EZB #0 that controls the up/down motion of a robot eye. You want eye motion to look natural rather than jerky.
- Open this skill's configuration. Add a row:
- EZB Index:
0 - Virtual Port:
V0 - PWM Port:
D2
- EZB Index:
- Save.
- In whatever robot skill drives the eye (auto position, slider, script, etc.), change the port it writes to from
D2toV0. - Set the Acceleration value for that command (Advanced Acceleration = 5, for example).
- Move
V0. You will seeD2ramp smoothly to the new position.
Repeat the mapping for any other PWM servos you want ramped.
Tuning tips
- Motion still looks jerky? Lower MaxStepSize, lower TickMs, or raise the Acceleration value sent with the command.
- Motion too slow? Lower the Acceleration value (1 is fastest), or raise MaxStepSize.
- Want different ramps for different joints? Set different Acceleration values per virtual port via scripting or per-control Advanced settings. The skill respects whatever each move command carries.
- Want some motions to ramp and others to snap? Send Acceleration = 0 on the snap moves and a positive Acceleration on the ramped moves. The skill will switch behavior per command.
- EZB bus seems busy / Wi-Fi stuttering? Raise TickMs (e.g. 30-50 ms). Fewer updates per second means less bus traffic.
First-move behavior (important)
The very first time a mapped Vx is moved after the skill starts (or after the configuration is changed), the skill writes the target position directly to the PWM port without ramping. This is intentional.
Reason: PWM servos have no position feedback. When a port has never been commanded yet, or has been "released" (no PWM signal), the skill has no idea where the servo physically is. If it assumed a position of 0 and ramped to (say) 150, the servo would whip from wherever it actually is, possibly slamming the robot into something or stripping gears.
To stay safe:
- On the first commanded move per
Vx, the skill checks the PWM port. IfIsServoReleasedis true, or the cached position is belowSERVO_MIN(uninitialized), it snaps directly to the target. You will see a single immediate move on that first command. - Every subsequent move on that same
Vxramps normally from the now-known position. - The same applies after releasing the PWM port mid-session - the next command after a release will snap, then ramping resumes.
Recommended practice: on startup, send each mapped Vx to a known "home" position once. This first move snaps the servo into place. After that, every motion you command on that Vx ramps smoothly. You can do this in a startup script:
// Home the eye servos. These first moves snap (no ramping).
Servo.SetPosition(V0, 90);
Servo.SetPosition(V1, 90);
Sleep(500);

// From here on, all V0/V1 motion ramps.
Servo.SetAcceleration(V0, 5);
Servo.SetAcceleration(V1, 5);
Limitations and gotchas
- This skill works on PWM ports
D0-D23only. Virtual portsV0-V99are the input side only. - Do not write directly to a PWM port that is currently mapped through this skill. The ramp loop and your direct write will fight.
- The skill subscribes to the EZBs referenced by the configured mappings. If you add a new EZB after the skill loaded, reopen the configuration and save to refresh subscriptions.
- Acceleration value semantics here are interpreted by this skill, not by EZB firmware. If you later switch to a controller that honors acceleration natively, remove this skill and the same
Accelerationvalue will be processed by the firmware instead. - Ramps are dropped on save/cancel of the configuration dialog so stale mappings do not keep driving servos.
Summary
| You want... | Do this |
|---|---|
| Smooth PWM servo motion | Map Vx -> Dx, command Vx with Acceleration > 0. |
| Instant move on a mapped servo | Command Vx with Acceleration = 0. |
| The same as before, no ramping involved | Don't map the port. Command Dx directly. |
| Faster ramp | Lower Acceleration, raise MaxStepSize. |
| Slower / smoother ramp | Raise Acceleration, lower MaxStepSize, lower TickMs. |
| Use this skill on a smart servo / Dynamixel | Don't. The servo handles acceleration internally. |
