MQTT client for ARC: connect to brokers, publish/subscribe topics, map incoming messages to variables (incl. binary arrays) and run scripts.
How to add the EZMQTT Client robot skill
- Load the most recent release of ARC (Get ARC).
- Press the Project tab from the top menu bar in ARC.
- Press Add Robot Skill from the button ribbon bar in ARC.
- Choose the Communication category tab.
- Press the EZMQTT Client icon to add the robot skill to your project.
Don't have a robot yet?
Follow the Getting Started Guide to build a robot and use the EZMQTT Client robot skill.
How to use the EZMQTT Client robot skill
MQTT (MQ Telemetry Transport) is a publish-subscribe-based "lightweight" messaging protocol for use on top of the TCP/IP protocol (port 1883). The publish-subscribe messaging pattern requires a message broker. The broker is responsible for distributing messages to interested clients based on the topic of a message.
This is an MQTT Client Control that connects to an MQTT broker and publishes/subscribes to topics. When messages are published to matching topics, the incoming data will be assigned to a variable, and an associated Script (message) will be launched.
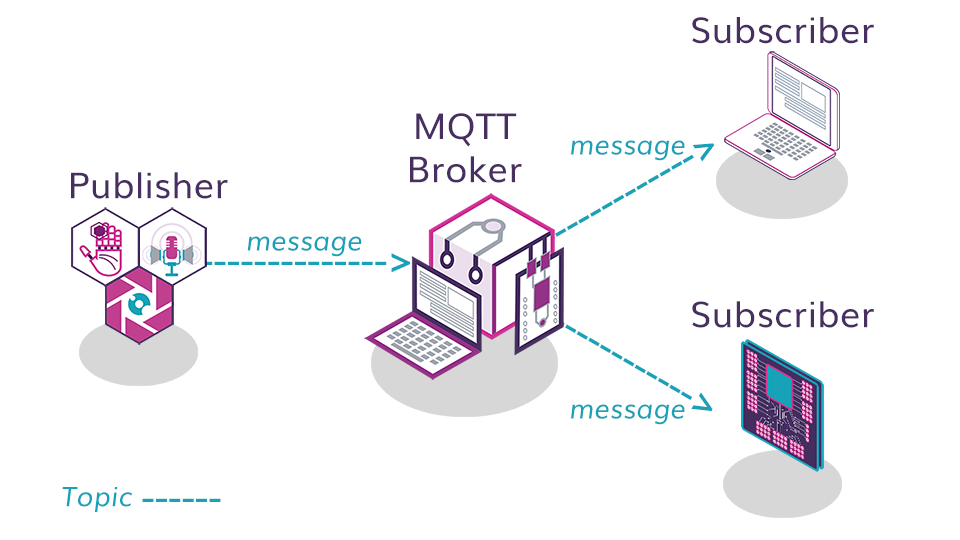
How EZMQTT Works
- Start the EZMQTT Broker
- In the EZMQTT Client Configuration, enter the Broker IP
- In the EZMQTT Client Configuration, enter a topic (Subscription) name
- In the EZMQTT Client Configuration, write a script that sends a message
- Connect Publisher Client(s) to the Broker to publish topic messages
- Connect Subscriber Client(s) to the Broker to receive topic messages
*Note: Clients can be both Publishers & Subscribers. The diagram above is a simplification.
Main Window
1. Client Connect Button This button connects the EZMQTT Client to the Broker. The Client publishes/subscribes to topics and sends/receives messages.
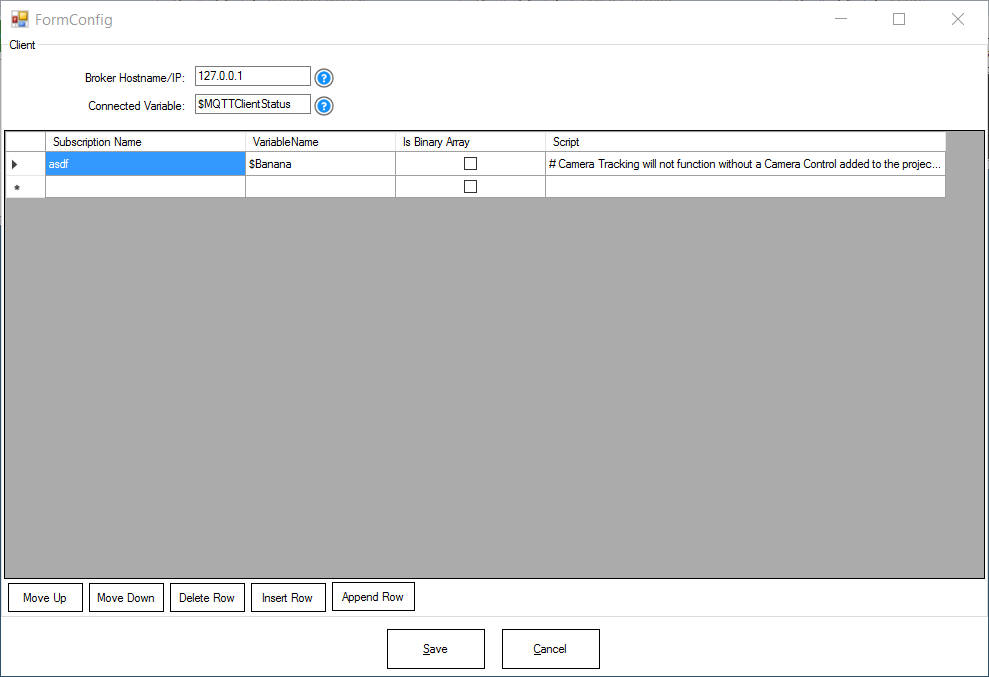
Configuration
1. Broker Hostname/IP Field This field is for entering the IP address of the Broker server to which you'd like the client to connect.
2. Connected Variable Field This variable represents the client's connection status to the broker. True means the client is connected to the broker.
3. Subscription Name Field This is the topic name that other clients will subscribe to.
4. Variable Name Field This variable is used for data that is being shared between clients.
5. Is Binary Array Checkbox If the data from the published messages is expected to be Binary, then check the checkbox. This will assign the data to an Array of the specified variable. If the Binary checkbox is unchecked, the expected data is an alphanumeric string.
6. Script Field This field is for the published topic messages.
7. Topic Management Buttons These buttons are used to add/remove topics, move, or edit topics.
How to Use EZMQTT Client
Add the EZMQTT Client skill to your ARC project (Project -> Add Skill -> Misc -> EZMQTT Client).
In the EZMQTT Client Configuration, add the broker IP address.
In the EZMQTT Client Configuration, add a topic name, variable name, and script (message).
Click the Client Connect button.
Code Samples
Connect Connects to the hostname of the specified MQTT broker. Either the CONNECT button on the control can be pressed, or a ControlCommand() can be passed. If no parameter is defined in the ControlCommand(), the default value from the config is used. Both examples of specifying a hostname and not specifying one are provided below.
# If not connected, connect to local MQTT broker
IF (!$MQTTClientStatus)
  ControlCommand("EZMQTT Client", "Connect", "127.0.0.1")
ENDIF

# Connect to default hostname specified in config
ControlCommand("EZMQTT Client", "Connect")
Disconnect Waits for the MQTT client to complete any necessary work and for the TCP/IP session to disconnect. This can be executed by pressing the DISCONNECT button on the control or by using the ControlCommand() method.
ControlCommand("EZMQTT Client", "Disconnect")
Subscribe Subscriptions to topics are specified in the Config menu of the control. The variable name and script to execute must also be provided. If the data from the published messages is expected to be Binary, then check the Binary box. This will assign the data to an Array of the specified variable. If the Binary checkbox is not checked, the expected data is an alphanumeric string.
Publish Publish specified data to the selected topic. The following commands are...
# Publish a string to the 'asdf' topic
ControlCommand("EZMQTT Client", "PublishString", "asdf", "Hello World")
# Publish binary array to the 'asdf' topic
defineArray($array, 5)
$array[0] = 1
$array[1] = 2
$array[2] = 3
$array[3] = 4
$array[4] = 5
ControlCommand("EZMQTT Client", "PublishBinary", "asdf", "$array")
# Publish a comma separated list of numeric values, variables and strings to the 'asdf' topic
$x = "Hello"
ControlCommand("EZMQTT Client", "PublishBytes", "asdf", $x, 32, "World")
Resources
You may also be interested in the Synthiam EZMQTT Broker from here: https://synthiam.com/Docs/Skills/Misc/EZMQTT-Broker?id=15863Here is a sample ARC project that demonstrates the EZMQTT Client connecting to an EZMQTT Broker: test mqtt.EZB


