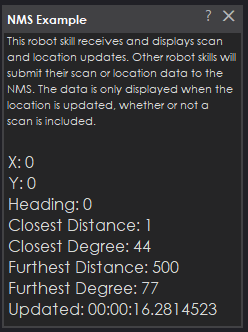
Example NMS Level #1 navigation skill showing subscription to combined scan+location data, displaying position and scan info; source code included.
How to add the NMS Example robot skill
- Load the most recent release of ARC (Get ARC).
- Press the Project tab from the top menu bar in ARC.
- Press Add Robot Skill from the button ribbon bar in ARC.
- Choose the Navigation category tab.
- Press the NMS Example icon to add the robot skill to your project.
Don't have a robot yet?
Follow the Getting Started Guide to build a robot and use the NMS Example robot skill.
How to use the NMS Example robot skill
An Example Project with source code that demonstrates how to create an NMS Level #1 navigation robot skill. In this robot skill, the NMS scan and location(position) data are displayed. Other than a demonstration of how to code a robot skill to receive NMS data, this is entirely useless. The code for this example robot skill demonstrates how something like The Navigator could be made.
Download the source code for this robot skill here: NMS Example Source.zip
This robot skill subscribes to an NMS event that contains combined scan and location data. As scan data is added to the NMS, it is accumulated in a buffer. Once a location data is updated in the NMS, the event is raised which contains both the latest position and scan data.
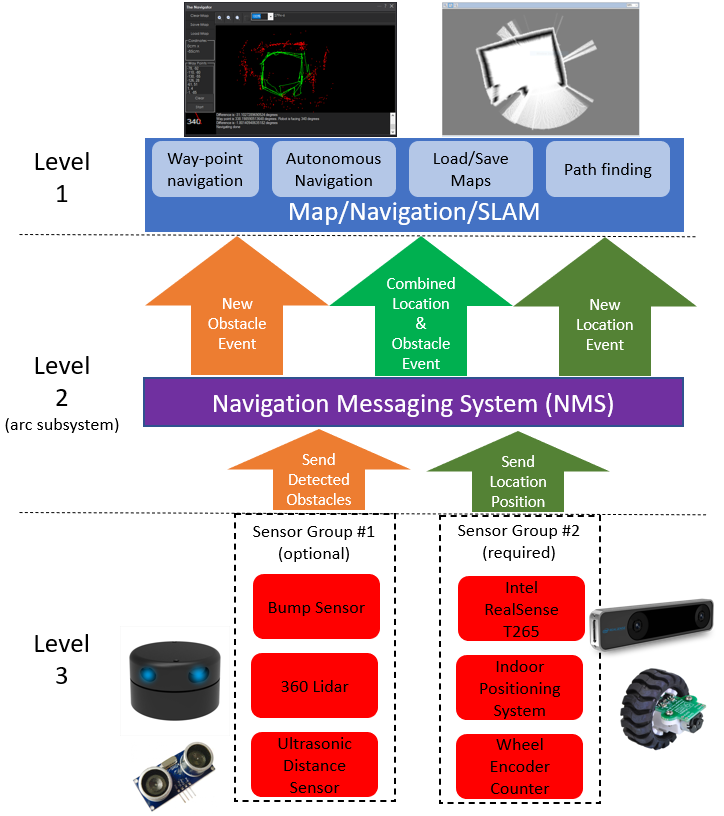
Similar to The Navigator and by referencing the NMS manual, this robot skill will require a (Level #3 Group #2) Location/Position robot skill in order to work. The (Level #3 Group #1) scan data alone does not provide enough information for the robot to determine the location/position. So this robot skill requires some form of a location. Check the NMS manual for more information. Notice how Level #3 Sensor Group #2 is required. Check the NMS manual for sensor group definitions.
The event is assigned in the loading of the form.
    public MainForm() {

      InitializeComponent();

      // do not show a config button in the title bar
      ConfigButton = false;

      // There is a comment on the event method below for this
      ARC.MessagingService.Navigation2DV1.Messenger.OnNewLocationPointScanPoints += Messenger_OnNewLocationPointScanPoints;
    }
We unsubscribe from the event when the form is closed.
    private void MainForm_FormClosing(object sender, FormClosingEventArgs e) {

      // When the form is closing remove the event
      ARC.MessagingService.Navigation2DV1.Messenger.OnNewLocationPointScanPoints -= Messenger_OnNewLocationPointScanPoints;
    }
This event is raised by the NMS when the location point is updated. This event is convenient because it contains both the scan points and location points. The scan points are accumulated until the location point is updated. So all the scan points passed in this event are based on the most recent location.
    private void Messenger_OnNewLocationPointScanPoints(ARC.MessagingService.Navigation2DV1.LocationPointScanPoints locationPointScanPoints) {

      // This event "may" block the NMS
      // Either run your code in a separate thread -or- make sure your code is super fast and great (optimize compiler as well with a release build)

      int closestDistance = int.MaxValue;
      int closestDegree = 0;

      int furthestDistnace = 0;
      int furthestDegree = 0;

      foreach (var scanPoint in locationPointScanPoints.ScanPoints) {

        if (scanPoint.Distance > 0 && scanPoint.Distance < closestDistance) {

          closestDistance = scanPoint.Distance;
          closestDegree = scanPoint.Degree;
        }

        if (scanPoint.Distance > 0 && scanPoint.Distance > furthestDistnace) {

          furthestDistnace = scanPoint.Distance;
          furthestDegree = scanPoint.Degree;
        }
      }

      Invokers.SetText(
        lblDebug,
        $"X: {locationPointScanPoints.LocationPoint.X}" + Environment.NewLine +
        $"Y: {locationPointScanPoints.LocationPoint.Y}" + Environment.NewLine +
        $"Heading: {locationPointScanPoints.LocationPoint.DegreesHeading}" + Environment.NewLine +
        $"Closest Distance: {closestDistance}" + Environment.NewLine +
        $"Closest Degree: {closestDegree}" + Environment.NewLine +
        $"Furthest Distance: {furthestDistnace}" + Environment.NewLine +
        $"Furthest Degree: {furthestDegree}" + Environment.NewLine +
        $"Updated: {locationPointScanPoints.LocationPoint.TimeStamp}");
    }

 Source Code


