

Record and replay EZB communications (servo & digital commands) with forward/reverse playback, save recordings and trigger them from scripts
How to add the Recorder robot skill
- Load the most recent release of ARC (Get ARC).
- Press the Project tab from the top menu bar in ARC.
- Press Add Robot Skill from the button ribbon bar in ARC.
- Choose the Scripting category tab.
- Press the Recorder icon to add the robot skill to your project.
Don't have a robot yet?
Follow the Getting Started Guide to build a robot and use the Recorder robot skill.
How to use the Recorder robot skill
- Not a macro recorder: It does not record your clicks, skill UI actions, or changes you make in skill settings.
- No audio recording: It does not record sound output (for example, music played from SoundBoard).
- Only EZB-connected hardware will “replay”: During playback you will see hardware on the EZB move/change (servos, outputs). You will not see skills themselves “run” or reconfigure.
Tip for beginners: Keep recordings short at first (a few seconds) and build from there.
Beginner Overview: How Recorder “Thinks”
When you press Record, ARC starts capturing the commands it sends to the EZB (example: “servo D0 to position 80”). When you press Stop, it stores that sequence in memory.
When you press Play Forward or Play Reverse, it re-sends those same commands to the EZB so your robot repeats the action.
Main Window
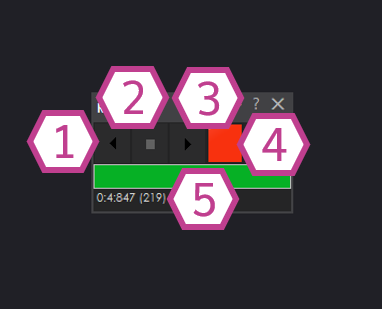
1. Play Reverse
Plays the current recording backwards. This can be useful for “undoing” a motion (for example, returning an arm to its starting position).
2. Stop
Stops the current action. Use this to end a recording or stop playback if you need to interrupt it.
3. Play Forward
Plays the recording in the same order it was captured (the normal playback mode).
4. Record
Starts recording EZB communication. While recording, move servos and change outputs using your other skills—those hardware actions are what gets captured.
5. Progress Bar & Timer
Shows elapsed time while recording and playback position while playing. This helps you see where you are in a recording.
Settings

1. Board Index
Select which EZB connection this Recorder listens to. If you only have one EZB connected, this is usually Board 0.
2. Title
Renames this instance of the Recorder skill. This is important if you add more than one Recorder (for example: one for “Wave”, one for “Walk”, one for “Dance”).
Note: Changing the title also changes the name you use in controlCommand().
Step-by-Step: Your First Recording (Beginner Friendly)
-
Add the Recorder skill to your project:
Project → Add Skill → Scripting → Recorder
- Add the skills you want to use (examples: Servo, Auto Position, Digital Output, etc.) and make sure your EZB is connected.
- In Recorder Settings, confirm the Board Index matches the EZB you’re controlling.
- Press Record.
-
Perform the actions you want to capture using other controls/skills (move servos, toggle digital outputs, etc.).
Tip: Smooth, slower movements often replay better than very fast changes. - Press Stop when finished.
- Press Play Forward to replay, or Play Reverse to run it backward.
Making Multiple Recordings
To store multiple separate recordings (like different “moves”), add multiple instances of the Recorder skill:
- Add another Recorder skill to the project.
- Rename each one using the Title field (example:
Recorder - Wave,Recorder - Nod). - Record different actions in each instance.
Trigger Recorder from Scripts (ControlCommand)
You can start/stop recording and play recordings from ARC scripts using controlCommand().
Replace "Recorder" with the exact Title of your Recorder skill instance.
controlCommand("Recorder", "PlayForward")
controlCommand("Recorder", "PlayReverse")
controlCommand("Recorder", "RecordStart")
controlCommand("Recorder", "RecordStop")Recorder - Wave, your script would use:
controlCommand("Recorder - Wave", "PlayForward")Requirements
You need an EZB I/O Controller (compatible hardware list and setup info): https://synthiam.com/Support/Get-Started/computer-configuration
