
Draws a live floor map of robot movement using Movement Panel, logging direction, distance and heading; configurable speed and turn settings.
Compatible with:
 Windows
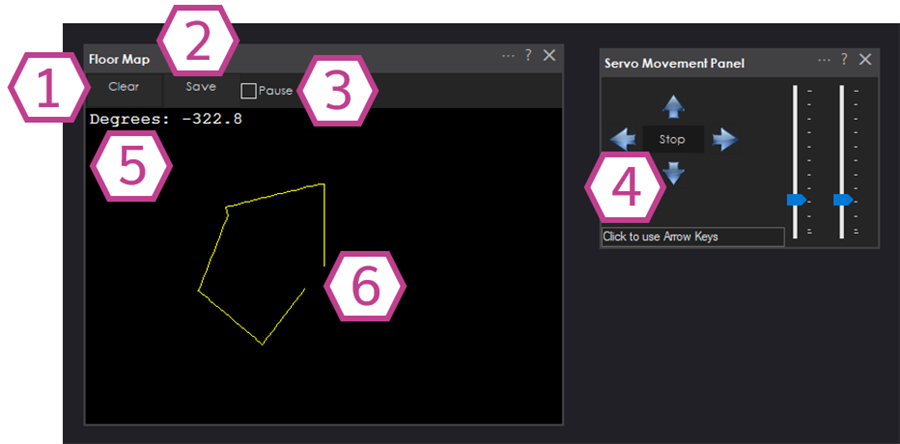
How to add the Floor Map robot skill
- Load the most recent release of ARC (Get ARC).
- Press the Project tab from the top menu bar in ARC.
- Press Add Robot Skill from the button ribbon bar in ARC.
- Choose the Remote Control category tab.
- Press the Floor Map icon to add the robot skill to your project.
Don't have a robot yet?
Follow the Getting Started Guide to build a robot and use the Floor Map robot skill.
How to use the Floor Map robot skill
What this skill does: Floor Map draws a simple “breadcrumb trail” (a line) showing where your robot has driven while you control it from a Movement Panel.
What this skill does NOT do: It does not navigate, avoid obstacles, or know the robot’s real position in the room. It’s a visual log of movement commands over time.
What this skill does NOT do: It does not navigate, avoid obstacles, or know the robot’s real position in the room. It’s a visual log of movement commands over time.
The Floor Map skill begins drawing only when the robot is being driven by a Movement Panel (Forward, Reverse, Left, Right, etc.). As the robot moves, the skill estimates distance and rotation using the settings you provide and draws a line on the map.
Important for beginners: The default settings are rarely correct for your robot. You must “tune” the speed values so the drawn line roughly matches how your robot actually moves.
Different surfaces change results. A robot may drive differently on tile vs. wood vs. carpet. Carpet can cause slipping and inconsistent turning, which makes mapping less accurate.
Different surfaces change results. A robot may drive differently on tile vs. wood vs. carpet. Carpet can cause slipping and inconsistent turning, which makes mapping less accurate.
Main Window
-
Clear Button
Clears the Floor Map display so you can start drawing a new path from a blank map.Tip: Use this before a new test run so your old path doesn’t overlap your new one. -
Save Button
Saves the current Floor Map image as a.jpgfile.Tip: Save after a run to compare results while tuning your settings. -
Pause Checkbox
Temporarily stops the map from updating (drawing).Useful if you want to move windows around or inspect the path without it changing. -
Movement Panel
Floor Map depends on a Movement Panel for driving commands. Add at least one Movement Panel skill to your project.If you don’t drive the robot using a Movement Panel, Floor Map will not know what to draw. -
Degrees Readout
Shows the robot’s current heading (direction) in degrees as the Floor Map estimates it.This is based on your tuning values, not a compass/IMU (unless your movement solution provides that separately). -
Floor Map Line
The drawn line represents the estimated path your robot has traveled while being driven by the Movement Panel.If the line doesn’t match reality, adjust the settings described below.
Settings
-
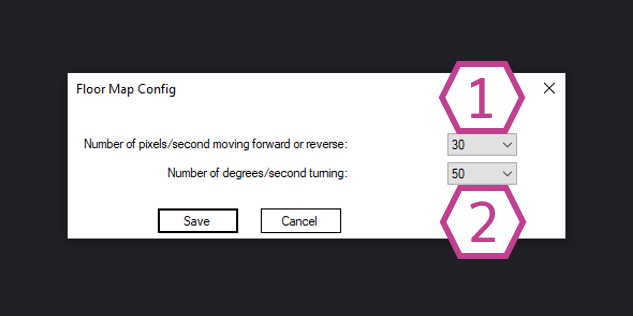
Number of Pixels (per second) Drop-Down
Controls how fast the line moves on the map when you drive Forward or Reverse.- Range: 1–80 pixels/second
- Default: 30
- What it means: Higher value = the map draws longer distance for the same amount of driving time.
Beginner tuning idea: Drive forward for 2–3 seconds in a straight line. If the drawn line is too short, increase the pixels value. If it’s too long, decrease it. -
Number of Degrees (per second) Drop-Down
Controls how fast the heading changes on the map when you rotate Left or Right.- Range: 1–360 degrees/second
- Default: 50
- What it means: Higher value = the map shows quicker turning for the same amount of turning time.
Beginner tuning idea: Try to rotate the robot about 90 degrees (a quarter turn). If the map shows less than 90 degrees, raise the degrees value; if it shows more, lower it.
Why tuning is necessary: Floor Map is estimating movement using “time × speed” values you provide.
If your robot slips, your battery voltage changes, or your surface changes (especially carpet), the estimate will drift.
How to Use Floor Map (Step-by-Step)
-
Add the Floor Map skill
In ARC:Project→Add Skill→Misc→Floor Map -
Add a Movement Panel
In ARC:Project→Add Skill→Movement Panels→ choose a panel style -
Connect and confirm your robot moves from the Movement Panel
Make sure your robot responds correctly to Forward/Reverse/Left/Right before worrying about the map accuracy. -
Tune the Floor Map settings for your robot
Adjust:- Pixels per second until straight driving looks reasonable
- Degrees per second until turning looks reasonable
-
Drive the robot and watch the path draw
Use the Movement Panel to move around. Floor Map will draw the estimated path. -
Clear / Save as needed
Use Clear to restart a run, and Save to capture the map as a.jpg.
Common Beginner Tips
- Start on a hard, consistent surface (tile/wood) before testing on carpet.
- Use short tests (2–5 seconds) while tuning so it’s easy to see what changed.
- Battery level matters: As batteries drain, motors can slow down, which may require re-tuning for best results.
- Expect drift over time: Because this is not true localization, longer runs will usually become less accurate.
