
Lattepanda by DF Robot
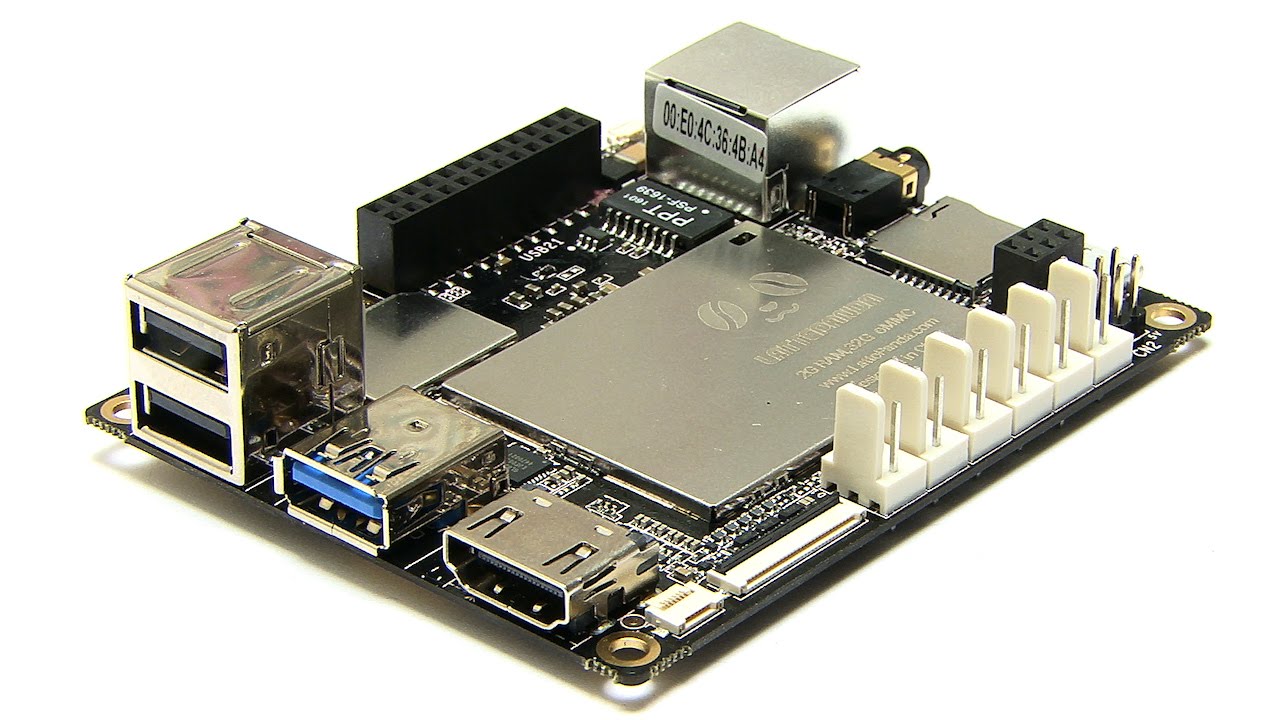
The LattePanda is a small single-board computer (SBC), similar to the Raspberry Pi and a kabillion times more powerful. The LattePanda can run Windows 10 and, therefore, a full version of ARC! The LattePanda also has an Arduino Leonardo built on board, which means you can load the EZB Firmware and have a self-contained and competent PC robot controller. This firmware works with ARC versions greater or equal to 2019.06.25.00.
* Connection Notes *
Due to an undocumented bug feature (?), the Arduino Leonardo's USB, the serial driver, requires DTR Enabled to trigger received data events. This can be done by viewing the Connection Config screen (the same place you set the baud rate) and checking DTR Enabled checkbox.
Arduino Firmware
In the meantime, download the Arduino firmware below. You can program on the Arduino Leonardo that's built into the LattePanda. Adding this firmware lets you connect ARC to the local Arduino and directly control the GPIO.
Download Arduino Leonardo Firmware: EZ-Genuino_Leonardo.zip (updated Dec 11, 2022)
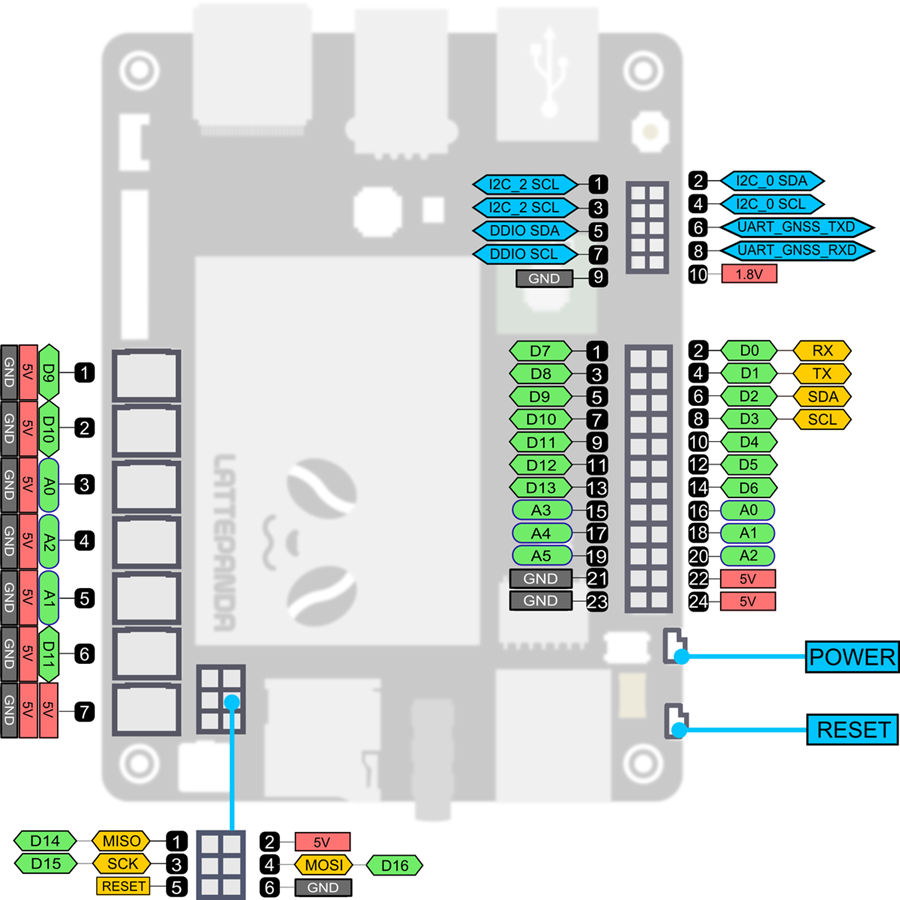
Pinouts
The Digital pins can be used for PWM, servos, and digital on/off. The ADC ports are 0-5 for analog input. Digital pin 0 is Uart #0 RX, and digital pin 1 is Uart #0 TX.
| Board | PWM Pins | PWM Frequency |
|---|---|---|
Uno, Nano, Mini |
3, 5, 6, 9, 10, 11 |
490 Hz (pins 5 and 6: 980 Hz) |
Mega |
2 - 13, 44 - 46 |
490 Hz (pins 4 and 13: 980 Hz) |
Leonardo, Micro, Yún |
3, 5, 6, 9, 10, 11, 13 |
490 Hz (pins 3 and 11: 980 Hz) |
Uno WiFi Rev2, Nano Every |
3, 5, 6, 9, 10 |
976 Hz |
MKR boards * |
0 - 8, 10, A3, A4 |
732 Hz |
MKR1000 WiFi * |
0 - 8, 10, 11, A3, A4 |
732 Hz |
Zero * |
3 - 13, A0, A1 |
732 Hz |
Nano 33 IoT * |
2, 3, 5, 6, 9 - 12, A2, A3, A5 |
732 Hz |
Nano 33 BLE/BLE Sense |
1 - 13, A0 - A7 |
500 Hz |
Due ** |
2-13 |
1000 Hz |
101 |
3, 5, 6, 9 |
pins 3 and 9: 490 Hz, pins 5 and 6: 980 Hz |
PDF Robot has a great shield for the latte panda that powers it from 7-12v and breaks out the I/o for servos and sensors. We highly recommend getting the shield to reduce spaghetti wiring on your robot :). Check it out here: lattepanda shield
EZ-Robot EZ-B v4 Direct Connection
While the onboard Arduino Leonardo is convenient, the amount of gpio is limiting. Those who wish to connect an EZ-B v4 to the LattePanda directly can do so and have full access to the 24-pin, three hardware UART, eight ADC, i2c, digital switching power supply, and real-time streaming audio.
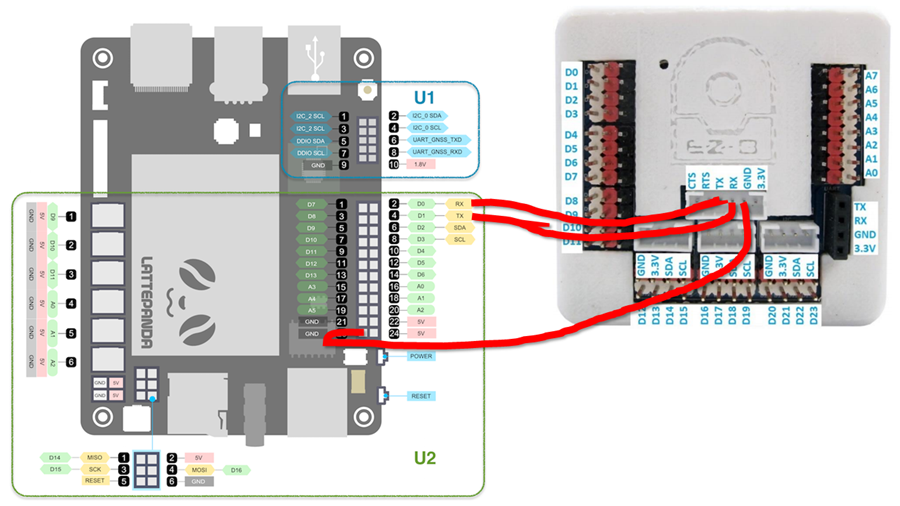
- The camera port of the EZ-B v4 will be used for the hardwired connection. View the datasheet of the EZ-B v4 to see the pinouts of the camera connection. It's best to modify an existing EZ-Robot camera cable to access the pins. Connect the EZ-B camera's TX to LattePanda pin #2 (D0 RX) on the Arduino header. Connect the EZ-B camera's RX to the Arduino header's LattePanda pin #4 (D1 TX). Connect the EZ-B camera's GND to LattePanda pin #23 (GND) on the Arduino header.
- The EZ-B v4 web configuration must be configured in the Advanced Tab to change the Serial/USB Connection to 256000 BAUD. This is done by connecting to the EZ-B v4 via Wi-Fi and visiting https://192.168.1.1 in your browser. Select Advanced Settings and change the Serial/USB Connection dropdown to 256000. Press the Save and Reboot button.
- Upload the following program to the onboard Arduino Leonardo on the LattePanda: EZB_Passthrough.zip. Due to the lack of hardware UARTs on the LattePanda, this converts the onboard Arduino Leonardo into a USB UART adapter at 256,000 baud.
- In ARC, press the CONFIG button on the connection control and enable DTR Enable.
- Select the COMx port from the drop-down in the connection control and press CONNECT. You are now connected to the EZ-B v4 via hardwire for instant response and no latency.
Installation Tips & Performance for SBCs
We have a guide in the Support section that includes steps on freeing storage space, increasing the performance, powering the SBC, and running headless with remote desktop software of robot computers, such as single-board computers. View the instructions HERE.

I added details on this page of how to connect an EZ-B v4 directly to the lattepanda's arduino uart port for no latency fast connectivity. The LattePanda's Leonardo may be limiting in gpio for you, so the above instructions explain how to expand the gpio with an EZ-B v4.
Hi DJ, thanks for the details to connect an EZ-B to the lattepanda. I have a question, though: in this configuration, can you still use the other pins of the lattepanda's Leonardo, or it is only the EZ-B you can use in ARC ?
Only the EZ-B in ARC. The LattePanda is consumed with transmitting and receiving data between the Intel CPU and EZ-B. However, the LattePanda doesn't give you much I/O anyway.
If you want to use the LattePanda's Leonardo I/O, then use the first version of the firmware. However, you are limited to only a few I/O and no hardware UART.
Thanks DJ for the clarification. As I have just bought the Gravity IO Expansion Shield you suggested in the other post, now I have a choice to make... :-)
Haha yeah. It’s a tough choice. The ezb I find is super convenient because the Leonardo on the pi still has a few quirks. I find not all ports can control servos. Sometimes the Leonardo reboots when moving too many servos at once. I think it’s the way arduino handles servos by connecting to pwm timers. There’s a limited number of timers so it has issues if you exceed that. Give it a try and let me know your experience
I am trying to decide which Panda to get, 32 Gig or 64 Gig. Does anyone know if an extra storage device can be added to this panda like adding a solid state portable terabyte hard drive and still have all the robot controller functions working at same time?I assume there must be extra SD card storage but the portable drives are way bigger and usually need the USB port. Thinking for camera footage to be stored this way from robot cam.
I don't know about any of that but when buying a computer or laptop I've always bought one with as much power and space as I could afford. Keep it simple and powerful. I often got over powered rigs but never was disappointed by their performance.
It has usb 3 so you can add an external solidstate drive. Blue usb connector is usb3
I never ever suggest running any software off an sdcard. It’s much to slow. A usb3 drive will have a theoretical transfer speed limit of 5gbps. A sdcard is between 2mbps and 4mbps
also, always buy ssd drives. They’re so cheap. $15 for a 120 gb ssd