
Create custom animations for JD Humanoid's 18 RGB Eyes LEDs via I2C - per-LED color frames, transitions, pauses, scripting and real-time preview.
 Hardware Info
 Source Code
How to add the RGB Animator robot skill
- Load the most recent release of ARC (Get ARC).
- Press the Project tab from the top menu bar in ARC.
- Press Add Robot Skill from the button ribbon bar in ARC.
- Choose the I2C category tab.
- Press the RGB Animator icon to add the robot skill to your project.
Don't have a robot yet?
Follow the Getting Started Guide to build a robot and use the RGB Animator robot skill.
How to use the RGB Animator robot skill
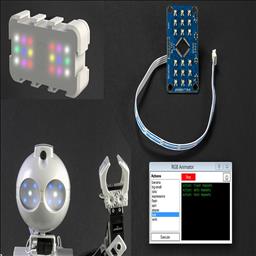
The RGB Animator skill lets you create colorful patterns and animations for the 18 RGB LEDs found in:
- EZ-Robot JD Humanoid eyes
- RGB Eyes EZ-Bit (18 RGB LED PCB / Block)
RGB Animator communicates with the RGB Eyes using the I2C interface. If the RGB Eyes are not connected to the EZ-B’s I2C pins/port and you run the skill, it can cause the EZ-B to lock up (freeze) because ARC is waiting for a device that isn’t there.
Beginner tip: Always connect the RGB Eyes to I2C and power before pressing Execute.
Main Window
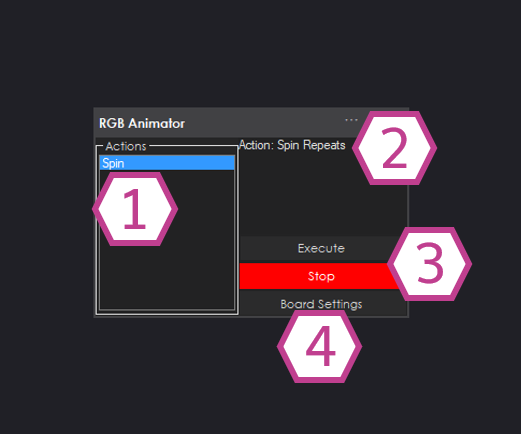
What You See in the Main Window
1. Action List
This is a list of the animations you have created (called “actions”). Click an action once to select it.
The selected action is the one that will run when you press Execute.
2. Status Display
Shows the most recent message from the skill (for example: started, stopped, running action name, etc.).
If something isn’t working, check here first.
3. Execute / Stop Buttons
Execute runs the currently selected action.
Stop immediately stops an action that is running (very useful if you enabled looping).
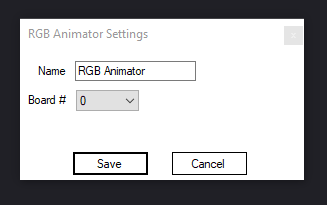
4. Board Settings Button
Opens a pop-up where you can:
- Change the skill title (the name shown on the control in ARC).
- Select the EZ-B board index (which EZ-B to use if you have more than one connected).
controlCommand() calls that reference this skill.
Configuration – Actions
Actions are made of frames. A frame is a “snapshot” of what color each of the 18 LEDs should be. When multiple frames play in order (with pauses/transitions), you get an animation.
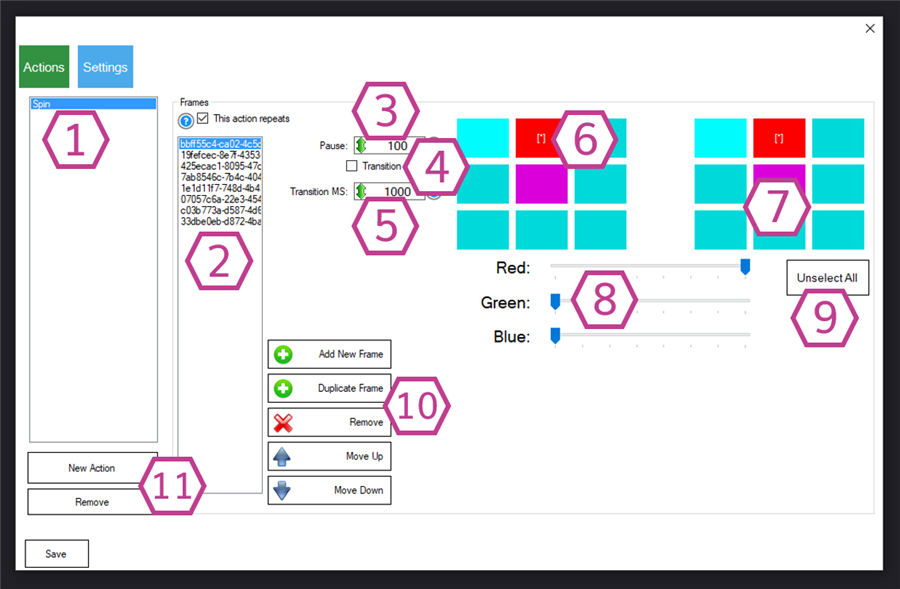
Actions Screen (Numbered Items)
1. Action List
Shows all actions you’ve created. Select an action here to edit its frames.
2. Frame List
Shows frames for the currently selected action. Frames play from top to bottom.
- Loop checkbox (above the frame list): when enabled, the animation repeats until you press Stop.
- Beginner tip: Leave looping off while testing, then turn it on once you like the animation.
3. Pause Drop-down
Sets the delay between frames (how long a frame stays on screen before the next frame).
Range is 0–5000 ms in steps of 100 ms.
- Right-click to type a custom value (5000 or below).
- Example: 200 ms makes a quick animation; 1000 ms makes a slow “blink” style animation.
4. Transition Checkbox
When enabled, the skill will fade (transition) from the current frame to the next frame instead of switching instantly.
5. Transition Drop-down
Sets how long the transition fade lasts (0–5000 ms).
Right-click to type a custom value (5000 or below).
6. Cursor (LED Selection)
The cursor(s) select which LED(s) you are editing. The selected LED squares are the ones affected by the color sliders.
- You can select multiple LEDs at once to set several LEDs to the same color quickly.
- The cursor color updates to show the combined RGB value you’re creating.
7. LED Display (18 LEDs)
This is a visual map of the 18 RGB LEDs in their physical order on the RGB Eyes board.
Each square represents one LED and shows its current color for the selected frame.
8. Red / Green / Blue Sliders
Use these to mix colors for the selected LED(s):
- Higher red = more red
- Higher green = more green
- Higher blue = more blue
- Example: Red + Green = Yellow, Red + Blue = Purple, all three high = White.
9. Unselect All Button
Clears all selected LEDs (removes all cursors). Use this when you want to start a new selection.
10. Frame Management Buttons
Tools to edit the frame list:
- Add a new frame
- Duplicate the selected frame (great for making small changes between frames)
- Remove a frame
- Move Up / Down to change playback order
11. Action Management Buttons
Add a new action or remove an existing action from the Action List.
Configuration – Settings
Settings Screen (What Each Option Does)
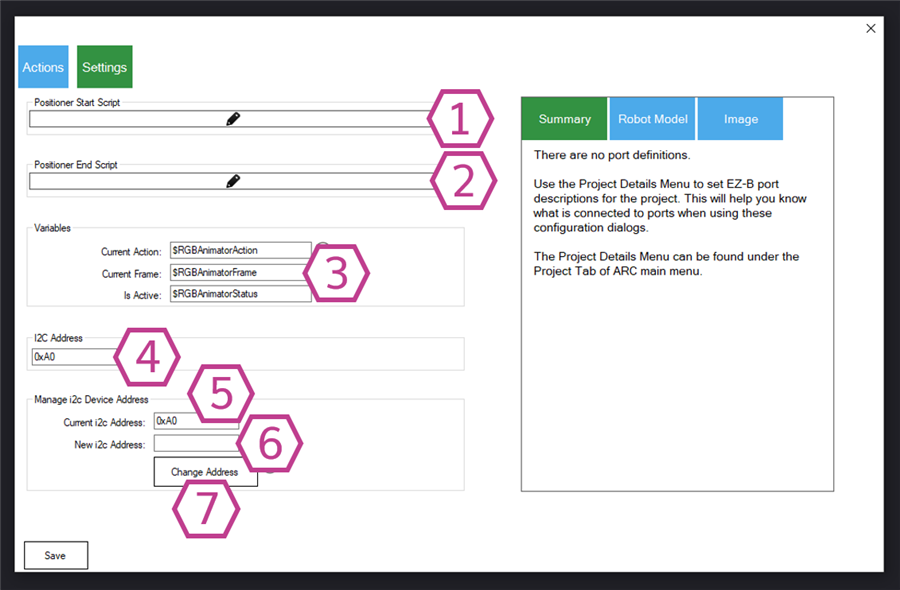
1. Animator Start Script
This ARC script runs automatically every time you execute any action in this skill.
Use it for things like setting robot states, playing a sound, or logging information.
2. Animator Stop Script
This ARC script runs when an action is stopped or when it finishes.
Use it to reset variables, turn off lights, or trigger the next behavior.
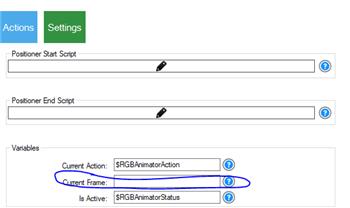
3. Variable Fields
These variables show what the animator is currently doing:
- Current action name/index
- Current frame
- Status (running or stopped)
4. I2C Address Field
The I2C address is like the device’s “ID” on the I2C bus. The RGB Eyes use a single-byte address.
You only need to change this if you plan to use more than one RGB Eyes device on the same I2C bus.
5. Current I2C Address Field
The address the device is using right now (the “from” address).
6. New I2C Address Field
The address you want the device to switch to (the “to” address).
7. Change Address Button
Sends the command that updates the RGB Eyes hardware to the new I2C address.
The default address is
0xa0. If you changed it and forgot the new address, see this forum thread:
How to recover RGB Animator I2C address.
It explains how to scan for I2C addresses (for example with an Arduino) and change it back.
How to Use RGB Animator (Beginner Walkthrough)
-
Add the skill to your project:
In ARC, go toProject→Add Skill→I2C→RGB Animator. -
Confirm hardware is connected:
Make sure the RGB Eyes are connected to the EZ-B I2C interface and powered on. -
Create an action:
Open Configuration and, on the Actions tab, click Add under Action Management to create a new action (for example: “Blink”, “Happy”, or “Rainbow”). -
Add frames to your action:
Click Add Frame a few times. Think of each frame as one “pose” for the LED colors. -
Set LED colors for each frame:
Click one or more LED squares (the 18 black squares) to select them, then adjust the R/G/B sliders. The RGB Eyes update in real time so you can immediately see your changes. -
Set timing (optional):
Choose a Pause between frames. Turn on Transition if you want a smooth fade and set the transition time. -
Test your animation:
Go back to the Main window, select your action in the Action List, and press Execute. Press Stop to interrupt (especially if looping is enabled).
Video
Requirements
The RGB Animator skill is compatible with:
Resources
The hardware design for this skill is open source. Files are available here: https://github.com/synthiam/E-64_RGB_Eyes.
Control Commands for the RGB Animator robot skill
There are Control Commands available for this robot skill which allows the skill to be controlled programmatically from scripts or other robot skills. These commands enable you to automate actions, respond to sensor inputs, and integrate the robot skill with other systems or custom interfaces. If you're new to the concept of Control Commands, we have a comprehensive manual available here that explains how to use them, provides examples to get you started and make the most of this powerful feature.
Control Command ManualAutoPositionStop
Stop the current LED animation that's playing.
Example: controlCommand("RGB Animator", AutoPositionStop)
Related Tutorials
Rgb Array Tutorial

Explanation And Uses Of Arrays.
Related Robots

Related Questions
Is It Possible To Read The RGB Values From JD Eyes

3 Pin Connect Rgb
Error With RGB

Upgrade to ARC Pro
Unleash your creativity with the power of easy robot programming using Synthiam ARC Pro
Hi, I want to connect an additional RGB panel to JD, the same panel as its eyes. How can I control both RGB panels separately (i'm using C# SDK)?
thank you, Orit
and additional question - how do I know the i2c address of the external rgb led array? when i try to connect it and disconnect the eyes, I still unable to control the external array.
Orit - the default i2c address of the RGB Eyes is 0xA0. This is visible in the configuration window for the control. If two RGB Eyes are connected to the EZ-B, they will both respond to the same address by default. Meaning, they'll duplicate the behavior.
In order to have two separate operational devices, you'd need to change the i2c address of one RGB eyes. You can do this in the RGB Eyes Config menu - For example, you can change the address to 0xA2 (since it must be a 7 bit address).
Be careful! If you change the address to an incorrect or incompatible address, the RGB eyes will be permanently damaged and need replacement.
OK, got it, thanks!