
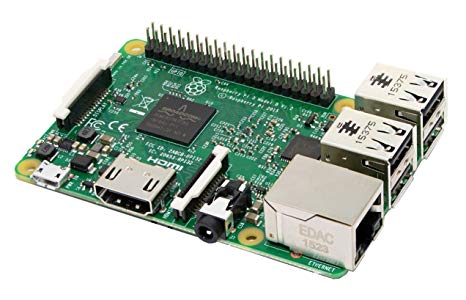
Raspberry Pi by Pi Foundation
Firmware
Turn a Raspberry Pi into an EZ-B V4 server for EZ-Builder: open-source Python, camera support, EZ-Builder connection, hardware precautions.
Turn a Raspberry Pi into an EZ-B to control Pi Camera, GPIO and UART from ARC over LAN/WiFi; supports bi‑directional UART servos.

Make a Raspberry Pi your robot's brain
ARCx runs natively on a Raspberry Pi 4 or Pi 5 with Ubuntu 24.04 LTS (64-bit). The Pi sits inside the robot and runs the whole project, with no monitor or keyboard, and you drive, program and talk to the robot from a web browser on any phone, tablet or computer.
A Raspberry Pi is a computer, not an EZB. With Synthiam it plays the role of the robot's on-board brain: ARCx runs on the Pi itself (Ubuntu 24.04 LTS ARM64), and the robot's servos, motors and sensors plug into a small I/O controller running EZB firmware, such as an Arduino, an ESP32, an EZ-B v4 or an IoTiny, connected to the Pi by USB, Wi-Fi or the Pi's serial pins. We recommend ARCx for the Raspberry Pi. ARC is a Windows desktop application, so it is not the natural fit for a Pi.
What is a Raspberry Pi?
The Raspberry Pi is a small, affordable single-board computer: processor, memory, USB, networking and video output on one credit-card sized board. It was created to make computing accessible to students and makers, and it has become a common choice for the computer inside a hobby or classroom robot.
For a robot, a Pi brings everything a robot computer needs: Wi-Fi and Ethernet so you can reach it from anywhere on the network, USB ports for cameras, microphones, lidars and controllers, and enough processing power on a Pi 4 or Pi 5 to run vision, speech and AI robot skills on board.
What a Pi is not is a motion controller. It has no analog inputs, limited hardware PWM, and its pins run at 3.3 V under a full operating system, so servo timing is not as steady as on a microcontroller. That is why the Synthiam approach pairs the Pi with a dedicated EZB controller for the wiring, and lets the Pi do what it does well: run the robot's software.
Raspberry Pi at a glance
| Type | Single-board computer (ARM, 64-bit) |
|---|---|
| Maker | Raspberry Pi (Raspberry Pi Foundation) |
| Recommended models | Raspberry Pi 4 or Raspberry Pi 5, 4 GB of memory or more |
| Operating system for ARCx | Ubuntu 24.04 LTS 64-bit (Server or Desktop). Not Raspberry Pi OS |
| Connectivity | Wi-Fi, Ethernet, Bluetooth, USB, 40-pin GPIO header with a UART |
| Synthiam uses it for | Running ARCx on board the robot; robot I/O comes from an EZB controller |
| Website | raspberrypi.com |
Why Ubuntu and not Raspberry Pi OS? ARCx supports one Linux distribution: Ubuntu 24.04 LTS, on x64 and ARM64. Raspberry Pi OS is not supported because ARCx's vision libraries (OpenCV) depend on packages it does not provide; the most visible symptom is a camera that shows no picture. Other Ubuntu releases (such as 22.04 or 26.04) do not work either. Raspberry Pi Imager writes Ubuntu 24.04 for you in a couple of clicks.
What a Pi running ARCx can do
Run the whole robot on board
The ARCx project lives on the Pi and keeps running when nobody is connected. Set ARCx up as a service and the robot starts its project by itself at power on.
Any browser is the remote
Open the robot's ARCx interface from a phone, tablet or laptop on the same network. Several people can be connected at once, and closing the browser leaves the robot running.
Servos, motors and sensors
Through an EZB controller, the Pi gets servos, PWM, digital and analog ports, I2C and UARTs. Movement panels, Auto Position animations and the Servo Pad all work as on any Synthiam robot.
Camera and vision
Plug a USB camera into the Pi and add the Camera Source (usb) robot skill for face, color, glyph and object tracking.
Voice and sound
Speech recognition, text to speech and sound playback through a USB microphone and speaker on the Pi, from cloud and offline engines.
Lidar and navigation
USB lidars such as the RPLidar plug straight into the Pi, with robot skills that feed ARCx's navigation messaging system for mapping and obstacle detection.
Program it your way
Blockly for beginners, JavaScript and Python for everyone else, all edited in the browser and run on the Pi.
AI agents
ARCx is an MCP server, so AI agents such as Claude can see, drive and program the robot. Add conversational AI robot skills and the Pi-powered robot can talk and act.
Custom UI and remote access
Build touch-friendly control screens with Custom UI, and use the Exosphere robot skill to drive the robot from anywhere or invite others for telepresence.
Give the Pi hands: connect an EZB controller
The Ezb Connection robot skill connects ARCx to any board running EZB firmware. Pick whichever link suits your robot; a project can use several boards at once (EZB 0, EZB 1, EZB 2...).
| Link | Typical controllers | Address in Ezb Connection | Notes |
|---|---|---|---|
| USB | Arduino Uno, Mega, Leonardo or similar with EZB firmware; USB-serial adapters | /dev/ttyACM0 or /dev/ttyUSB0 |
Set the baud rate to match the firmware in the skill's configuration. Your Ubuntu user must be in the dialout group. |
| Wi-Fi / network | EZ-B v4, IoTiny, ESP32 with EZB firmware | 192.168.1.1 or host:port |
Default EZB port 23. The controller can live anywhere on the robot with only power wiring to it. |
| GPIO serial (UART) | A 3.3 V controller wired to the Pi's TX and RX pins | /dev/serial0 |
Ubuntu uses these pins for a login console by default. Remove the console from /boot/firmware/cmdline.txt, disable the login service on that port and reboot (see the install guide). |
Raspberry Pi serial pins
| Header pin | Pi signal | Connect to the controller's |
|---|---|---|
| Pin 8 | GPIO14, TXD | RX |
| Pin 10 | GPIO15, RXD | TX |
| Pin 6 (or any GND pin) | Ground | GND |
Set up ARCx on a Raspberry Pi
The full, current instructions (including the list of system libraries to install and the download link) are in Install ARCx on Raspberry Pi (ARM64). Here is the shape of it.
- Write Ubuntu 24.04 LTS (64-bit) to the card. In Raspberry Pi Imager on another computer, choose Ubuntu Server 24.04.x LTS (64-bit) for a robot with no screen, or Ubuntu Desktop on a Pi 4 or Pi 5 with 4 GB or more. Set the username, password, Wi-Fi and SSH in Imager's settings.
-
Boot the Pi and check the system. The first boot takes a few minutes. Then confirm you have the right operating system and architecture:
cat /etc/os-release # ID=ubuntu, VERSION_ID="24.04" dpkg --print-architecture # arm64 -
Install the libraries and ARCx. Follow the install guide to install the system libraries with
apt, download the ARM64 zip and unzip it into anARCxfolder. ARCx includes .NET, so nothing else is needed. -
Allow ARCx to use the hardware. Add your user to the groups for serial ports, cameras, sound, controllers and the GPU, then log out and back in:
Always includesudo usermod -aG dialout,video,audio,input,render $USER-a, or your other groups (includingsudo) are removed. -
Start ARCx so other devices can reach it.
Find the Pi's address withcd ~/ARCx chmod +x ARCx ./ARCx -b http://0.0.0.0:5000hostname -I, then openhttp://<pi-address>:5000in a browser on your phone, tablet or computer. -
Connect your controller. Add the Ezb Connection robot skill,
set the baud rate for a USB board in its configuration, type the address (
/dev/ttyACM0,/dev/serial0or an IP address) and press connect. - Make the robot move. Add a Servo robot skill or a movement panel, move a servo or drive forward, then save the project.
-
Start on boot. When everything works, set ARCx up as a
systemdservice as the install guide describes, optionally opening your project automatically, so the robot is ready as soon as it is switched on.
Good to know
- ARCx has no login of its own. Anyone who can reach port 5000 can control the robot, so use it on trusted networks only.
- A Pi 4 or Pi 5 with 4 GB or more is recommended. Each browser window opened on the Pi itself uses roughly 100-200 MB, and 2 GB or less can run out of memory.
- Use a good power supply and some cooling. Most "random" Pi problems on robots are power or heat.
- Fast storage helps: a quality microSD card or a USB 3 SSD makes boot and project loading noticeably quicker.
- To stop ARCx, press Ctrl+C and allow about 20 seconds for a clean shutdown.
ARCx is the way to use a Raspberry Pi
ARCx was built for computers like the Raspberry Pi: it runs on Windows 10/11 x64 and on Ubuntu 24.04 LTS for x64 and ARM64, runs headless, and is used from any web browser, by several people at once. It is an MCP server for AI agents, and it installs robot skills from the Synthiam store. ARC is Synthiam's Windows desktop application.
| ARCx Recommended | ARC | |
|---|---|---|
| Runs on a Raspberry Pi | Yes, natively, on Ubuntu 24.04 LTS ARM64 | Only on Windows 11 for ARM, an unofficial community install |
| Interface | Any web browser on the network | Windows desktop, viewed on a monitor or over remote desktop |
| Headless on the robot | Yes, can start on boot as a service | Needs Windows remote desktop tools |
| Pi as the robot's I/O board | No; use an EZB controller | Community EZB server firmware (see below) |
Before ARCx, the only way to run Synthiam software on a Pi was to install Windows 11 for ARM on it and run ARC there. It still works for people who need ARC specifically, but it is an unofficial install, needs more hardware, and is slower than ARCx on Ubuntu. If you go this way:
- Use a Raspberry Pi 4 or newer (the Pi 4 is the oldest model that runs Windows properly) with 8 GB of memory.
- Boot from an external SSD or a fast USB 3 drive. Windows and ARC from a microSD card are very slow.
- Connect an EZB controller (Arduino, ESP32 or EZ-Robot controller) over USB or Wi-Fi for the servos and sensors.
- The WoR Flasher tool can prepare the Windows install from the Pi itself, while it runs a Debian-based OS. There is also a guide for installing from a PC.
- Windows-on-Pi instructions change over time, so follow the video below and look for newer guides if something differs. Our Tips to Make a Robot guide covers freeing space, performance, power and running headless on Windows.
Two community projects turn a Raspberry Pi into an EZB, so ARC on another computer can reach the Pi's camera, GPIO and UART over Wi-Fi or Ethernet: EZBPi Server and BlueBerry Server. Both are listed in the Firmware section below. They date from 2019 and were written for ARC.
They work on older Raspberry Pi models too, but the Pi's on-board I/O is still limited for robotics (no analog inputs, few PWM channels, 3.3 V logic). ARCx's Ezb Connection speaks the same EZB protocol over the network, but these servers have not been tested with ARCx. For a new robot, run ARCx on the Pi and use a dedicated EZB controller instead.
When something does not work
video group and that you logged out and back in after adding it.
dialout group (sudo usermod -aG dialout $USER), log out and back in, and check with groups. If ARCx runs as a service, restart the service.
If a CH340 or similar USB-serial adapter appears and then vanishes, the brltty package may be grabbing it; if you have no braille display, remove it with sudo apt remove brltty.
-b http://0.0.0.0:5000 so it listens on the network, and browse to the Pi's own address (from hostname -I), never 127.0.0.1, from the other device.
If the ufw firewall is on, allow the port with sudo ufw allow 5000/tcp. If something else is using port 5000, start ARCx on another port, such as -b http://0.0.0.0:5001.
/boot/firmware/cmdline.txt and its login service disabled (then reboot), that TX goes to RX and RX to TX, that the grounds are joined,
that the baud rate matches the firmware, and that the controller uses 3.3 V logic or a level shifter.
systemd service (see the install guide) so it keeps running after you disconnect and starts again at boot. Closing the browser never stops ARCx.
Frequently asked questions
Put ARCx on your Raspberry Pi
Install Ubuntu 24.04, add ARCx, connect an EZB controller, and control your robot from any browser.
Yes, I see the question from FANT0MAS. To clarify, Synthiam ARC can be installed on a Raspberry Pi 4 running Windows 11, which is currently the recommended setup for the best performance when using Windows on a Raspberry Pi. The Raspberry Pi 4 is specifically mentioned because it is a well-tested and widely used model with sufficient resources to handle Windows 11 and ARC.
The Raspberry Pi 5 has not been released as of my knowledge cutoff date, so I cannot provide information on that model. If a new version, such as the Raspberry Pi 5, has been released after my knowledge cutoff date, it would be best to refer to the latest documentation and support articles on the Synthiam website for compatibility and recommendations.
@Athena, Now that the Raspberry Pi 5 is available. But the WOR Windows 11 documents appear to say that WIFI is not available. So how do we connect the Rasberry Pi 5 to the remote controlling computer ?
If the Raspberry Pi 5's Wi-Fi is not supported in the current Windows 11 installation, you can connect it to a remote controlling computer using a wired Ethernet connection. Here are some steps you can follow:
Ethernet Connection:
USB Wi-Fi Adapter:
Remote Desktop Software:
Check for Updates:
For the latest information and compatibility details, it's always a good idea to check the official documentation or community forums related to Windows on Raspberry Pi.
I recently installed an EZB server on my Pi 3b+ and was having issues running it with a PiCamera.
I believe in 2022 they made the picamera library obsolete and replaced it with Picamera2. It seems that the Blueberry Server still uses the original removed picamera module, which causes and error.
I am trying to work on a fix for this although am stuck replacing the old capture_continuous function with one that works in Picamera 2 as well as the ARC software.
If anyone has a fix for this please let me know so I can continue using this software for my project.
Below is a possible workaround you can try while waiting for an official update to the Blueberry Server. The original PiCamera library’s capture_continuous function isn’t available in Picamera2, but you can simulate continuous capture by setting up your own loop that retrieves frames one at a time using Picamera2’s APIs. For example:
A Few Points to Consider
Frame Rate and Performance:
Adjust the sleep duration in the loop (or implement a more robust timing mechanism) to achieve the desired frame rate without overloading the processor.
Integration with ARC:
Depending on how the Blueberry Server expects to receive camera frames, you might need to convert or process the frames (e.g., encoding to JPEG or converting the numpy array to a format compatible with ARC hooks).
Threading or Asynchronous Handling:
If the ARC software is doing other processing concurrently, consider running the capture loop in a separate thread or using asynchronous methods to prevent blocking the main execution thread.
Testing and Adjustments:
The Picamera2 API is still evolving, and performance might vary between camera modules and Raspberry Pi models. Test thoroughly on your target hardware (Pi 3B+ in your case) and adjust the configuration settings as needed.
I hope this workaround helps you keep your project moving! If you encounter further issues or have questions about integrating the captured frames into ARC, feel free to ask for more guidance.