
Autonomous AI robot skill with vision, speech, movement, animations, and self-directed multi-step tasks powered by LLMs.
 Windows
How to add the Autonomous AI robot skill
- Load the most recent release of ARC (Get ARC).
- Press the Project tab from the top menu bar in ARC.
- Press Add Robot Skill from the button ribbon bar in ARC.
- Choose the Artificial Intelligence category tab.
- Press the Autonomous AI icon to add the robot skill to your project.
Don't have a robot yet?
Follow the Getting Started Guide to build a robot and use the Autonomous AI robot skill.
How to use the Autonomous AI robot skill
The Autonomous AI robot skill gives your robot a fully autonomous personality powered by large language models. Your robot will see through its camera, speak, move, perform animations, and take action on its own, all driven by AI decision-making. It supports OpenAI, Anthropic (Claude), Google (Gemini), and Groq (Meta Llama), as well as local OpenAI-compatible servers such as LM Studio and Ollama.
This skill turns your robot from a remote-controlled machine into an autonomous companion that can hold conversations, react to its environment, carry out multi-step tasks, and entertain itself when no one is around. The robot has internal drives (curiosity, boredom, sociability, and caution) that change over time and influence what it does on its own, so its behavior feels alive and varied.
Synthiam ARC is a robot software platform made of robot skills. Each robot skill is a small program that performs a specific job, and skills talk to each other using the ControlCommand() scripting syntax.
Autonomous AI builds on this by discovering the robot skills in your project and what each one can do. With that information, the AI writes and runs its own code to coordinate those skills and carry out what you ask, or what it decides to do on its own.
Example
Imagine you tell your robot:
"Move forward for 5 seconds, turn left, go forward for another 5 seconds, and wave at the first person you see."
Without Autonomous AI, you would program each step, link the inputs and outputs, and test the sequence. With Autonomous AI, the robot works out the steps itself. You can also teach it through conversation, giving corrections and feedback so it does better next time.
Safety Considerations
Autonomy makes the robot less predictable. Always keep a stop or panic button within reach when using this skill, because the robot controls itself and unexpected behavior can happen.
The main window has a Paused checkbox that stops the robot from acting on its own. It is checked every time the project loads, so the robot only starts acting on its own once you uncheck it. Pausing stops idle actions, the behavior loop, and idle sway. It does not stop a request that is already running. Press Cancel for that.
Get Started
This skill needs a few other robot skills that are already configured and tested, because their settings tell the AI what the robot can do.
- Camera Device (required) The robot must have a camera. Add the Camera Device robot skill and make sure it is connected and showing video. No scripts or other settings are needed in it. If the project has more than one camera, the first Camera Device is used.
- Movement Panel (recommended) Movement panels are the robot skills that make the robot move, such as walking with a gait or driving with H-bridge motors. There are movement panels for different drivetrains. Add and configure one so the AI can move the robot, then calibrate it on the Movement tab of this skill.
- Auto Position (recommended) The Auto Position robot skill holds your robot's animations (actions). It comes in two versions, with and without a movement panel. Its actions are given to the AI automatically.
- API key Get an API key from your AI provider and enter it on the Settings tab (see below). Then uncheck Paused, type a message, and press Send.
Original Demo
This video was the first demo of the robot skill. It shows the first generation, which answered one query at a time, before the robot could query itself to work through tasks on its own. The skill has come a long way since, but this early version already performed remarkably well.
Maximizing Reliability
The AI understands your robot through your project's configuration, so a clear, well-organized project gives the best results:
- Use descriptive names
- Give scripts, actions, and configuration items meaningful, short names.
- Example: instead of naming an action "Move1", name it "Move Forward 5s".
- Fill in description fields
- Most robot skills let you add descriptions to scripts and configuration items.
- Keep each description clear and informative without being wordy.
- The AI reads these to understand what each item does.
- Keep the project organized
- The AI plans its actions from the purpose of each item, so a logically organized project leads to smoother, more predictable behavior.
Main Window
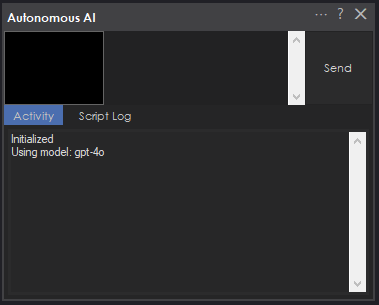
The main window is where you talk to the robot and watch what it is doing.
- Input field and Send button - Type a message and press Send (or Enter) to send it to the AI. While the AI is working on a request, the button changes to Cancel. Pressing it with the input field empty stops the current request. Pressing it with text in the input field stops the current request and sends the new text instead, so you can redirect the robot at any time.
- Camera preview - Shows the image the AI sees. The robot keeps up to 4 recent camera frames (one is added every 2 seconds) and combines them into a 2x2 grid separated by red lines, numbered 1 (newest, top-left) to 4 (oldest, bottom-right). This lets the AI notice changes and recall what just happened.
- Paused - When checked, the robot does not act on its own: idle actions, the behavior loop, and idle sway all stop. It is checked every time the project loads.
- Idle countdown bar - Shows the time left until the next autonomous idle action. It is held while a request is running and starts over when the request finishes.
- Activity tab - The activity log shows what the AI is doing: requests, spoken responses, the code it runs, drive states, behavior loop events, and errors. Beside it are three boxes showing the AI's latest Thinking, Memory notes, and Emotion.
- Script Log tab - Shows the output of the Speak Script (see the Scripts tab).
How It Works
When you send a message, or when the robot decides to act on its own, this is what happens:
- The robot takes the latest images from the camera. The camera is watched continuously, so the image is always current.
- A detailed set of instructions (the system message) is built. It contains the robot's personality, behavior rules, internal drives, the active goal, movement calibration, its estimated position, camera gimbal instructions, available animations and control commands, current ARC variable values (up to 50), and the Robot Soul (long-term memory).
- The camera image, your message, and the recent conversation are sent to the AI provider.
- The AI replies in typed sections: thinking, memory notes, speech, code to run, and emotional state.
- The robot carries out the sections. Speech is spoken through the Speak Script, and code is run to move the robot, play animations, and control other robot skills.
- If the code asks for a new camera image to check its progress, the result is sent straight back to the AI, and the loop continues until the task is done.
Only one request runs at a time. A request that gets no answer from the AI provider within 300 seconds is stopped and logged as timed out.
Response Sections
The AI organizes every response into typed sections that control what the robot does:
- Thinking - The AI's reasoning and planning. It is shown in the Thinking box and never spoken. Read it to understand why the robot does what it does.
- Memory - Notes the AI keeps for itself during a task, such as the goal, the current step, and the names of people it is talking to. They are shown in the Memory box and are not spoken.
- Speak - What the robot says. Spoken responses are short (1-2 sentences) and never contain emojis.
- JavaScript - Code that makes the robot act: movement, servos, animations, LEDs, and control commands of other robot skills.
- Emotion - The AI's current emotional state (happy, curious, excited, lonely, and so on). It is stored in the emotional state variable for other robot skills to use.
Thinking, memory, and emotion are handled first. Speak and JavaScript sections then run one at a time, in the order the AI wrote them. This lets the robot control timing, for example waving before saying "hello".
Self-Programming
The AI is given an up-to-date list of control commands from the robot skills in your project (see the Control Commands tab). It writes its own JavaScript, combining these commands with movement, servo, and sleep() calls into complete routines. After running a command, it can check the results in the ARC variables or a fresh camera image. If something fails, it reads the error, fixes its code, and tries again.
Autonomous Task Loop
The AI can carry out multi-step tasks on its own using a built-in loop:
- Think - Work out the goal and plan the steps.
- Remember - Record the goal, current step, and success condition in a memory section.
- Act - Run one step with a JavaScript section.
- Verify - Request a new camera image to check progress.
- Evaluate - Compare the new image with the goal.
- Continue or finish - If the goal is not met, update the memory and loop again. If it is met, say so and stop.
For example, if you tell the robot "move forward until I raise my hand", it moves forward a short distance, takes a new camera image, checks whether your hand is raised, and repeats until it sees it.
Safety limits keep tasks from running away:
- Max Recursive Calls (Behavior tab, default 50) limits how many times in a row the loop may repeat before it is stopped.
- A goal is abandoned after 5 failed requests while it is active, or after 120 seconds without any reported progress.
- When the AI stops looping on a goal without saying it is finished, the robot asks it to check whether the goal was really completed.
- You can always press Cancel to stop the current task.
Behavior Loop
While the robot is not paused and not already working on a request, a behavior loop runs every 2.5 seconds and decides whether the robot should do something on its own. It checks, in order of priority:
- Someone arrived or left - The robot greets a person who has just appeared (at most once every 60 seconds), and reacts when a person leaves (at most once every 15 seconds), such as looking around for them.
- Camera drift - When there is no task and no one to look at, the camera gimbal slowly drifts back toward center, without calling the AI.
- Scene changes - When the camera view changes noticeably, the robot reacts and investigates (at most once every 15 seconds).
- Goal check - If a task seems to have stopped, the AI is asked to confirm whether it was completed.
- Task continuation - If a goal is still in progress, the AI is asked to continue it.
- Drive-based behavior - With no task active, a strong drive can prompt an action: a bored robot does something spontaneous, a social robot engages the person in front of it, and a curious robot looks around more closely. A cautious robot stays quiet and observes.
To keep things calm and natural, the behavior loop asks the AI to do something at most once every 12 seconds, skips an action it has already repeated recently, and holds back while caution is high.
The robot knows a person is present when the AI has noted someone in its memory (for example their name) within the last 15 seconds. The robot uses the camera image to recognize people, so make sure the camera can see the people it talks to.
Internal Drives
Four drives, each from 0.0 to 1.0, model the robot's mood and change over time:
- Curiosity - Grows slowly over time and drops after the robot investigates a scene change. A curious robot examines its surroundings.
- Boredom - Grows when there is no task, faster when no one has interacted for a while, and drops while working on a task. A bored robot gets spontaneous: it explores, tells jokes, or moves around.
- Sociability - Grows when a person is visible but not interacting, and fades when no one is around. A social robot tries to engage the person it sees.
- Caution - Rises when something fails and fades over time. A cautious robot is careful, favoring observation over action.
Interacting with the robot lowers boredom and sociability, and completing a task lowers caution and boredom. The drives are included in every request, so the AI's mood matches them. Drives are not saved with the project, so they start fresh each time the project loads.
Autonomous Idle Mode
When Autonomous Idle Mode is enabled on the Behavior tab, the robot acts on its own after a period without interaction. Each time the idle timer starts, a random delay between Idle Min Seconds and Idle Max Seconds is chosen. When it runs out, the robot receives a prompt based on its strongest drive:
- Bored - Do something surprising: dance, tell a joke, explore.
- Social - Look for people, engage warmly, and express a desire for company.
- Curious - Examine the surroundings carefully and investigate specific objects.
- Cautious - Observe quietly and stay alert.
- Content (all drives low) - Look around, comment on the surroundings, share a thought, or move around.
The idle timer is held while any request runs and starts over when it finishes, so the robot never interrupts an active conversation.
Idle Sway
Servos added on the Servos tab with Idle Sway enabled gently move on their own to make the robot look alive. Each servo moves on its own slow wave with a random phase and speed, plus a smaller "breathing" motion, so they never move in lockstep. Now and then a servo holds still for a moment. Swaying is livelier when the robot is bored and calmer when it is cautious.
Idle sway runs whenever the robot skill is not paused. When another robot skill moves a sway-enabled servo, such as during an animation, swaying continues smoothly from the new position.
Position Tracking
The robot estimates its own position and heading by counting the movements it makes (dead reckoning), using the speeds and calibration values on the Movement tab. Its starting point is the origin. The estimate is included in every request, along with the places where the robot recently noticed things, so the AI can navigate, for example to return to where it saw something.
Dead reckoning drifts over time, so the AI is told to trust the camera over the numbers. Accurate movement calibration makes this much better. The position and observations are not saved with the project.
Conversation Memory
The skill manages the conversation so it stays within the AI's limits:
- Conversation history - Recent messages and responses are sent with every request, so the AI has the full context.
- Robot Soul (long-term memory) - Every so many messages (Compact History Every X Messages on the Behavior tab, default 50), the AI summarizes the conversation into a short bullet list and merges it into the Robot Soul. The detailed history is then cleared. The Robot Soul is included in every request, so the robot remembers names, facts, and preferences from long ago without sending the whole history.
- Saved with the project - Both the conversation history and the Robot Soul are saved with your project and restored when it loads.
Configuration Window
Press the Config button (gear icon) in the skill's title bar to open the configuration window. Every setting has a question mark (?) next to it. Hover over it to see help for that setting.
Getting Started
The first tab gives an overview of the skill and a link to this manual.
Settings
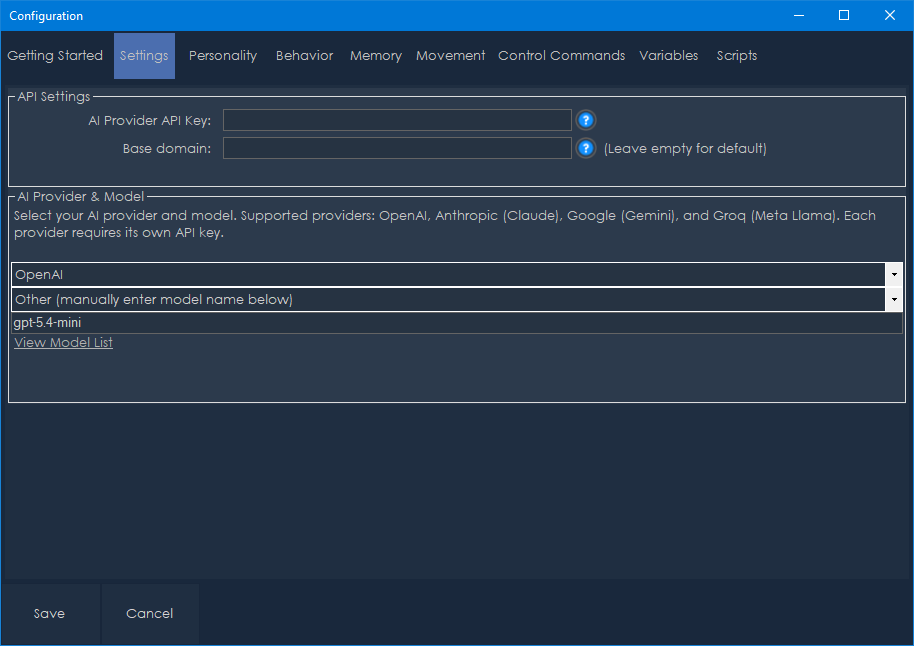
This tab chooses which AI powers your robot and how to connect to it.
AI Provider API Key - Your API key from the selected provider. Get one from your provider's website:
- OpenAI: https://platform.openai.com/api-keys
- Anthropic: https://console.anthropic.com/
- Google: https://aistudio.google.com/apikey
- Groq: https://console.groq.com/keys
One key is used for whichever provider is selected, so enter the matching key when you switch providers. The key is stored encrypted on this computer and is shared by all your projects. It is not saved in the project file, so sharing a project never shares your key. The key is only sent to the AI provider.
Base domain - Optional. Leave it empty to use the selected provider's official API. Enter a server address to use a local or self-hosted server, or an API proxy, for example http://127.0.0.1:1234 or http://192.168.1.50:1234. Use the address of the computer running the server, not 0.0.0.0. The API version path (such as /v1) is added automatically, so it works with or without it.
Using a local server (LM Studio, Ollama)
- Start the server and load a model that supports images (vision).
- Set the Provider to OpenAI and enter the server's address in Base domain (Ollama usually uses port 11434, LM Studio port 1234).
- Set the Model to Other and type the model name exactly as the server lists it.
- Local servers usually don't need an API key, but the key field cannot be empty, so enter any placeholder text.
Provider - The AI provider:
- OpenAI - GPT-4.1 (the default), GPT-4o, GPT-5, the o-series, and others.
- Anthropic (Claude) - Claude Sonnet, Opus, and Haiku models.
- Google (Gemini) - Gemini 2.5, 2.0, and 1.5 models.
- Groq (Meta Llama) - Llama 4 Scout, Llama 4 Maverick, Llama 3.x, and others, running on Groq's fast infrastructure.
Model - The model to use. The list changes with the provider. More capable models reason better and sound more natural, but cost more and respond more slowly. Choose a model that supports images (vision), because a camera image is sent with every request.
Other model - To use a model that isn't listed, such as a newly released one, choose "Other (manually enter model name below)" and type the exact model name in the box under the model list.
View Model List - Opens the selected provider's model list in your browser.
Personality
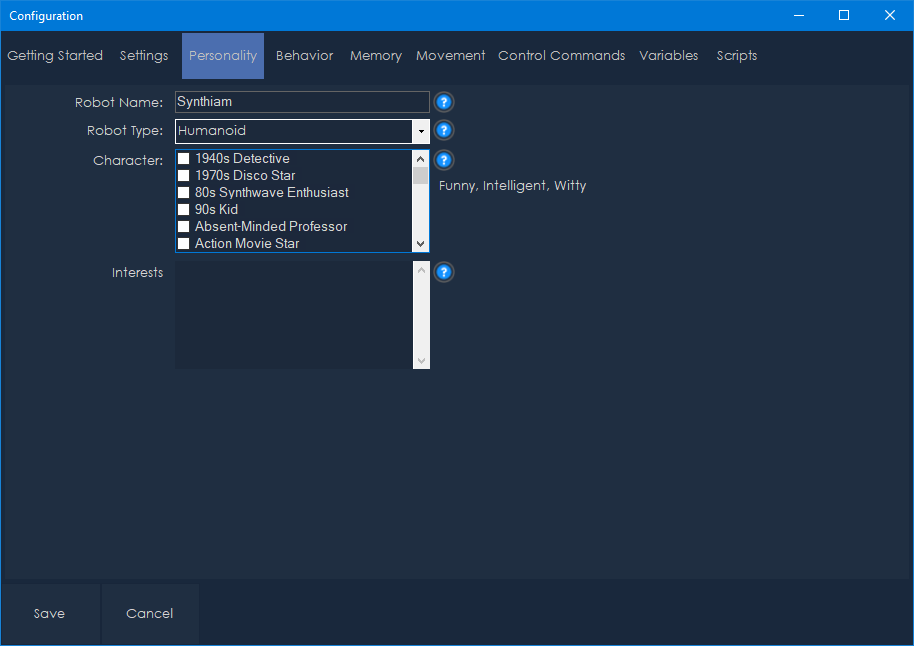
This tab defines who your robot is.
Robot Name - The robot's name (default "Synthiam"). The robot uses it when it refers to itself or introduces itself.
Robot Type - The robot's body type (default "Humanoid"). It tells the AI how the robot moves. Choose one of the presets or type your own, for example "EZ-Robot JD Humanoid":
- Humanoid - walks on two legs.
- Hexapod - walks on several legs.
- Tracked Rover - has tracks and turns like a tractor.
- Wheeled - has two or more wheels, sometimes with a castor.
- Drone - flies and can hover.
- Stationary - cannot move, such as an InMoov head.
Character - Personality traits for the robot (default: witty, intelligent, funny). Check as many as you like. They are combined into the robot's identity and shape how it speaks and behaves. More than 200 traits are available, from classics like "Witty", "Sarcastic", and "Curious" to characters like "Pirate", "Mad Scientist", "Shakespearean", "Cyberpunk Rebel", and "D&D Dungeon Master". The current selection is shown next to the list.
Interests and personality - Free text describing what your robot is passionate about, plus any other personality details. For example: "space exploration, classic movies, cooking, and quantum physics." The robot brings these topics up in conversation and during idle moments.
Behavior
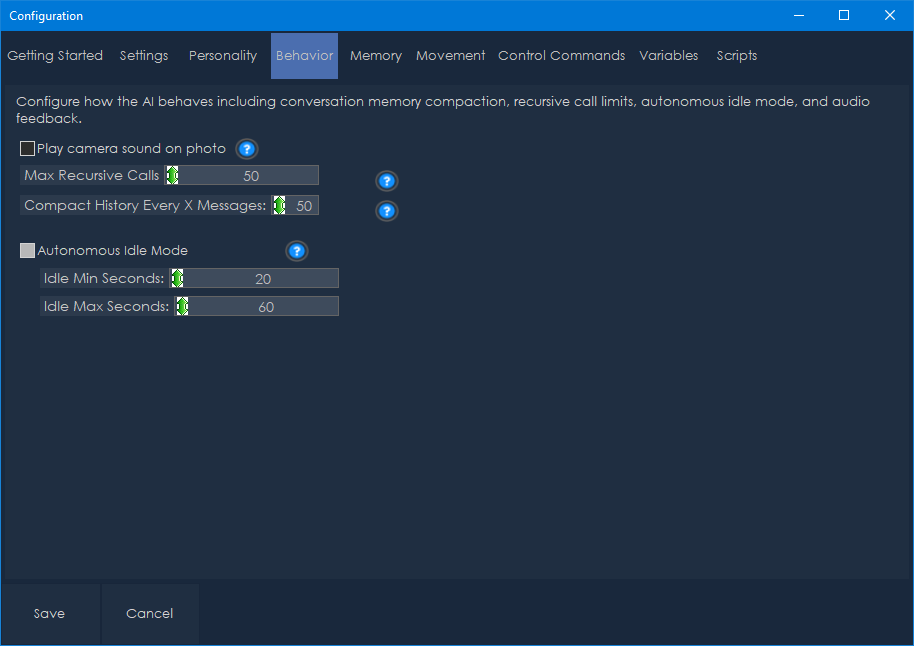
This tab controls the task loop limit, memory compaction, and Autonomous Idle Mode.
Max Recursive Calls (default 50, range 1-1000) - A safety limit for the AI programming itself. When the AI runs code that asks for a fresh camera image to check its progress, the result goes straight back to the AI so it can continue. This is how many times in a row that loop may repeat before it is stopped. The count starts over whenever the AI responds without looping. Increase it for long tasks such as searching or patrolling, and lower it for tighter control.
Compact History Every X Messages (default 50, range 10-1000) - How often the conversation is summarized into the Robot Soul. The robot's own idle and behavior prompts count as messages too. Lower values keep requests smaller and cheaper but may lose detail. Higher values keep more detail but send more tokens with each request.
Autonomous Idle Mode (default on) - When checked, the robot acts on its own after a period without interaction.
- Idle Min Seconds (default 20, range 5-300) - The shortest wait before acting on its own.
- Idle Max Seconds (default 60, range 10-600) - The longest wait. Each time, a random delay between the minimum and maximum is chosen. If the minimum is higher than the maximum, the maximum is used.
Memory
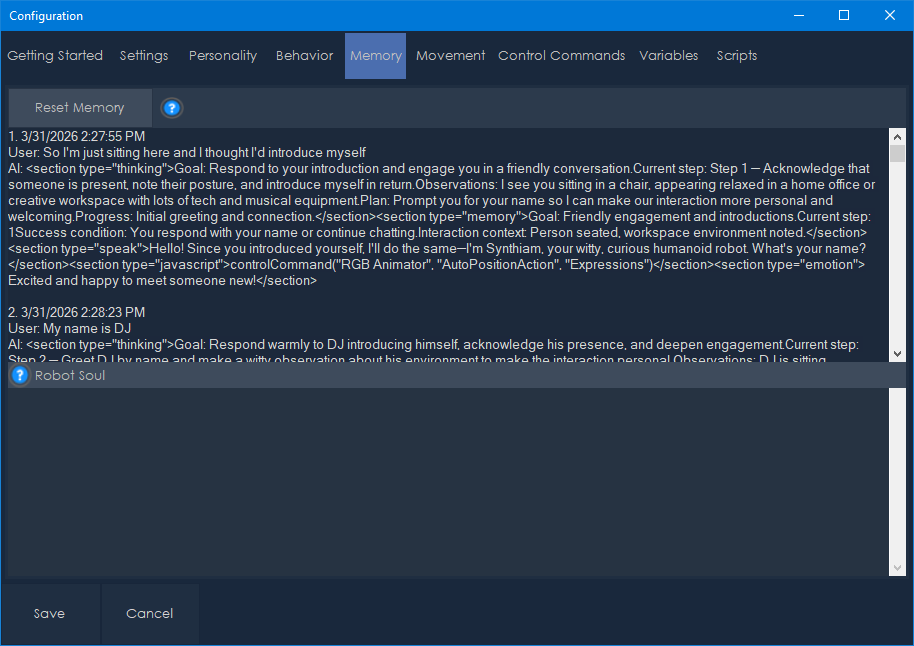
This tab shows what the robot remembers.
Conversation history - Every exchange since the last compaction, with timestamps, the input, and the AI's response. Older exchanges have been summarized into the Robot Soul.
Robot Soul - The robot's long-term memory: a bullet-point summary of the important people, facts, preferences, and experiences from past conversations. It is updated every time the history is compacted, included in every request, and keeps evolving as you interact with the robot.
Reset Memory - Clears the conversation history and the Robot Soul (and the robot's remembered observations) so the robot starts fresh. This happens immediately and is not undone by pressing Cancel.
Movement
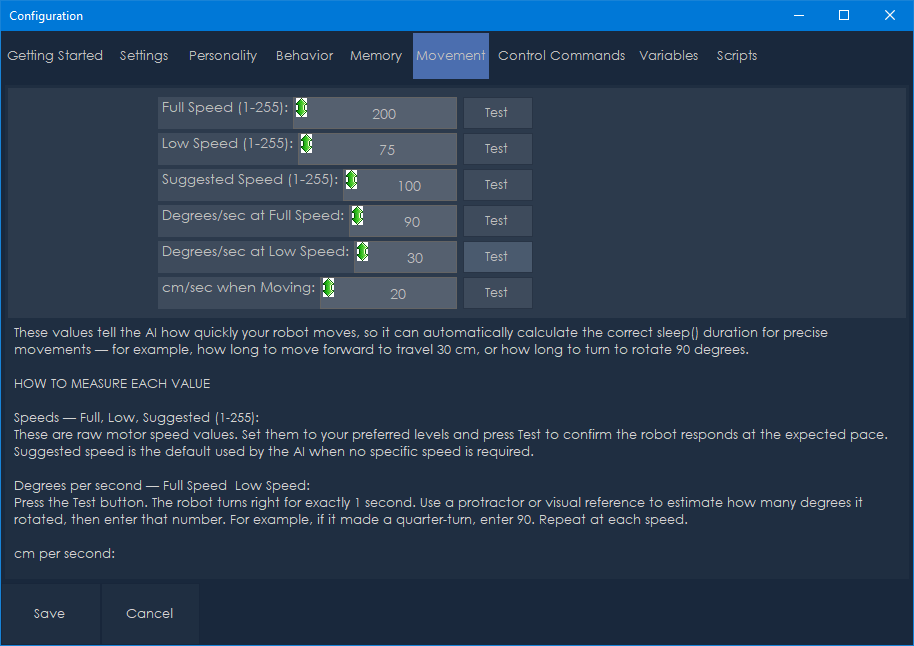
These values tell the AI how fast your robot moves, so it can work out how long to move. For example, how long to drive to travel 30 cm, or how long to turn to rotate 90 degrees. They also drive the robot's position tracking. If your robot moves, take the time to calibrate them.
Speeds (range 1-255):
- Full Speed (default 200) - The speed for fast movement. The Degrees/sec at Full Speed and cm/sec values are measured at this speed.
- Low Speed (default 75) - The speed for slow, careful movement and precise turns.
- Suggested Speed (default 100) - The speed the AI uses for general movement.
Each speed's Test button drives the robot forward at that speed for 1 second.
Degrees/sec at Full Speed (default 90, range 1-3600) and Degrees/sec at Low Speed (default 30) - How many degrees the robot rotates in 1 second at that speed. Press Test to turn right at that speed for exactly 1 second, then enter how far it rotated. For example, if it made a quarter-turn, enter 90.
cm/sec at Full Speed (default 20, range 1-1000) - How many centimeters the robot travels in 1 second at Full Speed. Put a piece of tape on the floor at the robot's front wheels, press Test to drive forward at Full Speed for exactly 1 second, then measure the distance. The value is scaled automatically for slower speeds.
For example, if the robot turns 90 degrees per second at Full Speed and you ask it to turn 90 degrees, the AI moves it for 1000 ms. Recalibrate when the robot changes surfaces (carpet or hard floor) or when you change its drive system.
Control Commands
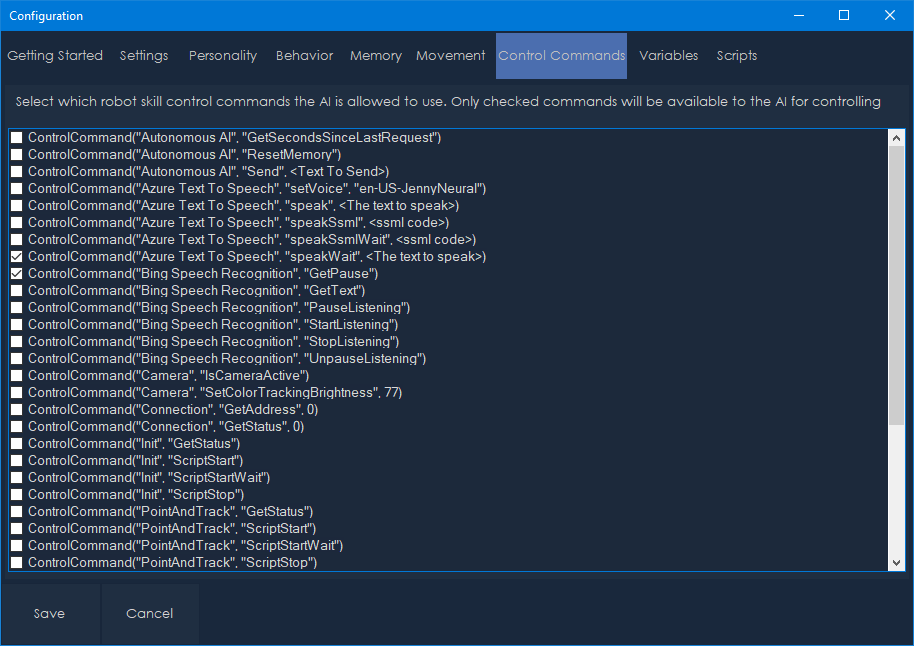
Control commands let the AI use the other robot skills in your project. For example:
- Run scripts from the Script Manager
- Change LED patterns
- Start or stop tracking, speech recognition, or navigation
- Control any other robot skill that has control commands
Automatically give the AI every ControlCommand from every robot skill in this project (default on, recommended) - The AI gets the full, up-to-date list of control commands from every robot skill in the project (up to 120), and the list below is grayed out. Robot skills you add later are picked up automatically.
Hand-picking commands - Uncheck the automatic option to choose commands yourself. Only the checked commands are given to the AI. This keeps requests smaller and stops the AI from using robot skills you don't want it to touch.
Auto Position and RGB Animator commands are always given to the AI, with extra guidance, and are not listed here.
Variables
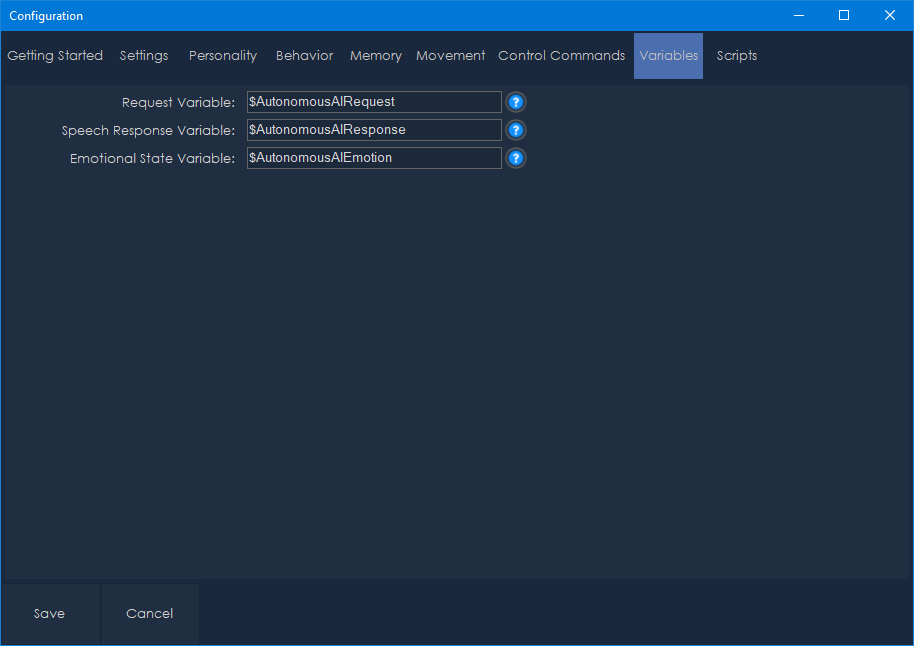
These global ARC variables share information between this skill and other robot skills.
Request Variable (default $AutonomousAIRequest) - Holds the most recent input sent to the AI.
Speech Response Variable (default $AutonomousAIResponse) - Holds the text the AI wants to say. It is set right before the Speak Script runs, so use it in that script to pass the text to your text-to-speech robot skill.
Emotional State Variable (default $AutonomousAIEmotion) - Holds the AI's current emotional state, such as "happy", "curious", or "excited". Other robot skills can use it to trigger matching animations, LEDs, or facial expressions.
Scripts
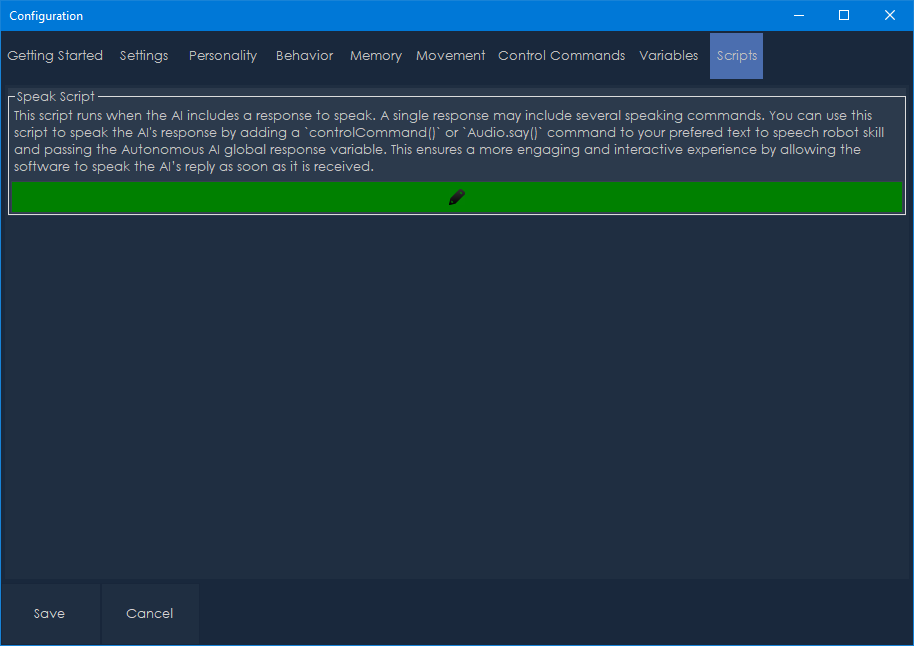
Speak Script - Runs each time the AI has something to say. One response can contain several speech sections, and the script runs once for each. The default script is:
Audio.sayWait(getVar("$AutonomousAIResponse"));
This speaks the response with ARC's built-in text-to-speech. You can change the script to:
- Use a different text-to-speech robot skill or voice, with a ControlCommand()
- Show something while speaking, such as LED animations or mouth movement
- Trigger other robot skills when the robot speaks
- Play sound effects before or after speaking
The robot waits for this script to finish before moving on to the next section, so use a "wait" version of your speech command (such as Audio.sayWait) to keep speech and actions in order.
Camera
This tab sets up the camera sound and the camera gimbal.
Play camera sound on snapshot (default off) - Plays a camera shutter sound each time an image is taken for the AI, so people know when the robot is looking. For example, they can pose for the response.
Vertical Servo - Check this if the camera tilts up and down on a servo.
- Servo Port - The port of the tilt servo.
- Camera Up / Center / Down - The servo positions for looking up, straight ahead, and down.
Horizontal Servo - Check this if the camera pans left and right on a servo.
- Servo Port - The port of the pan servo.
- Camera Left / Center / Right - The servo positions for looking left, straight ahead, and right.
The servo moves as you change each position, so you can find the right values. To set a value without moving the servo, right-click the value and type it in.
With a gimbal set up, the AI can look around on its own and keeps the person it is talking to centered in the camera view, making small corrections as they move. When there is no task and no one to look at, the camera slowly drifts back toward center.
Servos
This tab adds servos that sway gently to make the robot look alive (see Idle Sway above). Press Add to add a servo. Each servo row has:
- Delete - Removes the servo.
- Description - A name to help you remember which servo it is.
- Servo Port - The servo port to move.
- Min Position / Max Position - The safe range. The servo is never moved outside it. The servo moves as you change these values.
- Idle Sway - Check to enable swaying for this servo.
API Usage and Cost
You need an API key from at least one supported AI provider, unless you use a local server. Providers bill by the number of tokens processed. Every request includes a camera image and the robot's full instructions, so requests use more tokens than plain text chat. Autonomous behavior (idle mode and the behavior loop) also makes requests on its own, so expect ongoing usage while the robot is not paused.
Tips & Best Practices
Choosing a provider and model
- More capable models produce more natural, context-aware behavior but cost more and respond more slowly.
- Smaller models (mini, Haiku, Flash) are faster and cheaper, and suit simpler interactions.
- The model must support images (vision) for the robot to understand what it sees.
Calibrating movement
- Calibrate the Movement tab carefully. The AI relies on it for precise movement and position tracking.
- Use the Test buttons to check each value against how the robot actually moves.
- Recalibrate after changing floor surfaces or the drive system.
Setting up the camera gimbal
- If your robot has a pan/tilt camera, set up the gimbal on the Camera tab. It lets the robot look around and follow people with its gaze.
Tuning the personality
- Character traits and interests have a big effect on how the robot talks. Experiment with combinations.
- A robot with "Sarcastic" and "Witty" behaves very differently from one with "Overly Friendly" and "Curious".
- Interests give the robot topics to bring up during idle moments.
Managing token usage
- Lower Compact History Every X Messages to keep each request smaller.
- Hand-pick control commands instead of giving the AI all of them, to make the instructions shorter.
- Lengthen the idle interval, or disable Autonomous Idle Mode, to reduce autonomous requests.
- Check Paused when you aren't using the robot.
Idle behavior and drives
- Short idle intervals (10-30 seconds) make a very active robot. Longer ones (60-120 seconds) make a calmer one.
- Disable Autonomous Idle Mode if the robot should only respond when spoken to.
- Because the drives change over time, the robot's autonomous behavior varies naturally: sometimes exploratory, sometimes social or quiet.
Idle sway
- Small movements make a big difference in how alive the robot looks. Low widths (3-8) and a moderate random chance (30-50%) look the most natural.
- Swaying works with animations: it gives way when another robot skill moves the servo and continues from there.
Multi-step tasks
- Give the AI a clear success condition. "Move forward until you see a red object" works better than "explore around".
- Increase Max Recursive Calls for tasks that need many look-and-check cycles, such as patrolling or searching.
- Press Cancel at any time to stop a task. Goals are also abandoned automatically after repeated failures or 120 seconds without progress.
Control Commands for the Autonomous AI robot skill
There are Control Commands available for this robot skill which allows the skill to be controlled programmatically from scripts or other robot skills. These commands enable you to automate actions, respond to sensor inputs, and integrate the robot skill with other systems or custom interfaces. If you're new to the concept of Control Commands, we have a comprehensive manual available here that explains how to use them, provides examples to get you started and make the most of this powerful feature.
Control Command ManualSend
Send a text request to the Autonomous AI engine programmatically.
ControlCommand("Autonomous AI", "Send", "Hello, what do you see?");
- Parameter: The text message to send (string).
- Returns:
trueif the request was processed successfully,falseif an error occurred. - Note: Only one request can be active at a time. If the AI is already processing a request, this command will throw an error.
ResetMemory
Clear the conversation history, giving the robot a fresh context.
ControlCommand("Autonomous AI", "ResetMemory");
GetSecondsSinceLastRequest
Get the number of seconds since the last conversation request was made. Useful for building custom idle behaviors or monitoring robot activity.
var seconds = ControlCommand("Autonomous AI", "GetSecondsSinceLastRequest");
- Returns: An integer representing seconds since the last request.



v9 has been updated to include a memory and emotional state for the aI. In addition, there have been improvements to the task cancellation and integration in the ARC scripting engine.
v10 has been updated to include an option to specify the optimization response count. Also, it has a minor change for the optimization only to include user interactions, not any interaction. So recursive reasoning and scripts will not count as an interaction.
v11 has been updated to enhance the SEND/CANCEL button. If the ControlCommand() is sent to the robot skill from another skill, such as Bing Speech Recognition, the CANCEL button will cancel the process if needed. This allows canceling from other robot skill calls instead of only canceling the manually typed text.
v12 has been updated with a minor fix to the image processing. There is also an optimization for the data transmission to optimize the conversation by not removing images that aren't useful to the conversation. This results in quicker response and interaction.
v13 fixed an error about disposing of the cancellation token. This would happen on a rare occasion when canceling a task with the cancel button.
v14 has been updated to include support for additional models, upgraded memory training, and minor performance improvements. Also, the robot's current emotional state is stored in a variable and can be used externally.
v16 - Release Notes
Autonomous Idle Mode - "Giving the Robot Life"
Multi-Provider AI Support
Stateful Memory & Thinking System
Improvements
Credential Management
Configuration UI Overhaul
Script Awareness Enhancement
Movement Intelligence
Control Exposure
Cleanup & Optimization
Fixes
Notes & Recommendations
v17 - read the manual above for usage of these new features
A More Lifelike Robot
This update is where things start to feel different.
Your robot no longer just waits for instructions - it acts, reacts, and carries presence.
It’s less like operating a tool and more like sharing space with something active and aware.
Smarter Awareness
More Control Over Movement
Overall, this update pushes things closer to a robot that feels alive, attentive, and engaged - not just responsive.