Control WLED LED controllers in ARCx: power, color, brightness, effects, palettes, presets, and live state updates over Wi‑Fi.
 Windows
 ARM
 Linux
 MacOS
How to add the Wled Lights robot skill
- Load the most recent release of ARCx on a compatible operating system (Get ARCx).
- Press the + Skills menu from the top menu bar in ARCx.
- Choose the Display category tab.
- Press the Wled Lights icon to add the robot skill to your project.
Don't have a robot yet?
Follow the Getting Started Guide to build a robot and use the Wled Lights robot skill.
How to use the Wled Lights robot skill
The WLED Lights robot skill connects ARCx to a WLED LED controller over your network. WLED is free, open source firmware for ESP8266 and ESP32 boards that drives addressable LED strips and matrices (WS2812B/NeoPixel, SK6812, WS2815 and many more), with more than a hundred built-in effects and palettes.
With this robot skill your robot can turn its lights on and off, set their brightness and color, start effects, choose palettes, load presets, and react to what the lights are doing, all from the skill's window, from scripts, from your Custom UI screens or from an AI assistant. Give your robot glowing eyes that change color with its mood, a chest panel that shows a fire effect while it talks, or room lighting it switches on when it sees you.
What you need
- A WLED controller (an ESP8266 or ESP32 running WLED) with its LEDs set up, on the same network as the computer running ARCx. Follow the WLED getting started guide to flash and connect one.
- Its address: the IP address or name you type into a web browser to open the WLED page, such as
192.168.1.50orwled-chest.local. The WLED app shows it, and so does your router's list of connected devices. Giving the controller a fixed IP address in your router keeps it from changing.
No EZB controller or ports are used. The robot skill talks to WLED directly over Wi-Fi using the WLED JSON API.
Getting started
- Add the WLED Lights robot skill to your project.
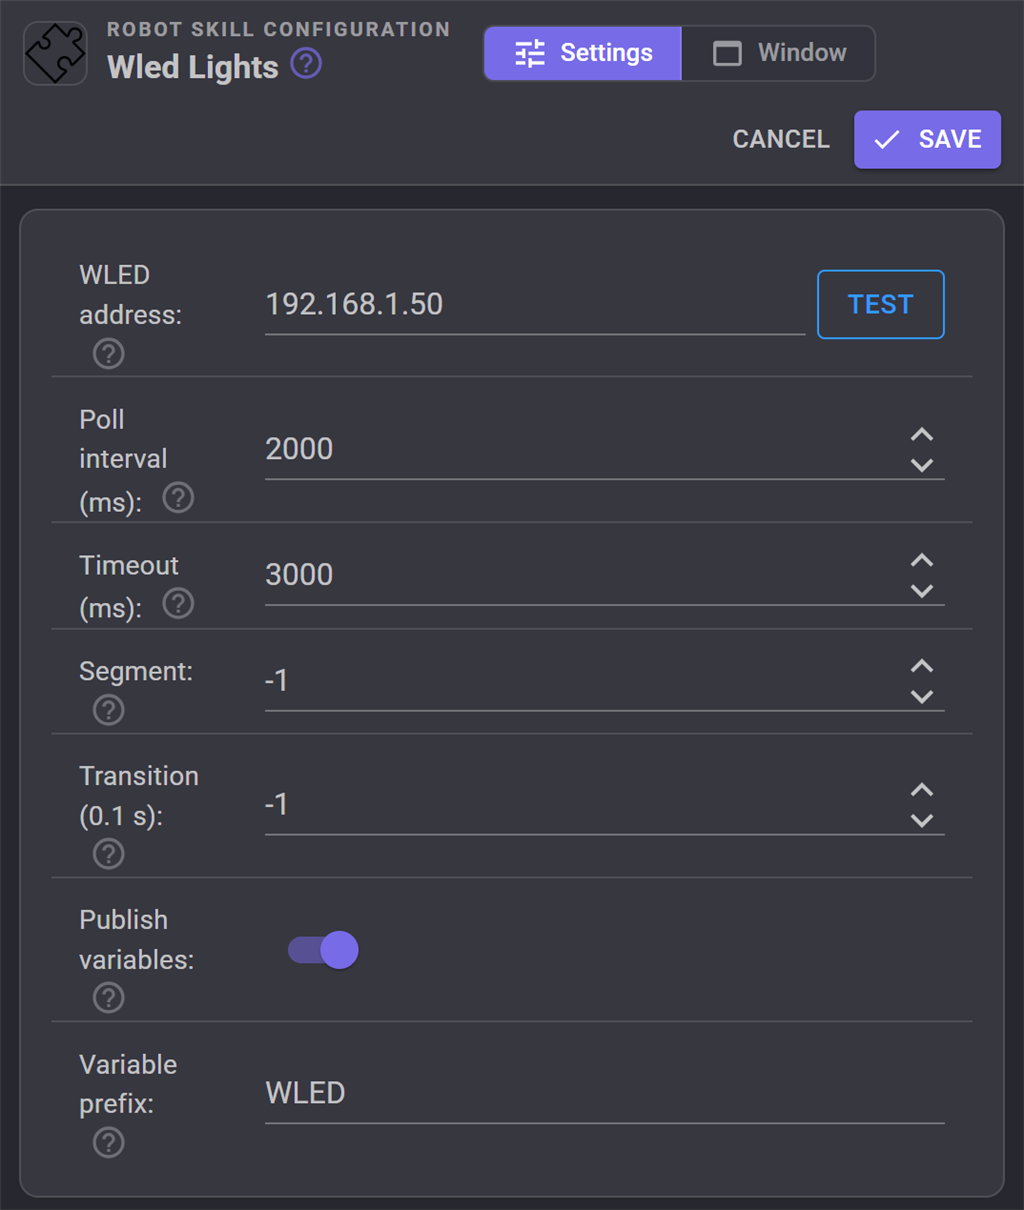
- Open its configuration, type the controller's address into WLED address and press Test. It answers with the controller's name, firmware version and number of LEDs.
- Press Save. The window shows Connected, and the controls follow whatever the lights are doing.
The window
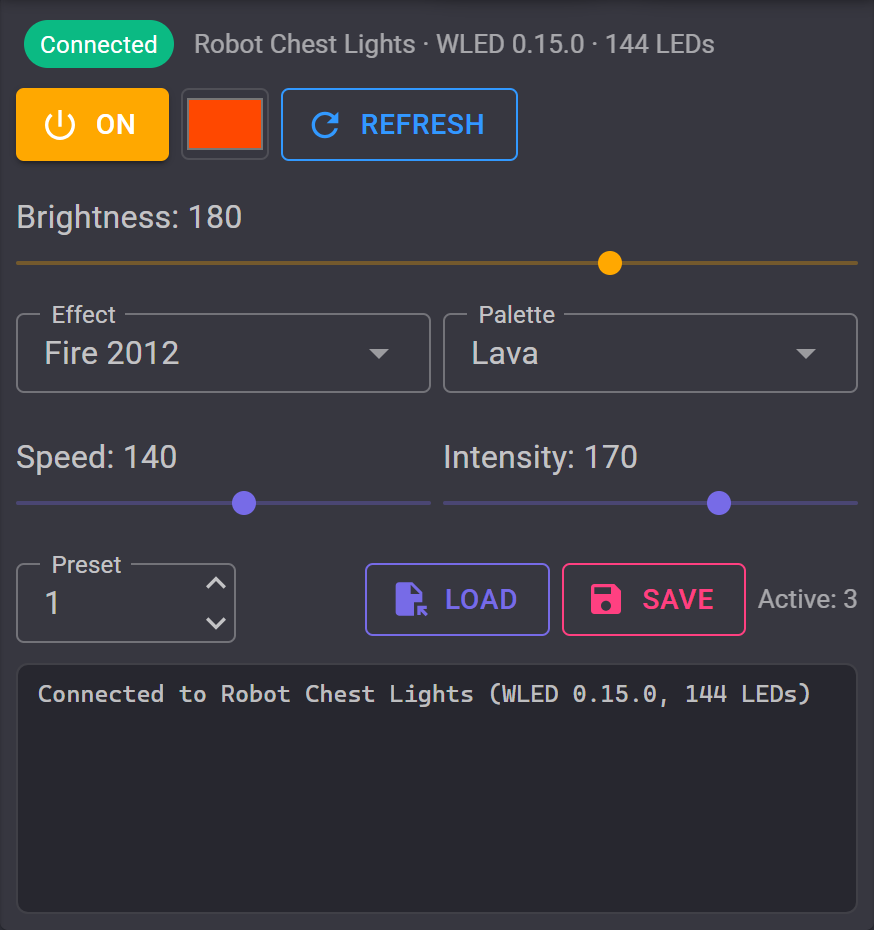
- Status: Connected with the controller's name, WLED version and LED count, or Not connected with the reason (no answer, wrong address, and so on). It reconnects by itself as soon as the controller answers again.
- Power: turns the LEDs on and off. It is lit while they are on.
- Color: the primary color. Click it to pick a new one.
- Refresh: reads everything from the controller now, including its list of effects and palettes.
- Brightness: the master brightness, 0 to 255. Changes are sent when you let go of the slider.
- Effect and Palette: every effect and palette the controller offers, by name. Effects that use a palette take their colors from it; the Solid effect uses the primary color.
- Speed and Intensity: the effect's speed, and its intensity (what that changes depends on the effect: the number of sparkles, the height of the flames, the size of the comet...).
- Preset: type a preset number and press Load to apply a preset saved on the controller, or Save to store the current look as that preset. Active shows the preset the controller reports as applied.
- Log: when the robot skill connects and disconnects, and anything that failed.
The window follows changes made anywhere else, such as from the WLED app, a button wired to the controller, or another device, because the robot skill reads the controller's state every couple of seconds (see Poll interval).
Configuration
| Setting | Description | Default |
|---|---|---|
| WLED address | The controller's IP address (192.168.1.50), host name (wled-chest.local) or full URL (http://192.168.1.50:80). Test checks it before you save. |
empty |
| Poll interval (ms) | How often the controller's state is read, so the window and variables follow changes made elsewhere. 0 turns polling off; the state is then only read when this robot skill changes something or Refresh is used. | 2000 |
| Timeout (ms) | How long to wait for the controller to answer before reporting it as not connected. | 3000 |
| Segment | Which LED segment color, effect, palette, speed and intensity changes apply to. -1 applies them to the segments selected in WLED, exactly like the WLED app; with one segment that is the whole strip. A number applies them to only that segment id, which lets several robot skills drive different parts of one strip. Power, brightness and presets always apply to the whole controller. | -1 |
| Transition (0.1 s) | How long changes fade in, in tenths of a second (10 is one second, 0 is instant). -1 uses the transition set on the controller. | -1 |
| Publish variables | Publish the controller's state as global variables (below). | On |
| Variable prefix | The start of each variable's name. | WLED |
Global variables
While Publish variables is on, the robot skill keeps these global variables up to date. Scripts, Custom UI labels ({WLEDEffect}) and other robot skills can read them at any time without asking the controller. The names below use the default prefix WLED.
| Variable | Value |
|---|---|
WLEDConnected |
true while the controller is answering. |
WLEDOn |
true while the LEDs are on. |
WLEDBrightness |
Master brightness, 0 to 255. |
WLEDColor |
The primary color as hex RRGGBB, such as FF4800. |
WLEDEffect / WLEDEffectId |
The running effect's name and id. |
WLEDPalette / WLEDPaletteId |
The palette's name and id. |
WLEDSpeed / WLEDIntensity |
Effect speed and intensity, 0 to 255. |
WLEDPreset |
The active preset id, -1 when none. |
WLEDName |
The controller's name as set in WLED. |
Using it from scripts
Every button in the window is also a control command, so scripts can do anything the window can. They are listed in the Control Commands section of this page, and in the script editor (press Ctrl+Q). The first parameter is the robot skill's window title, Wled Lights unless you renamed it.
Effects and palettes can be given by name (not case sensitive) or by number, and colors as red, green and blue or as hex.
// Angry eyes: red fire
controlCommand("Wled Lights", "On");
controlCommand("Wled Lights", "SetEffect", "Fire 2012");
controlCommand("Wled Lights", "SetPalette", "Lava");
controlCommand("Wled Lights", "SetBrightness", 255);

// Calm: soft blue, solid
controlCommand("Wled Lights", "SetEffect", "Solid");
controlCommand("Wled Lights", "SetColor", 0, 120, 255);
controlCommand("Wled Lights", "SetBrightness", 90);

// Read what the lights are doing from the variables
if (getVar("WLEDOn"))
  print("Running " + getVar("WLEDEffect") + " at brightness " + getVar("WLEDBrightness"));
# Load a look saved on the controller as preset 2
controlCommand("Wled Lights", "LoadPreset", 2)

# Hex colors work too
controlCommand("Wled Lights", "SetColorHex", "00AAFF")

# List every effect the controller offers
for name in controlCommand("Wled Lights", "GetEffects"):
  print(name)
For anything the commands do not cover, such as the nightlight, playlists, segment sizes or lighting individual LEDs, SendJson sends any WLED JSON API request as it is:
// Fade to off over 10 minutes with WLED's nightlight
controlCommand("Wled Lights", "SendJson", '{"nl":{"on":true,"dur":10,"mode":1}}');
The WLED JSON API reference lists everything a request can contain.
A command that cannot reach the controller stops the script with an error saying why, so a script knows when its lights did not change. Wrap it in try/catch if the script should carry on regardless.
Custom UI widget
The robot skill offers a WLED power and brightness widget for your Custom UI screens: a power button, a swatch of the current color, and a brightness slider. Set its Caption, and turn the slider off with ShowBrightness for a smaller button. The whole window can also be placed on a screen with the built-in Robot skill window widget.
AI assistants
When an AI assistant is connected to ARCx (Athena, or Claude, ChatGPT, Cursor and other MCP clients under Options, Preferences, AI connections), it can see and change the lights. The robot skill gives it tools to read the state, change several things in one go ("make the lights a slow purple rainbow at half brightness"), list the effects and palettes by name, and send raw JSON. Its configuration is described to the AI as well, so it can set the robot skill up for you.
More than one controller
Add one WLED Lights robot skill for each controller, for example one for the eyes and one for the chest, and give each its own Variable prefix (Eyes, Chest) so their variables do not overwrite each other. Scripts tell them apart by window title, so rename the windows to match: controlCommand("Eyes", "SetColor", 255, 0, 0).
To drive different parts of one long strip separately, set up segments in WLED, then add a robot skill for each segment with the same address and its own Segment number.
Troubleshooting
- Not connected / no answer: check that the address opens the WLED page in a browser on the ARCx computer, and that both are on the same network. A controller that was given a new IP address by the router needs the new address entered; reserve a fixed address for it in the router so it does not change.
.localnames do not work: mDNS names need Bonjour on Windows and may not work on every network. Use the IP address instead.- The effect or palette list is empty: press Refresh. The lists are read from the controller when it first connects.
- Colors look wrong: check the LED type and color order (RGB, GRB...) in WLED's LED preferences. The robot skill sends the color you choose; the controller decides how the strip shows it.
- Changes from the WLED app take a moment to appear: they appear on the next poll. Lower the Poll interval to see them sooner.
Control Commands for the Wled Lights robot skill
There are Control Commands available for this robot skill which allows the skill to be controlled programmatically from scripts or other robot skills. These commands enable you to automate actions, respond to sensor inputs, and integrate the robot skill with other systems or custom interfaces. If you're new to the concept of Control Commands, we have a comprehensive manual available here that explains how to use them, provides examples to get you started and make the most of this powerful feature.
Control Command ManualThis robot skill has 21 control commands, listed below. Send them from a JavaScript or Python script, from Blockly, or from another robot skill.
The first value is always the window title, which is the name in the title bar of the robot skill on your workspace. It starts out as Wled Lights, which is what every example below uses. If you rename the robot skill, or add a second copy of it to the project, use the title as it appears on that window instead.
ControlCommand() can be shortened to CC(), and both spellings work in JavaScript and in Python. The examples are JavaScript; Python is the same call, except that true and false are written True and False.
GetBrightness
The master brightness, 0 to 255, as last reported by the controller.
Syntax
ControlCommand("Wled Lights", "GetBrightness")
Returns: Integer [-2,147,483,648 to 2,147,483,647]
Example
var result = ControlCommand("Wled Lights", "GetBrightness");
GetColorHex
The primary color as hex RRGGBB, as last reported by the controller.
Syntax
ControlCommand("Wled Lights", "GetColorHex")
Returns: String
Example
var result = ControlCommand("Wled Lights", "GetColorHex");
GetEffect
The name of the effect that is running, as last reported by the controller.
Syntax
ControlCommand("Wled Lights", "GetEffect")
Returns: String
Example
var result = ControlCommand("Wled Lights", "GetEffect");
GetEffects
The names of the controller's effects; the position of a name is its effect id. Reserved entries are "-" or "RSVD".
Syntax
ControlCommand("Wled Lights", "GetEffects")
Returns: Array of String
Example
var result = ControlCommand("Wled Lights", "GetEffects");
GetPalettes
The names of the controller's built-in palettes; the position of a name is its palette id.
Syntax
ControlCommand("Wled Lights", "GetPalettes")
Returns: Array of String
Example
var result = ControlCommand("Wled Lights", "GetPalettes");
IsConnected
Whether the controller answered the last request.
Syntax
ControlCommand("Wled Lights", "IsConnected")
Returns: Boolean [true or false]
Example
var result = ControlCommand("Wled Lights", "IsConnected");
IsOn
Whether the LEDs are on, as last reported by the controller.
Syntax
ControlCommand("Wled Lights", "IsOn")
Returns: Boolean [true or false]
Example
var result = ControlCommand("Wled Lights", "IsOn");
LoadPreset
Load a preset saved on the controller, by id 1 to 250. Returns the preset id the controller reports as active.
Syntax
ControlCommand("Wled Lights", "LoadPreset", (Number)presetId)
Parameters
| # | Name | Type | What to pass |
|---|---|---|---|
| 1 | presetId | Number | A number, without quotes |
Returns: Integer [-2,147,483,648 to 2,147,483,647]
Example
var result = ControlCommand("Wled Lights", "LoadPreset", 0);
Off
Turn the LEDs off.
Syntax
ControlCommand("Wled Lights", "Off")
Returns: Boolean [true or false]
Example
var result = ControlCommand("Wled Lights", "Off");
On
Turn the LEDs on.
Syntax
ControlCommand("Wled Lights", "On")
Returns: Boolean [true or false]
Example
var result = ControlCommand("Wled Lights", "On");
Refresh
Read the controller's current state now, including its effect and palette lists. Returns true when it answered.
Syntax
ControlCommand("Wled Lights", "Refresh")
Returns: Boolean [true or false]
Example
var result = ControlCommand("Wled Lights", "Refresh");
SavePreset
Save the current state as a preset on the controller, by id 1 to 250, with an optional name. Overwrites a preset with that id. Returns the preset id.
Syntax
ControlCommand("Wled Lights", "SavePreset", (Number)presetId, (String)name)
Parameters
| # | Name | Type | What to pass |
|---|---|---|---|
| 1 | presetId | Number | A number, without quotes |
| 2 | name | Text | Your text, in quotes |
Returns: Integer [-2,147,483,648 to 2,147,483,647]
Example
var result = ControlCommand("Wled Lights", "SavePreset", 0, "name");
SendJson
Send any WLED JSON API state object as it is, such as {"on":true,"seg":[{"fx":9}]} (see kno.wled.ge/interfaces/json-api). Returns the controller's reply.
Syntax
ControlCommand("Wled Lights", "SendJson", (String)json)
Parameters
| # | Name | Type | What to pass |
|---|---|---|---|
| 1 | json | Text | Your text, in quotes |
Returns: String
Example
var result = ControlCommand("Wled Lights", "SendJson", "json");
SetBrightness
Set the master brightness, 0 (darkest) to 255 (brightest). Returns the new brightness.
Syntax
ControlCommand("Wled Lights", "SetBrightness", (Number)brightness)
Parameters
| # | Name | Type | What to pass |
|---|---|---|---|
| 1 | brightness | Number | A number, without quotes |
Returns: Integer [-2,147,483,648 to 2,147,483,647]
Example
var result = ControlCommand("Wled Lights", "SetBrightness", 0);
SetColor
Set the primary color from red, green and blue values, each 0 to 255. Returns the new color as hex RRGGBB.
Syntax
ControlCommand("Wled Lights", "SetColor", (Number)red, (Number)green, (Number)blue)
Parameters
| # | Name | Type | What to pass |
|---|---|---|---|
| 1 | red | Number | A number, without quotes |
| 2 | green | Number | A number, without quotes |
| 3 | blue | Number | A number, without quotes |
Returns: String
Example
var result = ControlCommand("Wled Lights", "SetColor", 0, 0, 0);
SetColorHex
Set the primary color from hex RRGGBB such as FF8800, or RRGGBBWW to include the white channel of an RGBW strip. Returns the new color as hex RRGGBB.
Syntax
ControlCommand("Wled Lights", "SetColorHex", (String)hex)
Parameters
| # | Name | Type | What to pass |
|---|---|---|---|
| 1 | hex | Text | Your text, in quotes |
Returns: String
Example
var result = ControlCommand("Wled Lights", "SetColorHex", "hex");
SetEffect
Start an effect, by name (such as Rainbow, Fire 2012 or Solid) or by numeric id. Returns the effect's name.
Syntax
ControlCommand("Wled Lights", "SetEffect", (String)nameOrId)
Parameters
| # | Name | Type | What to pass |
|---|---|---|---|
| 1 | nameOrId | Text | Your text, in quotes |
Returns: String
Example
var result = ControlCommand("Wled Lights", "SetEffect", "nameOrId");
SetIntensity
Set the effect intensity, 0 to 255. What it changes depends on the effect. Returns the new intensity.
Syntax
ControlCommand("Wled Lights", "SetIntensity", (Number)intensity)
Parameters
| # | Name | Type | What to pass |
|---|---|---|---|
| 1 | intensity | Number | A number, without quotes |
Returns: Integer [-2,147,483,648 to 2,147,483,647]
Example
var result = ControlCommand("Wled Lights", "SetIntensity", 0);
SetPalette
Choose the color palette effects use, by name (such as Default, Rainbow or Ocean) or by numeric id. Returns the palette's name.
Syntax
ControlCommand("Wled Lights", "SetPalette", (String)nameOrId)
Parameters
| # | Name | Type | What to pass |
|---|---|---|---|
| 1 | nameOrId | Text | Your text, in quotes |
Returns: String
Example
var result = ControlCommand("Wled Lights", "SetPalette", "nameOrId");
SetSpeed
Set the effect speed, 0 (slowest) to 255 (fastest). Returns the new speed.
Syntax
ControlCommand("Wled Lights", "SetSpeed", (Number)speed)
Parameters
| # | Name | Type | What to pass |
|---|---|---|---|
| 1 | speed | Number | A number, without quotes |
Returns: Integer [-2,147,483,648 to 2,147,483,647]
Example
var result = ControlCommand("Wled Lights", "SetSpeed", 0);
Toggle
Turn the LEDs on if they are off, or off if they are on. Returns the new power state.
Syntax
ControlCommand("Wled Lights", "Toggle")
Returns: Boolean [true or false]
Example
var result = ControlCommand("Wled Lights", "Toggle");
This list is read out of the robot skill itself each time its package is uploaded, so it matches the published version (v1).



This robot skill has been updated to v1.
What has changed
initial release