

Accurate Bing cloud speech-to-text for ARC: wake-word, programmable control, $BingSpeech output, Windows language support, headset compatible
How to add the Bing Speech Recognition robot skill
- Load the most recent release of ARC (Get ARC).
- Press the Project tab from the top menu bar in ARC.
- Press Add Robot Skill from the button ribbon bar in ARC.
- Choose the Audio category tab.
- Press the Bing Speech Recognition icon to add the robot skill to your project.
Don't have a robot yet?
Follow the Getting Started Guide to build a robot and use the Bing Speech Recognition robot skill.
How to use the Bing Speech Recognition robot skill
The Bing Speech Recognition robot skill for ARC lets your robot “hear” what you say by using Microsoft’s cloud-based speech-to-text service (often called Bing / Azure Speech). The skill listens to your microphone, sends the audio to Microsoft over the internet, and receives back the recognized words as text.
Once your speech becomes text, ARC can use it to:
- Run robot actions (move, turn on lights, play sounds, etc.)
- Trigger scripts (JavaScript or Python)
- Feed conversational AI (PandoraBots, ChatGPT-style systems, etc.)
Two Versions of This Skill
There are two speech-recognition skills you may see in ARC:
- Bing Speech Recognition (this skill): uses ARC Pro subscription cloud services. Limits are generally generous for normal robot use.
- Advanced Speech Recognition: a separate skill you can switch to if you need different quota/usage behavior or exceed ARC Pro query counts.
Before You Start (Beginner Checklist)
- Install the skill in your ARC project and make sure it opens without errors.
- Confirm your PC has internet access. Cloud speech recognition requires the audio to be uploaded.
- Pick a microphone (USB headset, Bluetooth mic, webcam mic, etc.).
- Test the microphone in Windows first (make sure the input meter moves when you talk).
Microphone Recommendation (Very Important)
Robots are noisy. Motors, servos, fans, and the robot’s own speaker can make speech recognition inaccurate. For best results, do not mount the microphone on the robot unless you have a very quiet robot and a high-quality mic setup.
Recommended mic locations
- On the controlling PC/laptop (desk mic or webcam mic)
- On you (headset mic or lapel mic)
- In the room, away from the robot’s speaker and motors
Gain vs. false positives
Higher microphone gain helps you be heard from farther away, but it also increases the chance that the skill “hears” noise and triggers accidentally (false positives). If you get random triggers, reduce gain, move the mic closer to your mouth, or use push-to-talk.
For best accuracy, use a headset or Bluetooth microphone instead of a built-in laptop microphone.
Main Window (What You’re Seeing)
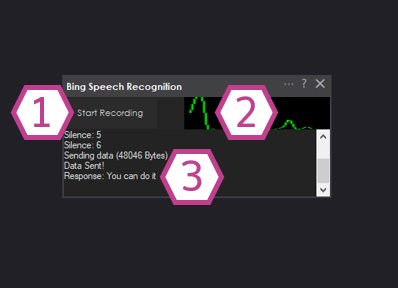
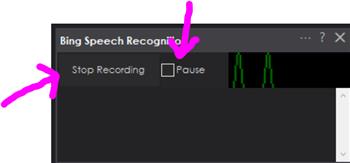
1. Start Recording / Start Listening Button
Starts speech recognition. The skill begins waiting for speech, captures your voice, converts it to text,
and shows the result in the Response Display. If you are brand new, click this first to confirm your mic works.
2. Audio Waveform
This is your quick microphone test. When you talk, you should see movement. If the waveform is flat,
Windows is probably using the wrong microphone or the mic volume is too low.
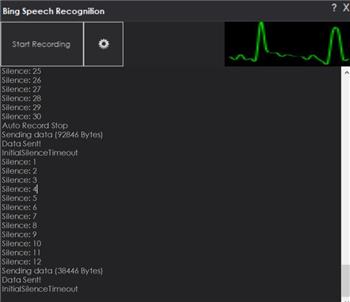
3. Response Display (Log)
Shows what ARC recognized, plus silence detection and helpful status/diagnostic messages.
Use this log to troubleshoot recognition quality, wake word confidence, and microphone settings.
Configuration (Settings Explained)
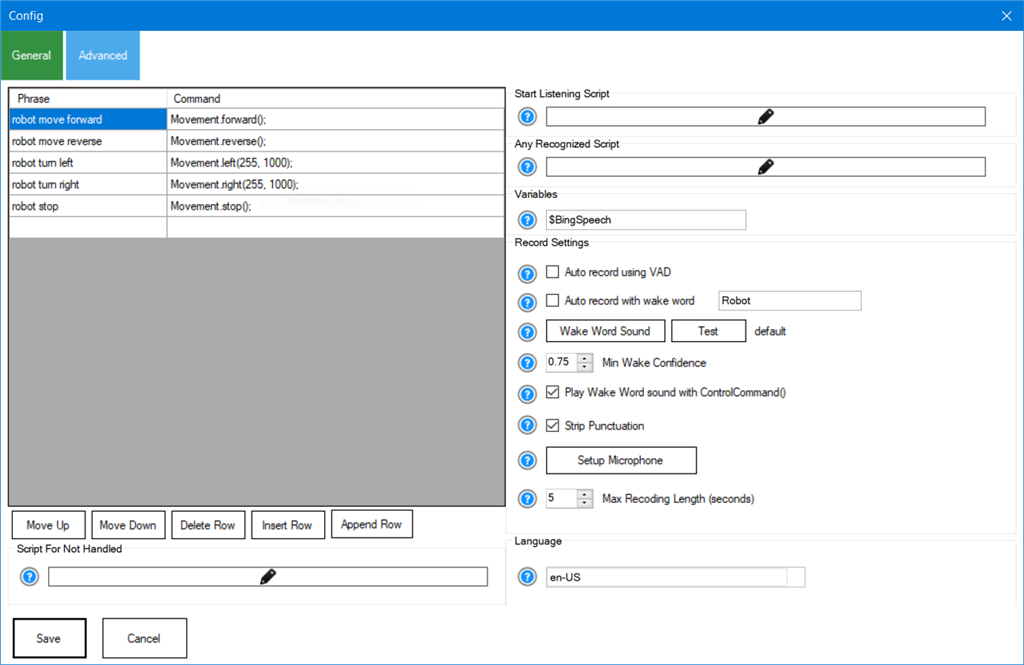
Beginner tip: If you’re not sure what to change, start with just these: Phrase List, All Recognized Script, and Language. Leave the rest at defaults until you have basic recognition working.
Phrase List
A list of phrases you want the skill to recognize as “commands”. When your spoken words match a phrase,
ARC can treat it as handled (a known command). Keep phrases short and distinct for best accuracy.
Examples: “robot start”, “turn left”, “stop”, “look at me”.
Not Handled Script
Runs when speech is recognized but it does not match anything in the Phrase List.
This is useful when you want a fallback behavior (for example: “I didn’t understand” or send text to an AI).
This script is skipped if a phrase match occurs.
All Recognized Script
Runs every time something is recognized, whether or not it matches your Phrase List.
The recognized text is stored in a variable (default: $BingSpeech), so you can read it in your script.
Common use: send all speech to a chatbot, log everything, or do your own custom parsing.
Start Listening Script
Runs whenever the skill begins listening. This is commonly used for feedback such as:
turning on an LED, showing a message on-screen, or playing a “listening” sound so you know it’s active.
Variable Field
The name of the ARC variable that will store the recognized text. Default is $BingSpeech.
Because it’s a normal ARC variable, you can access it from:
- JavaScript or Python
- Other skills that read variables
- Scripts using
GetVar()
Auto Record Using Wake Word
Enables wake-word detection (similar to “Alexa” / “Hey Google”). When the wake word is detected,
the skill automatically starts listening for your command.
Beginner note: Wake words are convenient, but can be unreliable in noisy rooms.
Push-to-talk is usually more dependable for robots.
Wake Word Sound
Plays a sound through the PC’s default speakers when the wake word is detected, so you know the robot “heard” the wake word.
Min Wake Word Confidence (0.0 – 1.0)
How “sure” the system must be before it accepts the wake word. Default is 0.75.
- Increase this if the wake word triggers by accident.
- Decrease this if you have to repeat the wake word too often.
Play Wake Word Sound with ControlCommand()
If enabled, the wake sound will also play when you start listening from a script using ControlCommand().
Useful if you want consistent audio feedback no matter how listening was started.
Stop Punctuation
Removes punctuation from recognized text. This can make command matching easier.
Example: “turn left.” becomes “turn left”.
Setup Microphone
Opens Windows audio settings so you can choose the correct input device and adjust levels.
Use this if the waveform does not move when you talk.
Max Recording Length (Seconds)
Limits how long the skill will listen before it stops automatically. This helps prevent the robot from listening forever,
which can reduce accidental triggers and excessive background audio uploads.
Pre-Record Seconds
The number of seconds of audio to include before the recording is triggered. When set to a value greater than zero,
the microphone continuously buffers audio in the background. When recording begins via wake word, control command,
or button press, the buffered audio is prepended to the recording. This is useful for capturing the beginning of a
phrase that may have started before the recording was triggered. Default is 0 (disabled).
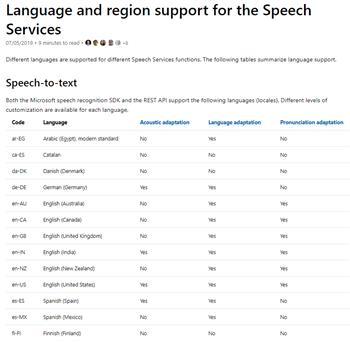
Language Drop-down
Selects the language/locale used for recognition (example: en-US). Available options depend on what is installed
and supported on your system.
If you don’t see the language you want, check Microsoft’s language/locale list and use the correct locale value:
Microsoft Speech-to-Text language support.
Quick Start (Your First Successful Test)
- Open the skill and click Setup Microphone. In Windows, select the mic you want to use.
- Speak normally and confirm the input meter moves in Windows and the audio waveform moves in ARC.
- Select the correct Language (for example: English (United States)).
- Click Start Listening (or Start Recording) and say a short phrase like: “hello robot”.
- Look at the Response Display and confirm your words appear as text.
How to Use Recognized Speech in ARC
When the skill recognizes speech, it stores the text in the variable (default: $BingSpeech).
You can use that variable in scripts to decide what your robot should do next.
Wake word vs. Push-to-talk
Automatic voice activity detection can be unreliable in noisy environments (common with robots). For dependable control, use push-to-talk: you explicitly start listening, speak, then stop listening.
Push-to-Talk Example (Recommended for Beginners)
The example below uses the Script skill and a physical button connected to EZ-B port D0 (configured with a pull-up resistor). The robot only listens while the button is held down. For a more in-depth tutorial on implementing push-to-talk, see the getting-started tutorial.
while (true) {

  // Wait for the button press (pulls D0 low)
  Digital.wait(d0, false);

  // Start Bing Speech Recognition
  ControlCommand("Bing Speech Recognition", "StartListening");

  // Wait for the button release (D0 returns high)
  Digital.wait(d0, true);

  // Stop listening and begin transcription
  ControlCommand("Bing Speech Recognition", "StopListening");
}
What this script is doing
- Waits until the button is pressed
- Starts listening
- Waits until the button is released
- Stops listening, then the service converts the recorded speech into text
Tutorial: Using This Skill with Conversational AI
A step-by-step tutorial shows how to use speech recognition with a chatbot for conversational robots: AI Robot Chat tutorial.
Videos
Example usage combined with Cognitive Vision and Cognitive Emotion.
Requirements
- Internet connection is required (speech recognition runs in the cloud).
- If your robot uses a separate WiFi network (for example, connecting directly to an EZ-B), you may need dual network connections (ex: Ethernet + WiFi, or two WiFi adapters). Learn more: Dual network connections.
Recommended Hardware
Headset or External Microphone
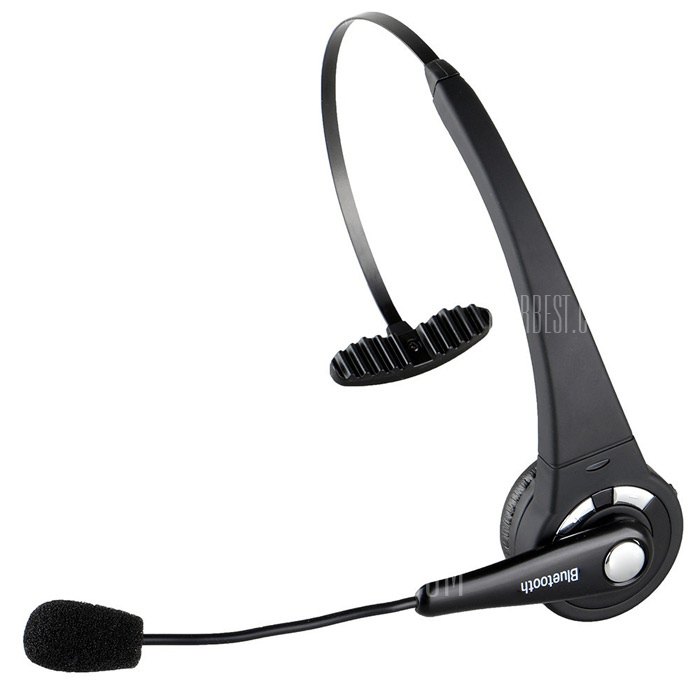
A headset or external microphone greatly reduces background noise and prevents the recognizer from hearing the robot’s own speaker. This improves accuracy and reduces false positives.
Resources: Configure Your Microphone in Windows
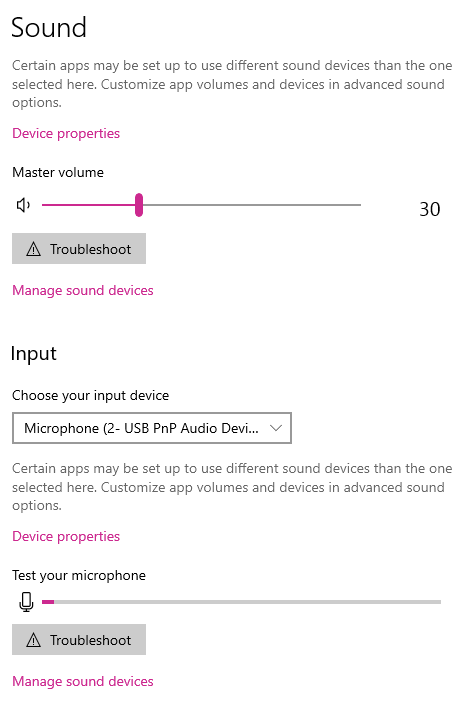
- Right-click the speaker icon in the Windows system tray
- Select Open Sound settings
- Under Input, choose the correct microphone device
- Speak and confirm the input meter responds
- Adjust microphone volume so normal speech peaks around the middle of the meter (avoid constant max/red levels)
Control Commands for the Bing Speech Recognition robot skill
There are Control Commands available for this robot skill which allows the skill to be controlled programmatically from scripts or other robot skills. These commands enable you to automate actions, respond to sensor inputs, and integrate the robot skill with other systems or custom interfaces. If you're new to the concept of Control Commands, we have a comprehensive manual available here that explains how to use them, provides examples to get you started and make the most of this powerful feature.
Control Command Manual// Starts listening and returns the translated text. No scripts are executed. (Returns String)
- controlCommand("Bing Speech Recognition", "GetText")
// Start listening and convert the speech into text. Sets the global variable and executes the script.
- controlCommand("Bing Speech Recognition", "StartListening")
// Stop the current listening process.
- controlCommand("Bing Speech Recognition", "StopListening")
// Pause listening so the wakeword (if enabled) does not trigger listening.
- controlCommand("Bing Speech Recognition", "PauseListening")
// Unpause listening so the wakeword (if enabled) will trigger listening.
- controlCommand("Bing Speech Recognition", "UnpauseListening")
// Return the status of the pause checkbox. (Returns Boolean [true or false])
- controlCommand("Bing Speech Recognition", "GetPause")
Related Tutorials
Speech Recognition Tutorial
Vision Training: Object Recognition
Related Hack Events

Treat-O-Matic 2020 Live Hack Part #6 The Finale

Treat-O-Matic 2020 Live Hack Part #5
Robot Learn A New Object

D-0 Droid Live Hack
Related Robots

Related Questions
Use Voice Recognition For Unsupported Languages
Anyone Having Issues With Bing Speech Recognition?
What Is The Difference Between Pauselistening And...

Upgrade to ARC Pro
Get access to the latest features and updates before they're released. You'll have everything that's needed to unleash your robot's potential!
I loaded the Watson Speech to text and worked like a charm. It waits until you start talking and when you stop it auto uploads so you can have a conversation with the robot. You get 500 minutes a month free. PTP wrote this one.
I will try it out then Nink, will give a try on my little panda pc .
It doesn't work in this skill:
As tested it does work. Perhaps you have the confidence recognition threshold too high?
I am a little confused as to the Configuration in the Bing Speech Recognition skill. I get a different Config screen to the one shown above. I get the Config shown below. I can't set the silence count or level threshold. The way it stands, the Bing Speech Recognition skill picks up my Wake Words all the time, even if I am just typing or saying completely different words. Not much use.
@afcorson, I've also struggled with relying on this skill's built in wake word and VAD to record or start scripts. After trying a a few times I went back to my original method of starting up Bing. You can see that outlined in Post 15 of this thread. It works 100% of the time. As mentioned in that post. I can start Bing listening using the Voice Recognition skill with it listening for just one word (I use Robot) and Bing will manage it's own recording time by setting it in it's Config page.
If you would like I can expound on my setup but I'm not able to do so right now as I'm not near my laptop.
Are the auto record using threshold and silence count options not available anymore with this Skill? I want the Bing Speech Recognition to stop when I stop speaking. Otherwise it waits 9 secs (or whatever I set it to) before sending the spoken text to the Chatbot. Another problem I am having is using ChatGPT. I set it up to work on my laptop, but when I copy the program to my Pepper robot (which has ARC runtime installed), the API key is not there so it doesn't work. I figured out I needed to create a new API key on the actual robot. Then it worked. I gave up on voice activation of Bing Speech Recognition and decided to use buttons to start a conversation and end it. IT was easy to start it with a keyword but not possible to end it until it timed out.
Oh! and here's another annoying problem. ChatGPT sometimes returns quote marks in its responses (ASCII 34). Unless these are removed, my SAY command falls over. Any ideas on removing quote marks from text? Well, I spent 3 hours on this problem and came up with this...
var ChatGPTresponse = getVar("$OpenAIResponse"); var noQuotes = ChatGPTresponse.replace(/["']+/g, ''); setVar("$Text", noQuotes); controlCommand("Dialogue", "ScriptStartWait");
Note: The Dialogue script says the $Text