
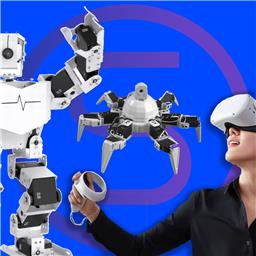
Immersive Meta Quest VR control for Synthiam ARC robots: stereoscopic camera view, map servos to hands/controllers, plus built-in remote desktop.
 Hardware Info
How to add the Oculus Quest Robot robot skill
- Load the most recent release of ARC (Get ARC).
- Press the Project tab from the top menu bar in ARC.
- Press Add Robot Skill from the button ribbon bar in ARC.
- Choose the Virtual Reality category tab.
- Press the Oculus Quest Robot icon to add the robot skill to your project.
Don't have a robot yet?
Follow the Getting Started Guide to build a robot and use the Oculus Quest Robot robot skill.
How to use the Oculus Quest Robot robot skill

Transform your robot interaction experience with the Oculus Quest robot skill for Synthiam ARC. This skill enables immersive control of robot cameras and servos using the Meta Quest 2 VR headset. This innovative skill offers a hands-on approach to robotics, complete with a remote desktop feature for seamless ARC control. It promises a future where remote work and safety in hazardous environments are enhanced through virtual reality.
Why Control Robots From VR?
While it is exciting to use this robot skill and have a robot mimic your movements with VR accessories, this is also a preview of future technology in the workplace. Robots can perform many jobs, but the computing power to automate the task is unavailable. Today, VR technology is advanced enough to allow humans to control robots remotely and accomplish tasks. This means, for example, that warehouse workers can work from the comfort and safety of their homes while improving outcomes by remotely controlling robots. As artificial intelligence improves, robots will require less human intervention, but humans will still be needed to help the robot when it gets stuck. This means one person can control many robots, complementing Synthiam's approach with our Exosphere product.Imagine people working from home while operating robots remotely in dangerous locations, such as mining, disaster recovery, or space exploration. With Synthiam's agnostic approach, our platform can program any robot. With the addition of virtual reality remote control, we are saving lives and improving job safety. There is no better time to familiarize yourself with this technology at home, school, or the workplace.
Downloading Quest Robot Controller App
Get the Oculus Quest Robot App: Oculus Quest Robot.apk (v0.10 June 25, 2022).
*Note: Due to Meta's review process complications, this app must be side-loaded while we work with Meta to have the app accepted for their store. Meta is currently disallowing this app because it connects to a PC. We're working to convince Meta that this useful VR app should be accepted for their review process so that students, robot builders, and inventors can use it. Stay tuned!
Meta Refuses To Accept Our App
We apologize for the method of installing the app rather than making it available in the Oculus app store. No matter how hard we plead, Meta will not accept our app in the store. The Meta Oculus Store denies our Oculus Quest Robot App because they do not like that it controls physical hardware. We continue to plead to their process, but they do not respond, and we continue to receive this same response.

Stereoscopic Camera View
This robot skill and Oculus Quest VR app optionally support two cameras (left and right eye), which provide the user with a 3D stereoscopic view. If two cameras are not required, a single camera can be used instead. The position of the two cameras is critical to prevent eye strain for the viewer. It is generally advised to measure the distance between your pupils. Use that measurement when distancing each camera from the center of each lens.Using Oculus Meta Quest App with Virtual Reality
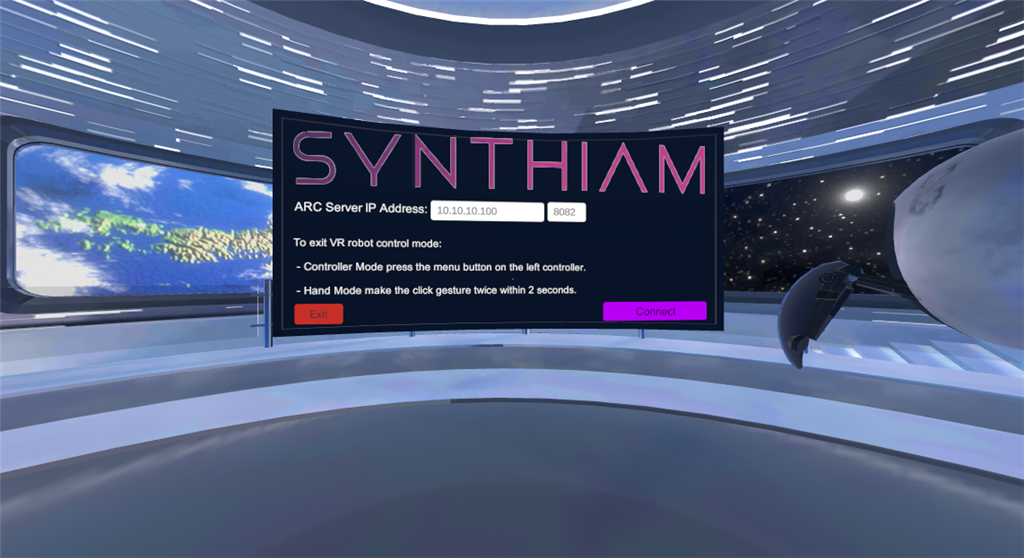
When the Oculus Meta Quest robot control app is loaded, you will find yourself on the bridge of a spaceship. The left controller can move your view around the ship to explore. The right controller can interact with the menu connecting to the robot.
Enter the IP Address of the Synthiam ARC software. The robot skill will show public and private IP addresses you can enter in this field. If you use this robot skill on your local network, use the local IP address. If you connect over the internet through a port on your router, use the public IP address.
The port can be edited, but the default value is always 8082.
Pressing the connect button will load the robot control view.
About The Oculus Meta Quest 2
The Oculus Meta Quest 2 (marketed since November 2021 as Meta Quest 2) is a low-cost virtual reality (VR) headset developed by Facebook Reality Labs (formerly Oculus). It is the successor to the company's previous headset, the Oculus Quest. The Quest 2 was unveiled on September 16, 2020, during Facebook Connect 7.As with its predecessor, the Quest 2 can run as a standalone headset with an internal, Android-based operating system that does not require a PC or high-cost graphics card. It is a refresh of the original Oculus Quest with a similar design but lighter weight, updated internal specifications, a display with a higher refresh rate and per-eye resolution, and updated Oculus Touch controllers.
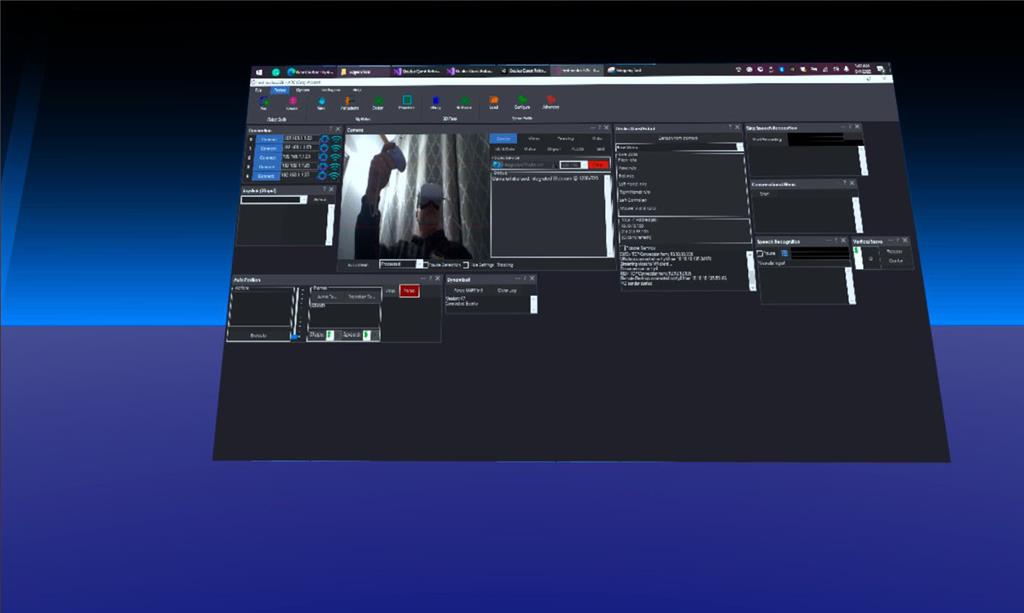
Main Window
Controller Inputs
Configuration
Press the configure button on the robot skill to view the configuration screen for this robot skill.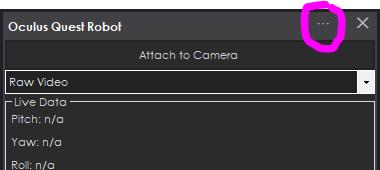
Headset
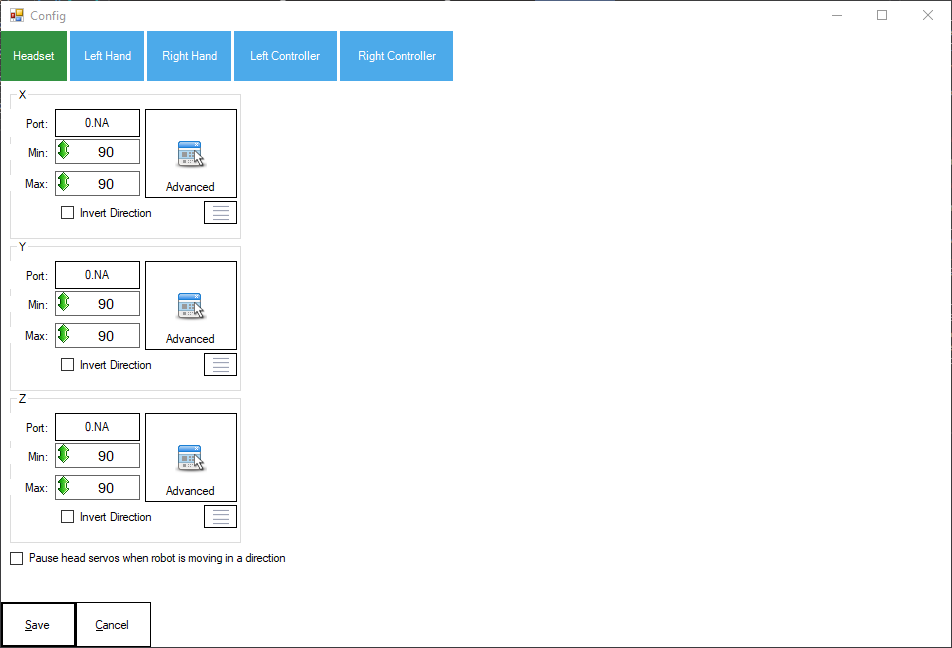
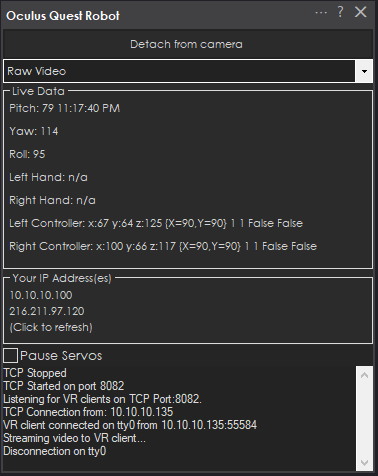
The servos for X (horizontal), Y (vertical), and Z (tilt) can be assigned. These servos will move with your headset to look around. Generally, you will want these servos attached to a camera so you can look around at the environment with the headset.
There is an option to pause servos when the robot moves and pause the headset servos while any Movement Panel is being moved. When checked, the headset servos are only usable when the robot is not moving. This is useful to reduce motion sickness while the robot is moving.
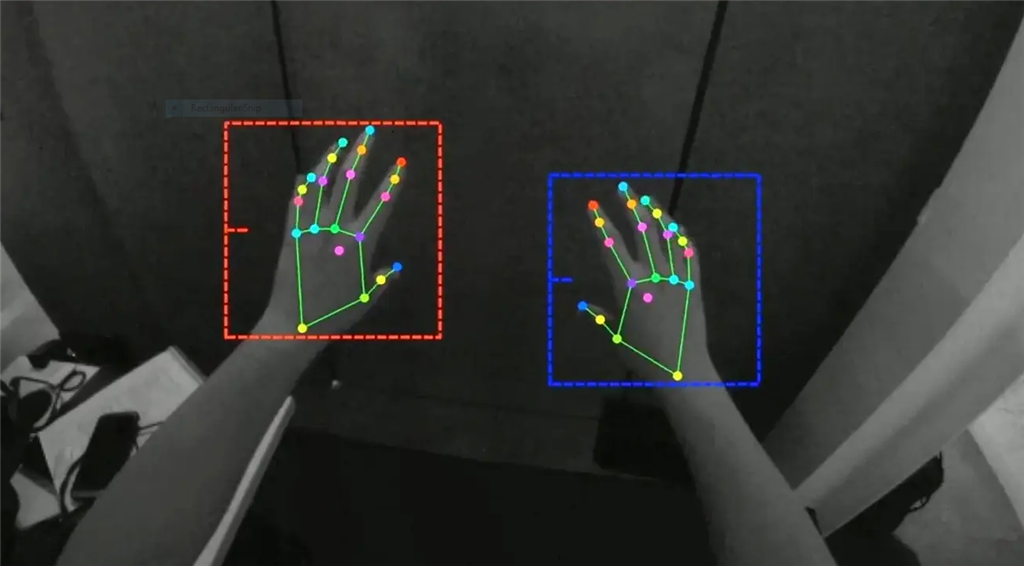
Left Hand & Right Hand
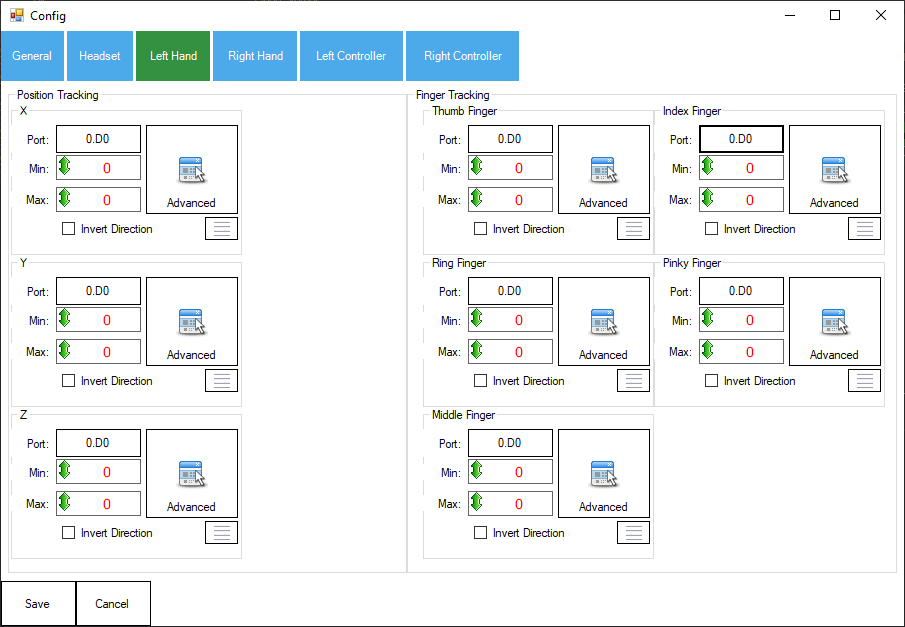
The position tracking group will bind servos to the hand's position. The X is horizontal, Y is vertical, and Z is the distance outward from your body.
The finger tracking group allows assigning servos to each finger. Gripping each finger into a fist will move the respective servos. This is useful when using a robot hand, such as the InMoov, to control each finger individually.
Left Controller & Right Controller
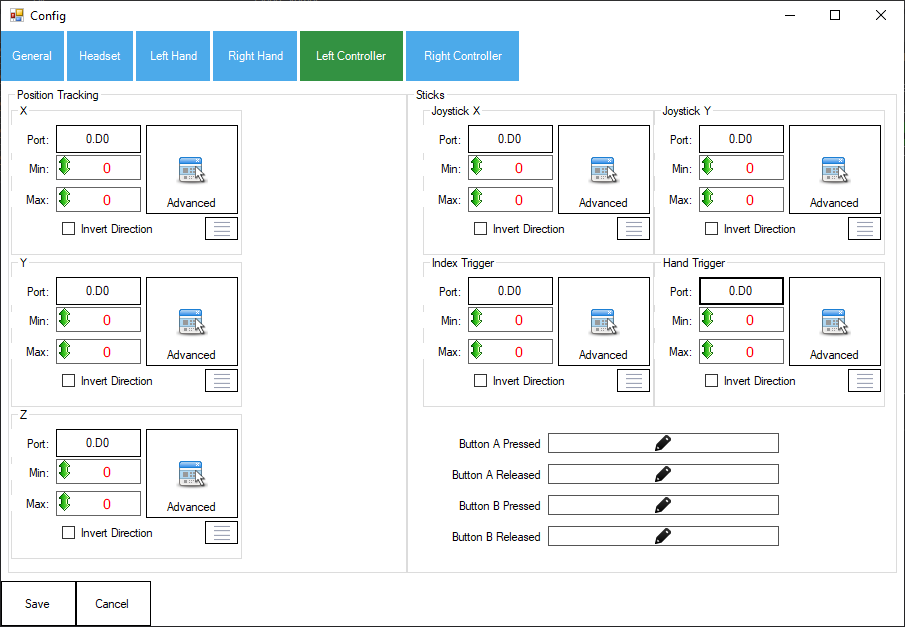
The position tracking will bind servos to the hand's position. The X is horizontal, Y is vertical, and Z is the distance outward from your body.
Triggers and analog sticks can also control servos. The triggers are the index trigger and the hand trigger. The analog stick for each controller can be assigned servos.
Scripts can be assigned to the A and B buttons when pressed or released.
General
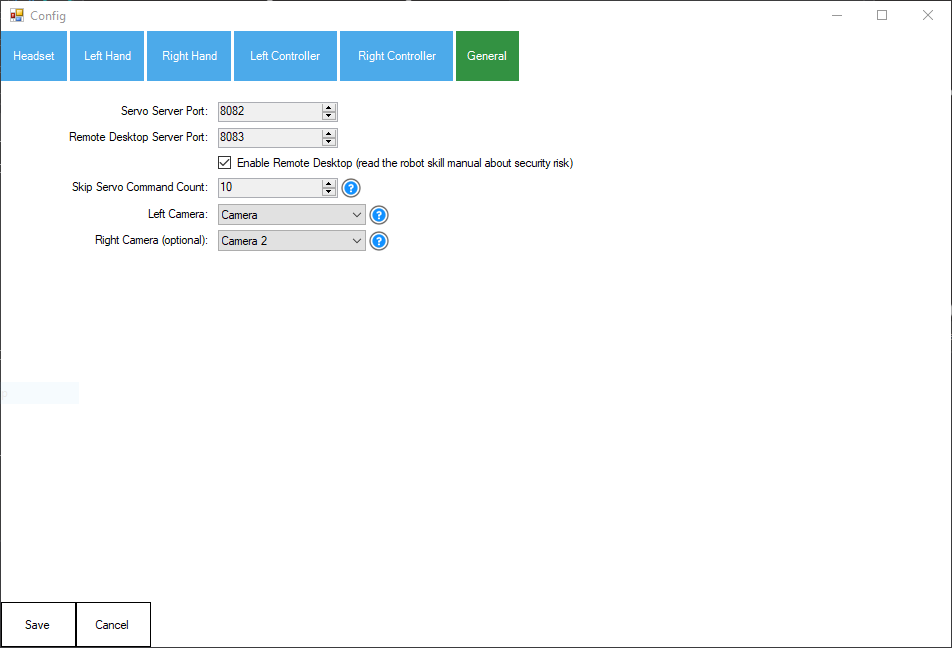
1) The TCP ports for servo Server and Remote Desktop are read-only. They cannot be changed,
Enable/Disable the remote desktop feature. This feature has no password protection, so be cautious if you enable it. Do not enable this feature on public networks.
The number of frames to skip when transmitting servo positions. If too many servo positions are set, the EZB may brown out due to a lack of power supply.
Left Camera (or single camera if using only one camera)
Right camera (optional if using only the left/single camera)
Remote Desktop
The remote desktop lets you move the mouse with the right controller. You can use the trigger to left-click and the hand grab to right-click. The remote desktop feature does not provide authentication, so only use this on private networks.
Press the menu button on the left controller to exit the remote desktop mode.
The analog stick on the left controller can move around the floating screenshot window.
Robot Control
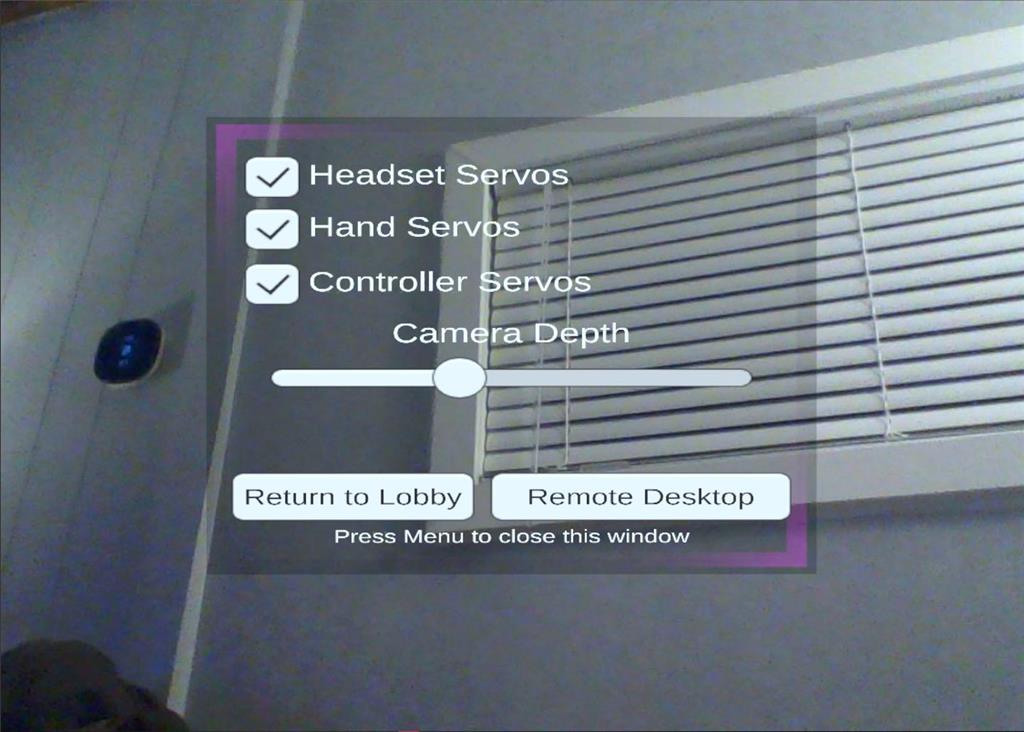
When viewing the robot control, the menu button on the left controller will load the menu to enable and disable specific servos.
In the popup menu, you can adjust the camera depth for comfort.
The return to lobby option will do just that: return you to the main menu lobby.
The remote desktop can remotely control ARC through the VR headset if the robot skill configuration is enabled.

I just press the upload button in the oculus developer hub.
To expand on DJ's response, the developer hub can be downloaded from here: https://developer.oculus.com/downloads/package/oculus-developer-hub-win/
Synthiam does not support adding apps to the Quest using this method, so there will not be a formal tutorial. The wait for Meta to review and accept the app will allow the app to be added to your quest from the store.
In the meantime, if you use the developer hub software, the apk can be installed by selecting your Quest from the devices menu. There will be an upload button that will allow selecting an APK to be added. I hope that helps!
Robot skill updated to v4
Fix for hand servo configuration not saving
Added remote desktop server (configurable in General tab)
Robot skill updated to v6
Meta Quest APK updated to v0.8 (Oculus Quest Robot.apk)
I'm excited, I got the Synthiam app sideloaded onto my quest last night! I used the SideQuest app on my laptop and loaded the APK into the headset via a USB-C cable. I found the app in the "Unknown Sources" section of the app menu on the Quest.
I used this skill and the camera skill in ARC to check out the camera view. It's so weird to be looking at yourself when you use a laptop camera!! A true out-of-body experience!
Is anyone else trying this out? I'd love to compare notes!
I'm wondering which robot would be the quickest to make/buy that has fingers? Is it still the inMoov?
Cool I still haven't purchased a quest yet was holding off until someone other than dev had it working. Did you try with JD and his grippers?
Right on @Nink, No I haven't tried that yet but I guess I could. I was just thinking that full finger movement would definitely be next level, but I guess I could start off small
I used JD with the grippers. I assigned my index finger to the gripper, and it worked well.
I'd like to 3d print only an inmoov arm and attach it to a mount or something. I don't need the full inmoov but just an arm. What would be really wild is an inmoov arm attached to a base that you can drive around. Then you could remotely operate a hand from anywhere in the world with it.