

Custom Movement Panel maps directional commands to scripts, adjusts per-wheel speed (0-255), and integrates with joysticks for unsupported motors
How to add the Custom Movement Panel robot skill
- Load the most recent release of ARC (Get ARC).
- Press the Project tab from the top menu bar in ARC.
- Press Add Robot Skill from the button ribbon bar in ARC.
- Choose the Movement Panels category tab.
- Press the Custom Movement Panel icon to add the robot skill to your project.
Don't have a robot yet?
Follow the Getting Started Guide to build a robot and use the Custom Movement Panel robot skill.
How to use the Custom Movement Panel robot skill
The Custom Movement Panel skill is used when your robot has a motor driver or movement controller that does not have a built-in ARC movement panel. Instead of ARC directly driving your motors, you will write scripts that run when you press: Forward, Reverse, Left, Right, and Stop.
This skill also includes a global speed system. Joystick-style controls (like the ARC Mobile Interface joystick or the Joystick Control skill)
can change the speed value. Your scripts can read the current speed (left/right) and react to it, or you can set it with SetSpeed(value).
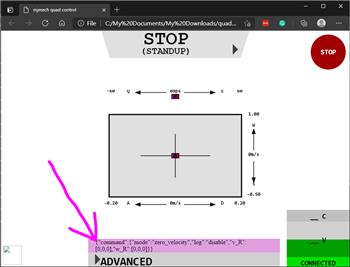
Main Window
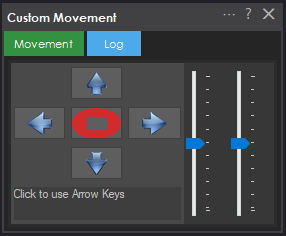
1. Movement Panel (Direction Buttons)
These buttons control the robot’s movement: Forward, Reverse, Left, Right, and Stop. When you click one, ARC runs the script you assigned for that direction in the skill’s settings.
2. Speed Sliders (Left / Right)
These sliders set the movement speed values used by the skill. Speed ranges from 0 to 255:
- 0 = no movement (effectively “off”)
- 255 = full speed
You can set different left and right speeds to help correct a robot that drifts because one motor is stronger than the other. Whenever you move a slider, the Speed Changed script can run (if you’ve configured it).
Settings
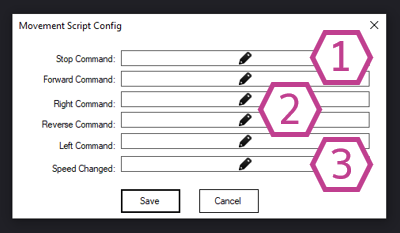
1. Stop Script
This script should immediately stop your robot. It runs when you press the Stop button and also when the
Stop() command is called from another script.
Make sure this script is reliable—stopping is a safety feature.
2. Direction Scripts (Forward/Reverse/Left/Right)
These scripts define what your robot does for each direction.
They run when you click the movement buttons and also when movement commands are called from scripts
(for example: Forward(), Left(), etc.).
3. Speed Changed Script
This script runs whenever the speed changes—either from moving the sliders or when SetSpeed(value) is used.
Use this if your hardware needs to be updated immediately when the speed changes (for example, sending a new speed value to your motor controller).
How to Use the Custom Movement Panel (Step-by-Step)
-
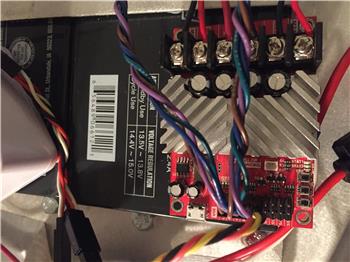
Connect your hardware.
Power your robot and connect your controller (for example, an EZ-B) to ARC. -
Add the skill to your project.
In ARC, go to: Project → Add Skill → Movement Panels → Custom Movement Panel. -
Open the skill settings and enter scripts.
Add a script for each direction and for Stop. Each script should send the correct commands to your motor driver/controller. -
Test movement using the main window buttons.
Click Forward/Reverse/Left/Right and confirm the robot moves correctly. If a direction is backwards, fix it by adjusting the script for that direction (for example, swapping motor directions). -
Fine-tune speed using the sliders.
Reduce speed if the robot is too fast, and adjust left/right balance if the robot pulls to one side.
Code Samples (EZ-Script)
These functions let you read the currently selected speed values. This is helpful if you want your movement scripts to automatically use whatever speed the user selected on the sliders (or from a joystick skill).
GetSpeed()
# Returns the global Movement Speed value (0-255)
# Example:
$x = GetSpeed()

GetSpeedLeft()
# Returns the global Movement Speed value for the left wheel (0-255)
# Example:
$x = GetSpeedLeft()

GetSpeedRight()
# Returns the global Movement Speed value for the right wheel (0-255)
# Example:
$x = GetSpeedRight()About SetSpeed(value)
You can also change the speed in code using SetSpeed(value).
This will update ARC’s movement speed value and can trigger the Speed Changed Script (if configured).
Resources
Read more about how Movement Panels work in ARC: https://synthiam.com/Docs/ARC-Overview/movement-panels.
Related Tutorials
The Robot Program Episode 006: Introducing ARC

Control More Than One Robot
Related Robots
Related Questions
JSON To Mjbots Quad Robot Series
Adjusting Encoders On A Roboclaw 2X15

HELP NEEDED FOR 21DOF EZB HUMANOID ROBOT
Movement Panel With Servo Control

Upgrade to ARC Pro
Stay at the forefront of robot programming innovation with ARC Pro, ensuring your robot is always equipped with the latest advancements.
I found my issues. Yes was looking at wrong panel. Thanks
HI @Jeremie I wish I saw your post. I have been trying to do the same thing. Could you please share your ARC file if you still have it. I am knee deep in custom Movement Panel and I am not winning. There are so many factors to deal with when you try to use strafe movement versus regular movement.
I feel we are pushing the limits of the custom movement panel. I am using key control and custom Movement Panel but they don't all work together. We really need 2 joysticks and 2 movement panels or even better a new Movement Panel skill that is specifically designed for mecanum wheels.
Use the custom Movement Panel v2 that has roll left and roll right, which you can use for strafing: https://synthiam.com/Support/Skills/Movement-Panels/Custom-Movement-Panel-v2?id=21148
Hello! I am trying to get the custom Movement Panel to increment a servo each time the Left/Right button is pressed. I am using the code:
ServoUp(1.D3, 20)
When I push the button, it increments correctly. However when I push it a second time it does not respond. Is there there something I am missing that would allow it to continuously increment over and over again, continuously turning left? With its current funtionining, it is basically just activating a frame/gait control one-time movment.
EDIT: It works properly when movement is triggered from another skill. It seems its just the arrows that only allow one iteration
hi electrophuntronic
am gessing
:loop sleep(300) Servo(D3,1,180) sleep(300) goto(loop)
A Movement Panel is not meant for what you're trying to use it for. A Movement Panel is used to move a robot. You can't hit forward and then hit forward again. Think of it this way, if your robot is moving forward, and you press forward again, how can it possibly go more forward?
You can only go one direction at a time. If you are walking forward, you can't go any more forward because you're already walking forward.
Maybe you want to create an interface builder and add buttons incrementing the servo position each time the button is pressed.
@Nomad, your servo position command looks wrong. You have too many numbers. You would use that last number if you want to use random positions but you'd have to use the command ServoRandom (servoPort, lowPosition, highPosition)
Here is the proper example: Servo (servoPort, position)
I think DJ has hit it on the head. The OP will have to use a script and attach it to a button. His script looks correct to move one servo position value at a time using the command ServoUp(). To move the other way he'd attach a second script to a second button he's using and with the command: ServoDown (servoPort, count).@elektrophunktronic, I see in your code you are using .1 to start your statment inside the (). Are you using more then one EZB? If not you dont have to use that part of the command. EZ Script knows to look for only one EZB if you are connecting only to one. Now, if you have more then one connection then you would start numbering them in your command. 1. 2. 3. and so on. Please forgive if you already know this.
Good luck and have fun!!