
jp15sil24
Movement Panel With Servo Control
I have modified my 3-wheel robot by replacing the two 360-degree servos with a motor equipped with a differential. This motor is controlled by a dual H-bridge using PWM signals. While I'm not entirely sure if this is the optimal setup, I'm still learning and experimenting with various possibilities. Currently, the single motor controls both rear wheels, allowing for synchronized forward and reverse movement, which is functioning well.
For steering, I have installed a servo at the front to control the wheel's left-right movement. However, I'm encountering an issue where the joystick correctly manages the forward and reverse motion but fails to control the steering. I would like to have a single control interface or "tool" that can manage both forward/reverse and left/right steering using the servo. If achieving this with a joystick is not feasible, could you suggest an alternative solution?
Related Hardware (view all EZB hardware)
Related Robot Skill (view all robot skills)


To achieve a single control interface that manages both forward/reverse movement and left/right steering using a servo, you can use the Custom Movement Panel in ARC. This setup will allow you to control the differential motor for forward and reverse movement and the servo for steering. Here's how you can configure it:
Step-by-Step Configuration
Add the Custom Movement Panel:
Projecttab and click onAdd Skill.Movement Panelsand selectCustom Movement Panel.Configure the Custom Movement Panel:
Script for Forward and Reverse:
Script for Left and Right Steering:
Stop Script:
Joystick Control:
Alternative Solution
If using a joystick is not feasible, consider using the Mobile Interface Builder in ARC to create a custom control interface. This interface can have buttons or sliders for forward/reverse and left/right steering, which can trigger the respective scripts in the Custom Movement Panel.
Additional Tips
Feel free to ask if you need further assistance or clarification on any of these steps!
Is what you described a setup thats similar to a car? Where the wheels only go forward and backward, and the front wheels turn left and right?
the robot you have selected is an adventure bot. That doesn’t fit your description. Perhaps you meant to select the robot controller that you’re using. Can you tell us what robot controller you’re using and I’ll fix your post.
@df sures. Yes it is a modified adventurebot, it is like a RC car, iotiny,camera.Rear wheels go forward and reverse, one front wheel for steering with a servo in D4 . I use the Dual Hbridge W/PWM (L298N) port D2,D3 and D5 pwm. I connected only the right side for one motor
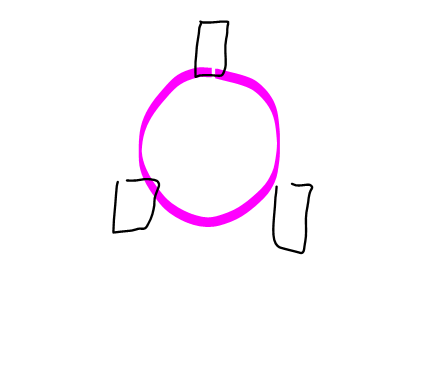
Would you describe it as looking like this from the top down? Where the rear wheels are on either side in the back, and there's a single front wheel that steers left/right by a servo.

I have some concerns about the viability of this configuration. I don't know its usefulness because it cannot pivot for tracking and navigating. It's a configuration you don't see with robotics for several reasons. The closest configuration to this in robotics would be having an unpowered castor front wheel and the rear wheels individually turn left/right to control the steering. A popular example would be any robot vacuum, similar to the iRobot Roomba.However, if you have a specific use case for this configuration, let me know, and hopefully, we can make something work for additional features. Although getting a Movement Panel for it isn't very difficult, I'm more concerned about how other movement features will work with that configuration.
@dj sures your drawing corresponds exactly to my wheel robot. I thought the configuration with only one motor and differential and one front wheel for steering could be easier to implement as 2 wheels individually turn left/right for steering. You have only one motor and one servo instead of 2 motors. A configuration in which the motors are very expensive, it would be an alternative.Duno if it makes sense to get a new Movement Panel which controls the forward/reverse/speed and the right/left steering (or something else) over a servo. The idea of front wheel steering came from a bicycle with JD on it. JD stands or sits on a 3 wheel robot platform and move the handlebar left or right. I have a JD beside, i have to built it and play easy rider
It’s absolutely possible to implement this, but as mentioned, it’s not a popular approach in robotics due to its lack of agility. Without a pivoting (rotating) movement mechanism, the system’s range of motion is limited, which significantly impacts agility. Robots relying solely on this type of movement may struggle to make tight turns or navigate complex environments efficiently. A more effective alternative is incorporating a pivoting mechanism or using designs inspired by robot vacuums, where a caster wheel in the front provides smooth directional changes and reduces strain on servos. That being said, you can make it work by using a Custom Movement Panel v2 and tailoring the scripts to your specific configuration, such as the ports, servo direction, and range.
Custom Movement Panel v2 manual is here: https://synthiam.com/Support/Skills/Movement-Panels/Custom-Movement-Panel-v2?id=21148
Here’s how you can structure your scripts for the different movement commands:
Forward Script
Comments:
d0,d1, 'd2', andd3are assigned to the correct ports for motor control and servo.1 to 180in theUtility.mapfunction based on your servo's specific limits.Reverse Script
Comments:
Utility.mapmatches your servo’s capabilities.Stop Script
Comments:
General Notes
Using these scripts, you can successfully implement a Movement Panel with servo control. However, this design has notable drawbacks, including reduced maneuverability due to the lack of pivoting motion and increased wear on the servos from the constant adjustments required to mimic a turning motion.
Let me add some context to the script as well.
In ARC, there is a movement manager who controls a Movement Panel in your project. When any robot skill requests to "move forward," the left and right wheel speed is also specified. That is how you can have a slight left or slight right forward motion. See the image below...
So what you'd be doing is only able to use the Forward, Reverse, and Stop movements. You cannot use "left" or "right". The forward and reverse will have slight left, slight right, etc. That's done by subtracting the specified speeds for the left and right to produce a positive or negative differential. That value is mapped to a servo angle for steering the front wheel.
The custom Movement Panel v2 is here: https://synthiam.com/Support/Skills/Movement-Panels/Custom-Movement-Panel-v2?id=21148
Any luck with getting this to work? The angle of steering and max speed might require some tweaks to the Utility.map parameters, but it should work fine