Sound Activated Circuits (Leds, Lamps Etc)
Description
One item that crops up often is sound activated LEDs or lights. And while the Sound servo control in ARC can handle this it is not perfect. So some clever scripting needs to be used to activate/deactivate/dim the lights or LEDs.
A quick little example of the outcome of the script initially done for Rex's project Questor.
So how is it done? It's very simple to be honest.
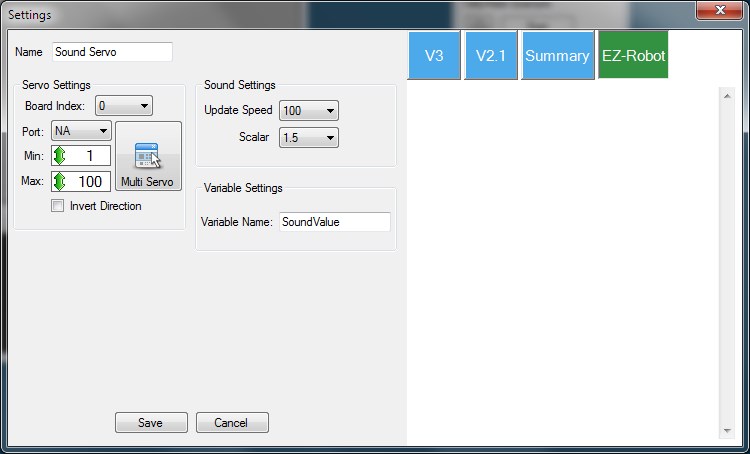
First add the Sound servo control and set it up as below.
Notice how the port...Step 1
One item that crops up often is sound activated LEDs or lights. And while the Sound servo control in ARC can handle this it is not perfect. So some clever scripting needs to be used to activate/deactivate/dim the lights or LEDs.
A quick little example of the outcome of the script initially done for Rex's project Questor.
So how is it done? It's very simple to be honest.
First add the Sound servo control and set it up as below.
Notice how the port used is set to N/A. We don't want it to control any servo directly, what we want is the variable it gives.Then add a new script control or new script to a script manager...
# Sound servo to PWM range Script
# Author: Rich
# Version: 1.0.0
# Date: 25th June 2013

# Variables (do not adjust)
# $soundvalue = auto
$pwmvalue = 0

# Main script
# Set the start point for the never ending loop
:loop
# Check the variable from the Sound servo control against a list of pre-determined levels (you may need to change these) and set the PWM value to suit.
IF ($soundvalue < 10)
  $pwmvalue = 0
ELSEIF ($soundvalue < 20)
  $pwmvalue = 10
ELSEIF ($soundvalue < 30)
  $pwmvalue = 20
ELSEIF ($soundvalue < 40)
  $pwmvalue = 30
ELSEIF ($soundvalue < 50)
  $pwmvalue = 40
ELSEIF ($soundvalue < 60)
  $pwmvalue = 50
ELSEIF ($soundvalue < 70)
  $pwmvalue = 60
ELSEIF ($soundvalue < 80)
  $pwmvalue = 70
ELSEIF ($soundvalue < 90)
  $pwmvalue = 80
ELSEIF ($soundvalue < 100)
  $pwmvalue = 90
ELSE
  $pwmvalue = 100
ENDIF

# Set the PWM with the value chosen above (you may need to change the port to suit)
PWM(D7, $pwmvalue)
# Add any other PWM ports above this line with PWM(PortNo, $pwmvalue)

# Sleep for 100ms to avoid saturation (you may need to adjust this to increase accuracy or increase stability. Reduce the delay for better accuracy, increase for better stability)
Sleep(100)

# Jump back to the start
Goto(loop)
Change the port on the PWM command line if needed, I used D7 but any port will work. Duplicate that line with a different port number if you need 2 (or more) ports to react.
You may also need to adjust the PWM values in the if/elseif part to suit your robot, LEDs, Lamps etc.
Lastly, connect up the LEDs, Lamps etc. to the EZ-B using the TIP Transistor circuit method.
Now, when any sound is detected by the Sound servo control it should adjust the PWM of the digital port in steps, as defined in the If/ElseIf/Else statement. If low level sound (in this case below 10 however that can be adjusted) the PWM is set to 0 and therefore the LED, Lamp etc. is off.
If you have any questions, queries, problems or even suggestions please feel free to ask. This is currently Version 1.0.0 of this script, there is always scope to improve I may, should time permit, add in the usual variables for ease of use (that'll be V1.0.1)


My LEDs were too dim with PWM so I simplified your code and just went with setting them on and off. It seems to work well. I want my robot to sing, so I need to figure out a way to separate the left and right channels so I can put the voice on one and the music on the other.
Thanks for getting me on the right track.
Thomas Messerschmidt Creator of Simone, the A.I. Fembot
Can any help explain what this means "Lastly, connect up the LEDs, Lamps etc. to the EZ-B using the TIP Transistor circuit method."? The link for "TIP Transistor circuit method" is a broken link.
Maybe this Link? Tip120 & Tip122 Transistor Switching Circuit
Dave, yea I thought it could be that but the link went to the EZ-Robot site so I was thinking DJ or Jeremie may be able to supply the details if it is needed.