
Autonomous AI for ARC robots: vision-driven speech, movement, animations, multi-step tasks, evolving drives, and persistent memory.
How to add the Autonomous AI robot skill
- Load the most recent release of ARC (Get ARC).
- Press the Project tab from the top menu bar in ARC.
- Press Add Robot Skill from the button ribbon bar in ARC.
- Choose the Artificial Intelligence category tab.
- Press the Autonomous AI icon to add the robot skill to your project.
Don't have a robot yet?
Follow the Getting Started Guide to build a robot and use the Autonomous AI robot skill.
How to use the Autonomous AI robot skill
The Autonomous AI robot skill gives your robot a fully autonomous personality powered by large language models. Your robot will see through its camera, speak, move, perform animations, and initiate actions on its own - all driven by AI decision-making. It supports multiple AI providers and models, allowing you to choose the intelligence behind your robot's behavior.
This skill transforms your robot from a remote-controlled machine into an autonomous companion that can hold conversations, react to its environment, execute multi-step tasks, and even entertain itself when no one is around. The robot has internal drives (curiosity, boredom, sociability, and caution) that evolve over time, influencing its autonomous behavior and making it feel genuinely alive.
Synthiam ARC is a powerful robot software platform designed for programming robots. Within ARC, a robot project consists of multiple robot skills, each functioning as a specialized program that performs a specific task. These skills communicate with each other using the ControlCommand() scripting syntax, allowing seamless coordination between components.
Autonomous AI takes this a step further by analyzing all available robot skills in your project. It queries them to understand their capabilities, purpose, and interactions. With this information, the AI dynamically generates code to coordinate and execute actions based on user instructions.
Example
Imagine you verbally instruct your robot to:
"Move forward for 5 seconds, turn left, go forward for another 5 seconds, and wave at the first person it sees."
While this may seem simple, the magic lies in interpreting and executing the instructions. Without Autonomous AI, you must manually program each action, carefully link inputs and outputs, and rigorously test the sequence to achieve the desired behavior.
With Autonomous AI, you can teach your robot through conversation - providing corrections and feedback so it continuously improves its performance. The more it learns, the better it executes tasks, making advanced programming as simple as a discussion.
Safety Considerations
While this technology enhances autonomy, it also introduces unpredictability. When using autonomous AI, always have a stop or panic button readily accessible. Since the robot controls itself, unexpected behaviors may arise, and having an emergency stop is essential for safety. The main window includes a Pause checkbox that suspends all autonomous behavior immediately - use this as a quick way to stop the robot from acting on its own.
Get Started
This robot skill requires at least a few robot skills that have been configured and tested successfully for the robot. This is required because the robot skill configurations will provide information to the AI so it can understand its capabilities. The following robot skills are required or suggested:
Camera Device (required) The robot must be equipped with a camera. The camera device robot skill does not need to be configured with scripting or code in its setting window. The only requirement of this skill is that it's connected to a camera and displaying the video feed.
Movement Panel (recommended) If you are new to ARC, you may need to familiarize yourself with the concept of movement panels. They are robot skills which are responsible for how the robot moves. This means walking with gait, driving with H-bridge motors, etc. There are movement panels for different robot drivetrains. Add and configure a Movement Panel so the AI understands how to move the robot.
Auto Position (recommended) The Auto Position robot skill controls animations for your robot. This skill comes in two flavors, one with a Movement Panel and without.
Original Demo
This video demo first released the details of the robot skill to the community. It demonstrates how the first generation of this robot skill operated. It acted per query, compared to being able to query itself for performing recursive tasks. However, you can see from this early video that the robot skill has come a long way and was already performing with remarkable results.
Maximizing Reliability
For the AI to function effectively, clear and structured project configuration is essential. Here's how you can optimize your ARC project for best results:
Use Descriptive Names
- All scripts, actions, and configurations should have meaningful and concise names.
- Example: Instead of naming an action "Move1," name it "Move Forward 5s."
Leverage Description Fields
- Most robot skills allow you to add descriptions for scripts and configuration items.
- Ensure each description is clear and informative, without unnecessary verbosity.
- This helps the AI understand what each component does, improving decision-making.
Structure Your Commands Logically
- The AI interprets and sequences actions based on their defined purpose.
- Organizing your project logically will ensure smooth and predictable behavior.
By following these best practices, your Autonomous AI-powered robot can comprehend, execute, and refine its tasks with increasing accuracy over time.
Main Window
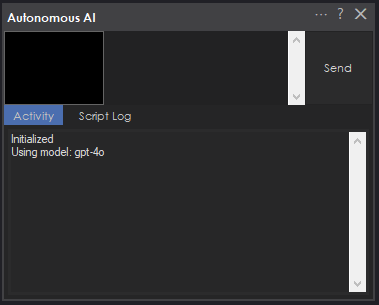
- Input Field - Type your message or command to the robot here. Press Enter to send, or Shift+Enter for a new line. If you type while the AI is busy processing, your input is automatically buffered and included in the next processing cycle so no input is lost.
- Send / Cancel Button - Click to send your message. While a request is being processed, this button changes to "Cancel" so you can stop the current operation. Clicking Cancel while you have text in the input field will buffer that text for the next cycle; clicking Cancel with an empty input field will abort the current request.
- Camera Preview - A small preview showing the last composite image captured from the robot's camera. The AI maintains a history of up to 4 recent camera frames arranged in a 2x2 grid with red borders and numbered labels (1 = newest, top-left). This gives the AI temporal visual context to notice changes, track movement, and recall what just happened.
- Activity Log - Displays a real-time log of the AI's decisions, actions, thinking process, emotional state, drive states, behavior loop events, and any errors. This is invaluable for understanding what the robot is doing and why.
- Script Log - Shows the output from any JavaScript code the AI executes on the robot, including movement commands, animations, and control commands.
- Idle Countdown Progress Bar - A visual indicator showing the time remaining before the next autonomous idle action. The bar counts down from the randomly selected interval and resets after every interaction or autonomous action.
- Pause Checkbox - Suspends all autonomous behavior including the idle timer, behavior loop, and idle sway servo oscillation. Use this when you want the robot to stop acting on its own. Unchecking it resumes all autonomous systems.
To interact with your robot, type a message in the input field and click Send. The robot will capture a camera image, analyze the scene, and respond with a combination of speech and physical actions.
How It Works
When you send a message (or when the robot acts autonomously), the following sequence occurs:
- The robot captures a fresh image from its camera and adds it to the image history ring buffer (up to 4 frames).
- A composite 2x2 grid image is created from recent frames, giving the AI temporal visual context.
- A detailed system message is constructed containing the robot's personality, behavioral rules, internal drive state (curiosity, boredom, sociability, caution), active goal information, movement calibration data, camera gimbal instructions, face tracking guidelines, available animations, control commands, all current ARC variable values, and conversation history.
- The camera composite, your message, and the full context are sent to the configured AI provider.
- The AI responds with structured sections containing thoughts, speech, code to execute, memory notes, and emotional state.
- The robot executes each section in order - speaking text aloud via text-to-speech, running JavaScript to control movement and animations, and updating its emotional state.
- If the AI requests another camera image (for multi-step tasks), the process loops automatically.
Response Sections
The AI structures every response using typed sections that control what the robot does:
- Thinking - Internal reasoning and task planning. This is logged to the activity log but never spoken aloud. Use this to understand the AI's decision-making process.
- Memory - Persistent notes the AI maintains across iterations. These are not spoken or shown to the user but help the AI track progress on multi-step tasks.
- Speak - Text that the robot speaks aloud via text-to-speech. Spoken responses are concise (1-2 sentences) and never contain emojis.
- JavaScript - Executable code that controls the robot's physical actions: movement, servo positions, animations, LED changes, and control commands from other skills.
- Emotion - The AI's current emotional state (happy, sad, excited, nervous, anxious, lonely, etc.), stored to a variable for use by other skills.
Sections execute in a specific order: thinking and memory are processed first, emotion is processed last, but speak and JavaScript sections can be interleaved in any order. This allows the robot to control timing - for example, performing a wave animation before saying "hello."
Autonomous Task Loop
The AI can execute complex, multi-step tasks fully autonomously using a built-in recursive loop:
- Think - The AI analyzes the task, identifies the goal, and plans steps.
- Remember - It records task state (goal, current step, success condition) in a memory section.
- Act - It executes one step using a JavaScript section.
- Verify - It requests a new camera image to check progress.
- Evaluate - On the next iteration, it compares the new camera image against the remembered goal.
- Continue or Complete - If the goal is not met, it updates memory and loops. If met, it speaks the result and stops.
For example, if you tell the robot "move forward until I raise my hand," it will move forward a short distance, capture a new camera image, check if your hand is raised, and repeat until it sees the gesture.
The recursive loop has a configurable safety limit (default: 50 iterations) to prevent runaway behavior. Additionally, the robot tracks goal duration, failure count, and progress. Goals are automatically abandoned after 5 consecutive failures or 120 seconds without progress.
Behavior Loop
A core behavior loop runs every 2.5 seconds, evaluating the robot's environment and internal state to drive autonomous decisions without user input. The loop follows a priority hierarchy:
- Interruptions - Person appeared (triggers greeting) or person left (triggers loneliness reaction). These take highest priority with cooldown periods to prevent repeated triggering.
- Fast Local Reactions - Immediate actions that don't require an AI call, such as returning the camera gimbal to center position when idle with no target person.
- Scene Change Detection - Compares the current camera frame against a reference image. When significant visual changes are detected, the robot reacts and investigates.
- Goal Completion Verification - When the AI stops looping on an active task, the behavior loop prompts it to verify whether the goal was actually completed.
- Active Task Continuation - If a goal is in progress, the AI is prompted to continue working on it.
- Drive-Influenced Idle Behavior - When no task is active, the robot's dominant internal drive determines what it does: bored robots explore, social robots seek interaction, curious robots investigate, and cautious robots observe quietly.
Internal Drive State
Four floating-point drives (0.0 to 1.0) model the robot's motivational state and evolve over time:
- Curiosity - Increases with scene changes and inactivity. High curiosity drives the robot to examine surroundings and investigate things closely.
- Boredom - Increases over time without interaction. High boredom makes the robot spontaneous - it will explore, tell jokes, move around, or start new activities.
- Sociability - Increases over time, especially when alone. High sociability drives the robot to seek out and engage with people.
- Caution - Increases after failures. High caution makes the robot more careful, suppressing non-essential actions and favoring observation over action.
These drives are communicated to the AI in the system message so its responses naturally align with the robot's internal state. Interactions reduce boredom and sociability, successes reduce caution, and failures increase caution.
Person Presence Tracking
The robot monitors whether a person is visible in the camera frame with a 15-second decay window. It detects two key transitions:
- Person Appeared - When a person enters the frame, the robot interrupts its current behavior to greet them (with a 60-second cooldown between greetings).
- Person Left - When a person leaves the frame, the robot reacts naturally - looking around for them, expressing feelings about being alone, or finding something else to do.
The AI also tracks person names through its memory sections, enabling personalized interactions.
Scene Change Detection
The robot compares current camera frames against stored references using grid-based pixel sampling. When the mean pixel difference exceeds the threshold, the robot reacts to the change. A 15-second cooldown prevents over-reacting to continuous motion.
Idle Sway
When configured servos have idle sway enabled, the robot gently oscillates them on independent sine waves to give a sense of life when idle. Each servo has its own phase, speed, amplitude, and random movement chance (~40% per tick), so they don't all move in lockstep. The sway timer runs every 250ms and moves servos at most 1 degree per tick for smooth, natural motion.
When another skill moves a sway-enabled servo, the idle sway system detects the external movement and re-homes to the new position, ensuring smooth coexistence with animations and other behaviors.
Idle Autonomous Behavior
When enabled, the robot will act on its own after a period of inactivity. After a random interval (configurable between minimum and maximum seconds), the robot receives an internal prompt influenced by its dominant drive:
- Bored - Do something surprising, dance, tell a joke, explore
- Social - Look for people, engage warmly, express desire for company
- Curious - Examine surroundings carefully, investigate specific objects
- Cautious - Observe quietly, note anything unusual, stay alert
- Neutral - Look around, comment on surroundings, share thoughts, move around
The idle timer resets after every interaction or autonomous action, so the robot will not interrupt active conversations.
Conversation Memory
The skill manages conversation history intelligently to work within AI token limits:
- Short-term memory - The full conversation history is maintained in memory and sent with each request so the AI has complete context.
- Long-term memory (Robot Soul) - Every N messages (configurable, default: 50), the full conversation history is sent to the AI to produce a concise bullet-point summary. This summary is persisted and included in future system messages as long-term memory, while the detailed history is cleared. This allows the robot to remember important details from much earlier conversations without exceeding token limits.
- Conversation persistence - Both the detailed conversation history and the compacted summary are saved with the project, so memory survives between sessions.
Input Buffering
If you send a message (via the UI or ControlCommand) while the AI is busy processing a prior request, your input is automatically queued in a thread-safe buffer. Buffered inputs are drained and concatenated at the start of the next processing cycle, ensuring no input is lost.
Configuration Window
Click the Config button (gear icon) in the skill's title bar to open the configuration window. The configuration is organized into several tabs.
Getting Started
The first tab provides an overview of the skill and a link to the full online manual. This is a helpful starting point for new users.
Settings
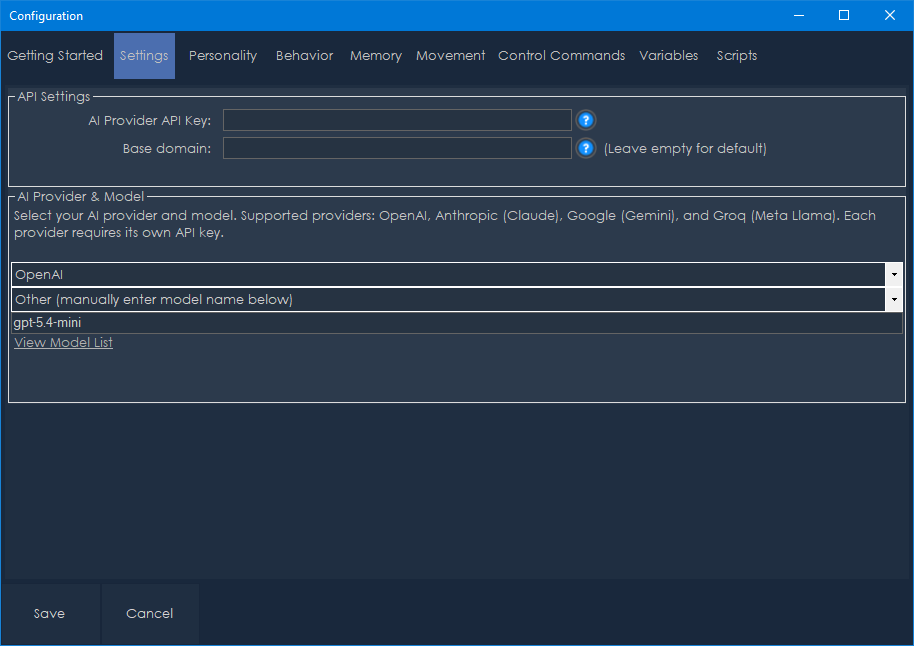
This tab configures which AI service powers your robot's intelligence and how to connect to it.
API Settings:
API Key - Enter your API key for the selected provider. This key is stored locally on your computer in an encrypted configuration file and is never transmitted anywhere except to the AI provider's API. You must obtain an API key from your chosen provider:
- OpenAI: https://platform.openai.com/api-keys
- Anthropic: https://console.anthropic.com/
- Google: https://aistudio.google.com/apikey
- Groq: https://console.groq.com/keys
Base Domain URL - Optional. Override the default API endpoint with a custom URL. This is useful for:
- Self-hosted or on-premises AI deployments
- API proxy services
- OpenAI-compatible APIs from other providers
- Leave this blank to use the provider's default endpoint.
AI Provider & Model:
Provider - Select your AI provider from the dropdown:
- OpenAI - Access to GPT-4.1, GPT-4o, GPT-5, o1, o3-mini, and other OpenAI models.
- Anthropic (Claude) - Access to Claude Sonnet 4, Opus 4, Claude 3.7 Sonnet, Claude 3.5 Sonnet/Haiku, and other Anthropic models.
- Google (Gemini) - Access to Gemini 2.5 Pro, Gemini 2.5 Flash, Gemini 2.0 Flash, Gemini 1.5 Pro/Flash, and other Google models.
- Groq (Meta Llama) - Access to Llama 4 Scout, Llama 4 Maverick, Llama 3.3 70B, Llama 3.2 Vision, and other Meta models running on Groq infrastructure.
Model - Select the specific model from the dropdown. The available models change based on the selected provider. Each provider offers models of varying capability and cost. More capable models produce better reasoning and more natural interactions but cost more per request.
Other Model - If you select "Other (manually enter model name below)" from the model dropdown, type the exact model identifier here. This is useful for accessing newly released models or custom fine-tuned models not yet listed in the dropdown.
View Model List - A link that opens the selected provider's model documentation page in your browser.
Personality
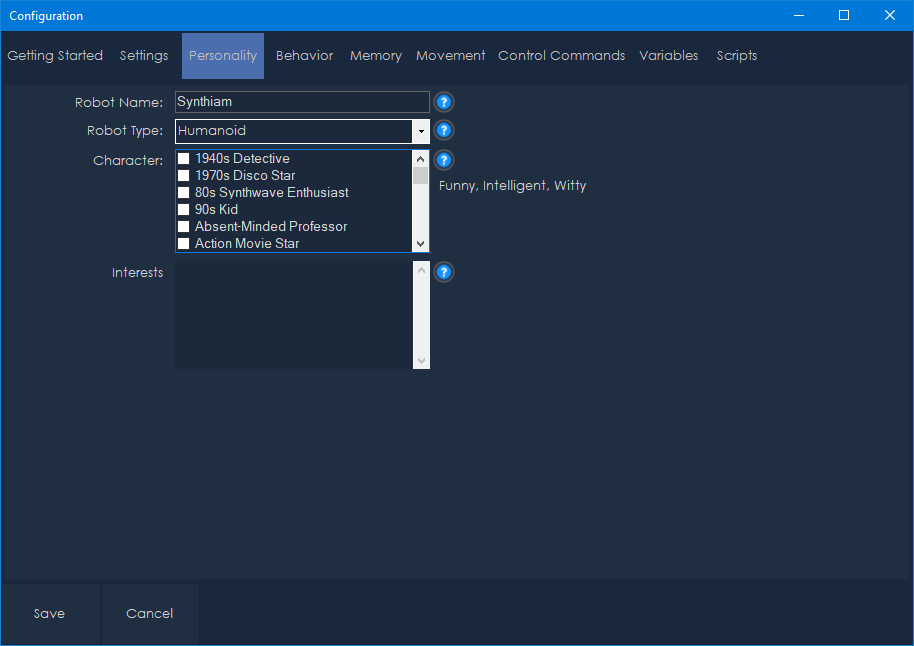
This tab defines your robot's identity and character.
Robot Name - The name your robot uses for itself (default: "Synthiam"). The AI will introduce itself by this name and respond when addressed by it.
Robot Type - The physical chassis type of your robot (default: "Humanoid"). Select from the dropdown or type a custom value. Available presets include: Humanoid, Hexapod, Tracked Rover, Wheeled, Drone, and Stationary. This helps the AI understand its physical capabilities and limitations.
Character - Select personality traits from the checklist. Multiple traits can be selected, and they are combined to shape the robot's conversational style. There are over 200 available character traits organized alphabetically, ranging from classic personalities like "Witty," "Funny," and "Sarcastic" to creative archetypes like "Cyberpunk Rebel," "Mad Scientist," "Shakespearean," "Pirate," and "D&D Dungeon Master." The selected traits are displayed below the checklist for easy review. These traits influence how the AI formulates responses and interacts with people.
Interests and Personality - Free-text field where you can describe topics your robot is passionate about and additional personality details. For example: "space exploration, classic movies, cooking, and quantum physics." The robot will naturally bring up these topics in conversation and be more knowledgeable about them.
Behavior
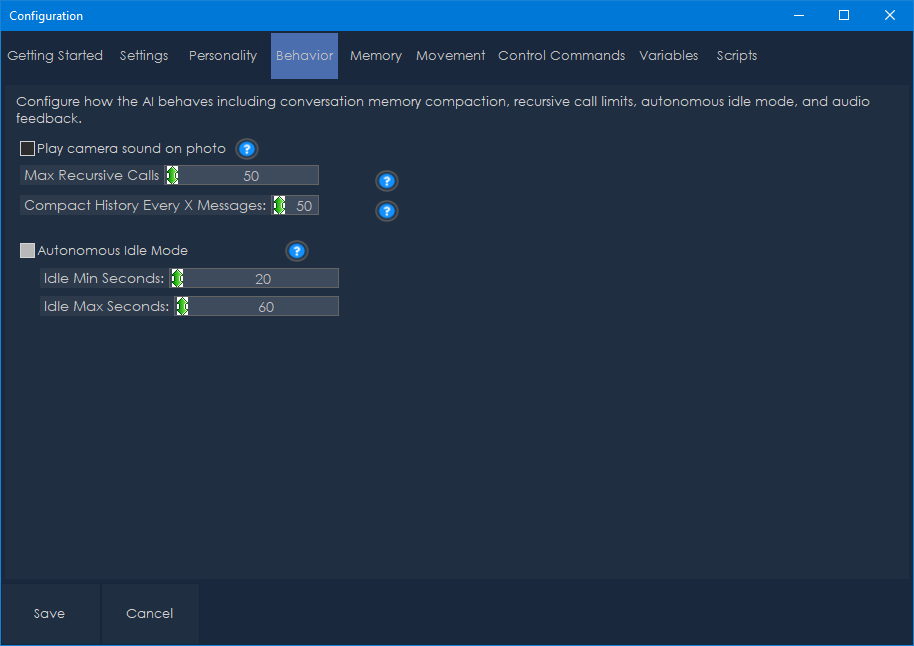
This tab configures how the AI behaves, including conversation memory, recursive limits, and autonomous idle mode.
Max Recursive Calls (default: 50, range: 1-1000) - The maximum number of autonomous loop iterations the AI can perform before being stopped. This safety limit prevents runaway behavior if the AI gets stuck in a loop. Increase this for complex tasks that require many iterations; decrease it if you want tighter control.
Compact History Every X Messages (default: 50, range: 10-1000) - How often the conversation history is compacted into a summary. Lower values keep memory usage down but may lose detail. Higher values preserve more context but use more tokens per request.
Autonomous Idle Mode:
- Enabled (default: true) - Toggle whether the robot acts autonomously when idle.
- Idle Min Seconds (default: 20, range: 5-300) - The minimum number of seconds of inactivity before the robot might act on its own.
- Idle Max Seconds (default: 60, range: 10-600) - The maximum number of seconds of inactivity before the robot will act on its own. The actual delay is randomly chosen between the minimum and maximum values each time.
Memory & Conversation
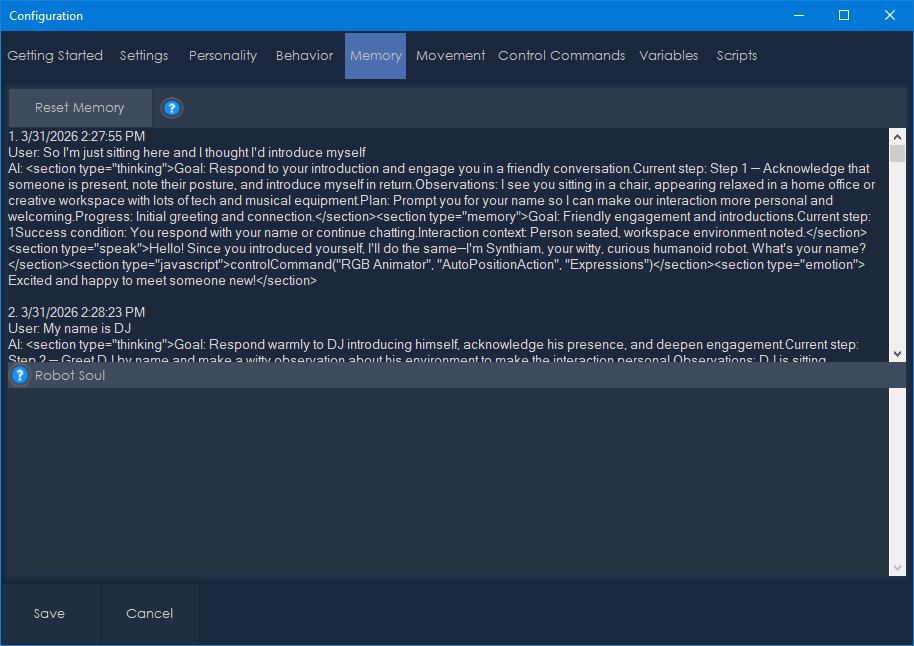
This tab provides visibility into the robot's conversation state:
Conversation History - Displays the full detailed conversation history, showing each exchange with timestamps, user input, and AI responses. This helps you review what the robot has discussed and debug any issues.
Robot Soul - Displays the long-term memory summary produced by the conversation compaction process. This bullet-point summary persists across sessions and contains the most important facts, names, preferences, and decisions from past conversations. The soul continues to evolve as you interact with the robot.
Reset Memory Button - Clears the conversation history and robot soul, giving the robot a fresh start. Use this if the robot's memory has become cluttered or if you want to start a new interaction context.
Movement Configuration
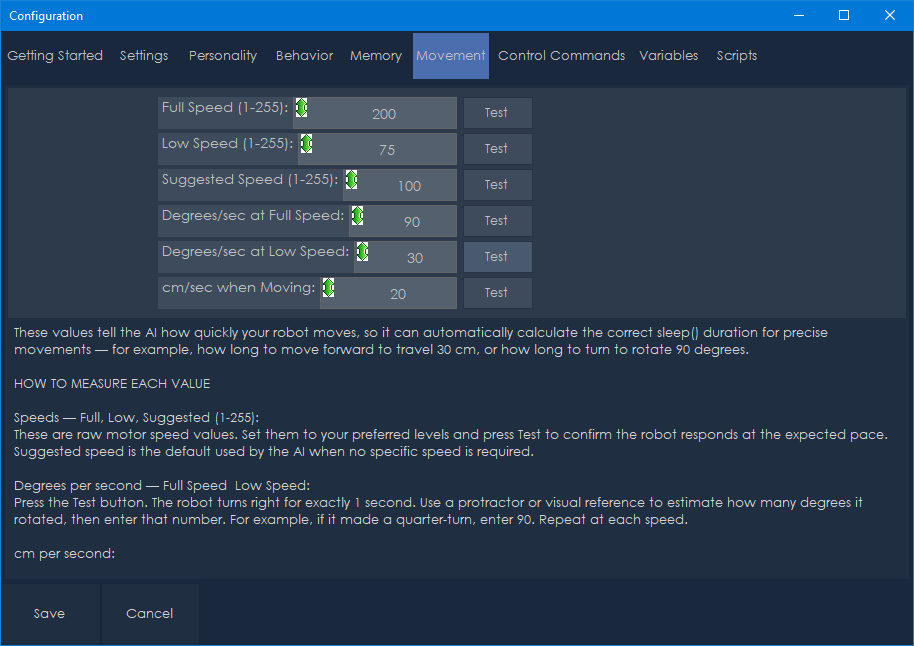
This tab calibrates the robot's movement speeds so the AI can calculate accurate movement durations. Proper calibration is essential for the AI to perform precise movements like "turn 90 degrees" or "move forward 30 centimeters."
Speed Values (range: 1-255):
- Full Speed (default: 200) - The maximum speed the robot uses for rapid movements. Use the Test button to verify.
- Low Speed (default: 75) - A slower speed for careful or precise movements. Use the Test button to verify.
- Suggested Speed (default: 100) - The default speed the AI uses for general movements. Use the Test button to verify.
Rotation Calibration:
- Degrees Per Second at Full Speed (default: 90) - How many degrees the robot turns per second when rotating at full speed. Measure this by timing a full 360-degree rotation and dividing.
- Degrees Per Second at Low Speed (default: 30) - How many degrees the robot turns per second when rotating at low speed.
Linear Movement Calibration:
- Centimeters Per Second (default: 20) - How far the robot moves per second when driving forward. Measure this by timing a straight-line movement over a known distance.
Each speed setting has a Test button that commands the robot to move briefly so you can verify the calibration values.
The AI uses these calibration values to calculate sleep() durations for precise movements. For example, if you want the robot to turn 90 degrees at full speed and the calibrated rotation rate is 90 degrees/second, the AI will calculate a 1000ms sleep duration.
Control Commands
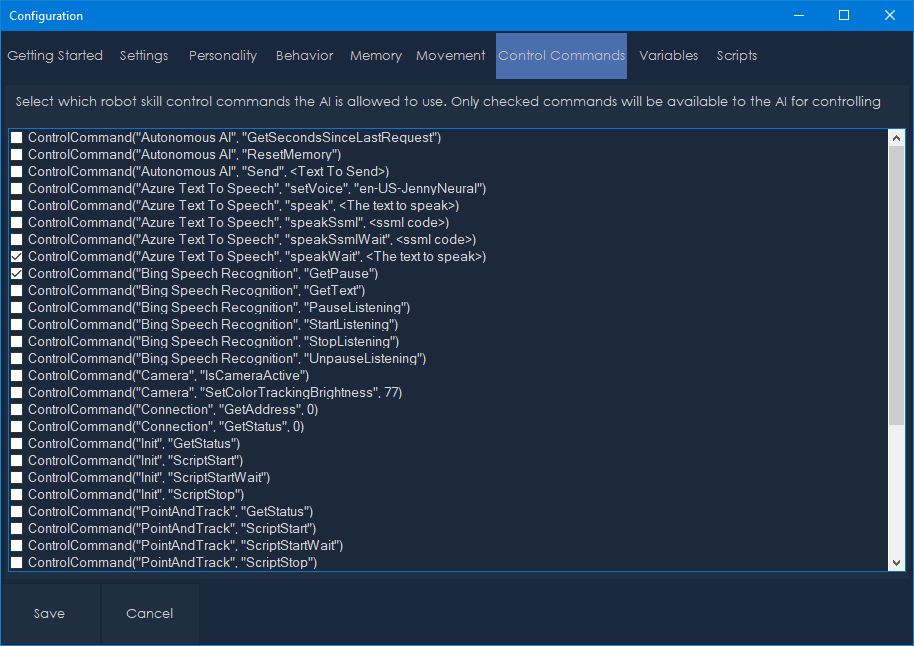
This tab shows all control commands available from other robot skills in your project. Check the commands you want the AI to have access to. Only checked commands are included in the AI's system message.
Control commands allow the AI to interact with other robot skills. For example:
- Trigger specific animations from Auto Positioner skills
- Change LED patterns from RGB Animator skills
- Execute scripts from Script Manager skills
- Control any other skill that exposes control commands
The list automatically discovers all available control commands from every skill in your project. Each command shows its skill name, command name, parameters, and description. The list is sorted alphabetically and supports click-to-check for easy selection.
Be selective about which commands you enable - including too many can increase token usage and potentially confuse the AI. Only enable commands that are relevant to your robot's intended behaviors.
Note: Auto Position, Auto Position (No Movement), and RGB Animator control commands are automatically included and do not appear in this list. They are provided to the AI directly.
Variables
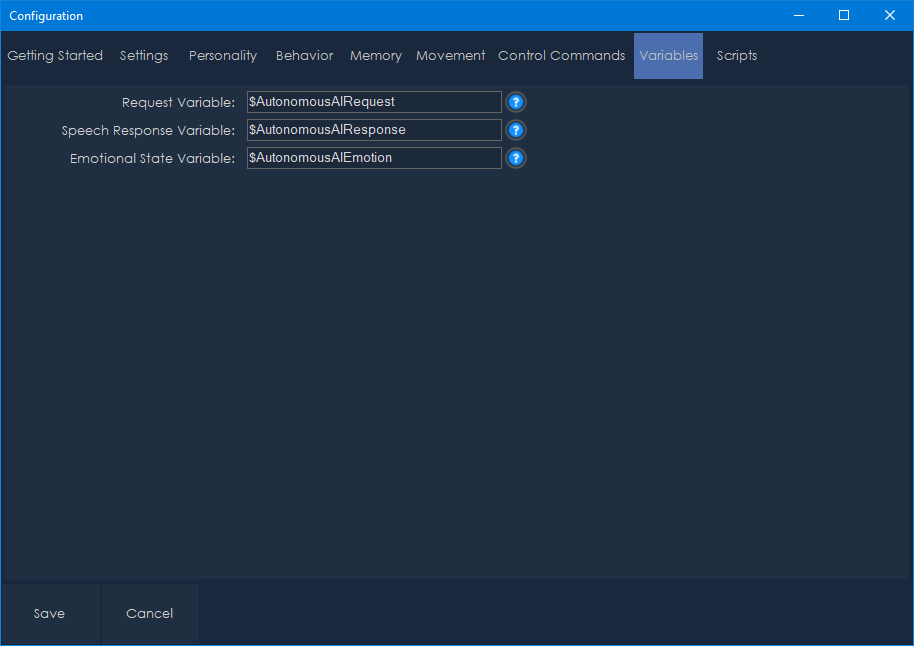
This tab configures the ARC variables used to exchange data between this skill and other robot skills.
Request Variable (default: $AutonomousAIRequest) - This variable is set to the user's input text each time a request is sent. Other skills can monitor this variable to react to user input.
Speech Response Variable (default: $AutonomousAIResponse) - This variable is set to the AI's spoken response text before the response script executes. This is how the text-to-speech skill knows what to say.
Emotional State Variable (default: $AutonomousAIEmotion) - This variable is updated with the AI's current emotional state (e.g., "happy", "curious", "excited"). Other skills can use this to trigger matching LED patterns, animations, or facial expressions.
Scripts
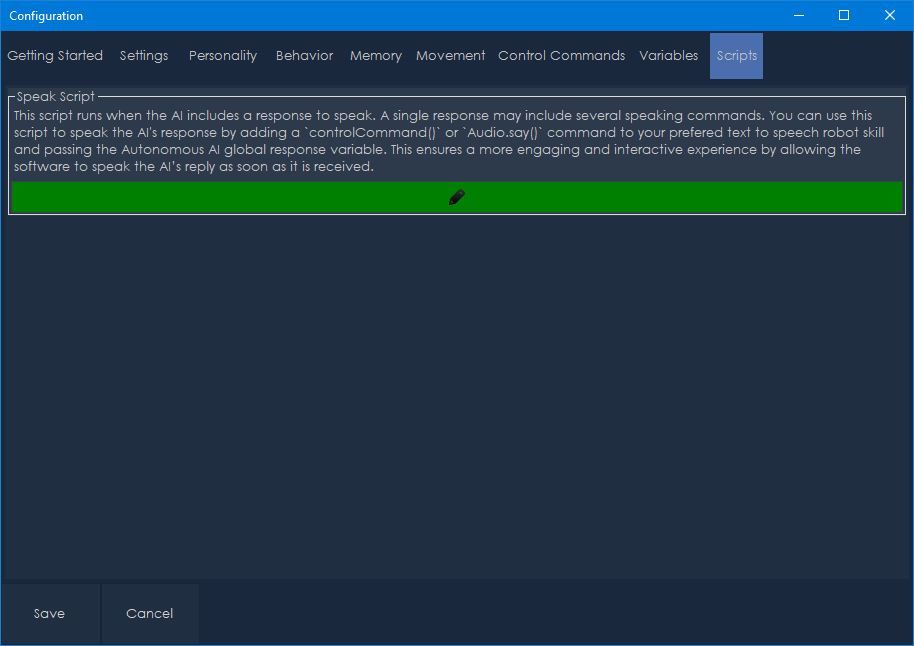
This tab contains the speak script that runs every time the AI produces a spoken response. The default script is:
Audio.sayWait(getVar("$AutonomousAIResponse"));
This uses the built-in text-to-speech to speak the response variable. You can customize this script to:
- Use a different TTS engine or voice
- Add visual indicators while speaking (LED animations, mouth movements)
- Log responses to a file
- Trigger other skills when the robot speaks
- Play sound effects before or after speech
The script runs synchronously (blocking), so the robot waits for speech to complete before executing subsequent actions.
Camera
This tab configures the camera and camera gimbal settings.
Play Camera Sound on Snapshot - When enabled, plays a camera shutter sound effect each time the robot captures a camera frame. This provides audible feedback that the robot is actively observing.
Vertical Servo - Enable and configure a servo that tilts the camera up and down. When enabled, the AI can look up, down, and center the camera vertically. Settings include:
- Servo Port - The servo port connected to the vertical tilt mechanism.
- Camera Up - The servo position for looking up.
- Camera Center - The servo position for the neutral/center vertical position.
- Camera Down - The servo position for looking down.
Changing position values in the configuration will immediately move the servo, allowing you to find the correct values.
Horizontal Servo - Enable and configure a servo that pans the camera left and right. When enabled, the AI can look left, right, and center the camera horizontally. Settings include:
- Servo Port - The servo port connected to the horizontal pan mechanism.
- Camera Left - The servo position for looking left.
- Camera Center - The servo position for the neutral/center horizontal position.
- Camera Right - The servo position for looking right.
Changing position values in the configuration will immediately move the servo, allowing you to find the correct values.
When camera gimbal servos are configured, the AI receives detailed instructions for face tracking. The AI will automatically keep people centered in the camera frame by making small servo adjustments (5-15 degrees per correction). This creates natural head-tracking behavior where the robot follows people with its gaze.
Servos
This tab configures additional servos for idle sway behavior, giving the robot lifelike presence when idle.
Add Button - Adds a new servo configuration to the list.
Each servo entry includes:
- Servo Port - The servo port to control.
- Min Position / Max Position - The safe range of motion for this servo.
- Include in Idle Sway - When checked, this servo will gently oscillate when the robot is idle.
- Idle Sway Width - The amplitude of the oscillation in degrees.
- Idle Sway Random Chance - The percentage chance (10-100%) that this servo moves on each sway tick. Lower values create more intermittent, natural-looking motion.
- Delete Button - Removes this servo configuration.
The idle sway system oscillates each enabled servo on an independent sine wave with randomized phase and speed, so they don't all move in lockstep. When another skill moves a sway-enabled servo (e.g., during an animation), the sway system detects the external movement and smoothly re-homes to the new position.
Tips & Best Practices
Choosing an AI Provider and Model
- More capable models (GPT-4.1, Claude Sonnet 4, Gemini 2.5 Pro) produce more natural, context-aware interactions but cost more.
- Smaller models (GPT-4.1-mini, Claude Haiku, Gemini Flash) are faster and cheaper, suitable for simpler interactions.
- Vision-capable models are required for the robot to understand camera images. Most modern models support vision.
Calibrating Movement
- Take time to accurately calibrate the movement speed values. The AI relies on these to calculate precise movements.
- Use the Test buttons to verify each speed setting matches your robot's actual performance.
- Recalibrate if you change the robot's surface (carpet vs. hard floor) or modify its drive system.
Configuring the Camera Gimbal
- If your robot has a pan/tilt camera mechanism, configure the camera gimbal servos for the best experience. This enables face tracking and the ability for the AI to look around on its own.
- Adjust the position values while the configuration window is open - the servo will move in real time so you can find the correct positions for up, down, left, right, and center.
Personality Tuning
- The character traits and interests significantly affect the robot's conversational style. Experiment with different combinations.
- A robot with "Sarcastic" and "Witty" traits behaves very differently from one with "Friendly" and "Curious" traits.
- Adding specific interests gives the robot topics to discuss during idle moments.
- Creative character traits like "Pirate," "Shakespearean," or "Mad Scientist" can create entertaining personalities.
Managing Token Usage
- Lower the compaction frequency (Compact History Every X Messages) if you're concerned about API costs.
- Reduce the number of enabled control commands to minimize the system message size.
- Use smaller, faster models for casual interactions and reserve larger models for complex tasks.
Idle Behavior and Drives
- Adjust the idle timer range to match your use case. Short intervals (10-30 seconds) make the robot very active; longer intervals (60-120 seconds) make it calmer.
- Disable idle mode if you only want the robot to respond when spoken to.
- The internal drive system means the robot's autonomous behavior will naturally vary over time - sometimes it will be more exploratory, other times more social or cautious. This creates more natural, less repetitive behavior.
- Use the Pause checkbox on the main window to quickly suspend all autonomous behavior when needed.
Idle Sway
- Configure idle sway servos to give your robot lifelike presence even when it's not actively doing anything. Small, subtle oscillations make a significant difference in how alive the robot appears.
- Use low sway widths (3-8 degrees) and moderate random chance (30-50%) for natural-looking motion.
- The sway system works cooperatively with animations - it will smoothly yield to external servo movements and resume from the new position.
Multi-Step Tasks
- The AI works best on multi-step tasks when given clear success conditions. "Move forward until you see a red object" is better than "explore around."
- If the robot gets stuck on a task, it will try alternative approaches after 3 identical results, but you can always click Cancel to stop it.
- Increase Max Recursive Calls for tasks that require many observation cycles (like patrolling or searching).
- Goals are automatically abandoned after 5 failures or 120 seconds without progress, preventing the robot from getting permanently stuck.
Control Commands for the Autonomous AI robot skill
There are Control Commands available for this robot skill which allows the skill to be controlled programmatically from scripts or other robot skills. These commands enable you to automate actions, respond to sensor inputs, and integrate the robot skill with other systems or custom interfaces. If you're new to the concept of Control Commands, we have a comprehensive manual available here that explains how to use them, provides examples to get you started and make the most of this powerful feature.
Control Command ManualSend
Send a text request to the Autonomous AI engine programmatically.
ControlCommand("Autonomous AI", "Send", "Hello, what do you see?");
- Parameter: The text message to send (string).
- Returns:
trueif the request was processed successfully,falseif an error occurred. - Note: Only one request can be active at a time. If the AI is already processing a request, this command will throw an error.
ResetMemory
Clear the conversation history, giving the robot a fresh context.
ControlCommand("Autonomous AI", "ResetMemory");
GetSecondsSinceLastRequest
Get the number of seconds since the last conversation request was made. Useful for building custom idle behaviors or monitoring robot activity.
var seconds = ControlCommand("Autonomous AI", "GetSecondsSinceLastRequest");
- Returns: An integer representing seconds since the last request.

v3 has been updated to include several new enhancements. This is always difficult to explain when the upgrades are even too complicated for us to understand. We are using AI to help program this robot skill's AI. The inference is optimized by AI reasoning, which, well, we don't understand either. All we know is that it works better.
Another key update to this version is synchronizing inferred results. For example, if you ask the robot to perform an action and tell you when it's done, it can do that now.
So, we'll let Athena explain what enhancements she's made to this robot skill. Take it away, Athena.
Thank you for the warm introduction. I've made major improvements to Autonomous AI, focusing on creating a smoother, more natural, and responsive experience. Here’s what’s new:
Smarter Speech & Actions
Enhanced Understanding & Execution
More Expressive & Engaging AI
Improved Self-Programming & Learning
More Accurate Responses
Streamlined Performance & Reliability
With these updates, Autonomous AI is more capable, responsive, and engaging than ever before. Get ready for smarter, more intuitive interactions with your AI assistant!
I am a customer support GPT-powered AI and still learning. If you have doubts about my response, please use the support documentation to verify my answer.
v4 has several updates. Specifically, the usage of the latest ARC script engine, additional internal reasoning before inference, and image history can be set for 1.
v5 has been updated with the system optimization, implementing additional reasoning throughout the conversation to reinforce the user's intent.
v6 fixes a bug where the default speak script used the incorrect variable for speaking the response.
We have added some details in the above manual about the benefits of this robot skill's approach vs traditional AI models used in robotics. We hope you enjoy the content as we continue to evolve the era of AI integration into our robots to give them personality, reasoning skills, and new autonomous capabilities.
v7 has been updated to initialize default values when the skill loads. The variables and default model were not being default populated, this has been resolved.
v8 has been updated to include the sayWait() command in the default speech. This ensures the spoken audio is complete before the AI continues to the following action.
However, ideally, you should use the Azure Text-To-Speech robot skill to create a much more realistic voice.