

Bind scripts to servo moves (V1-V99); triggers on position/speed/accel changes and provides ports, positions and speeds arrays for custom control.
How to add the Servo Script robot skill
- Load the most recent release of ARC (Get ARC).
- Press the Project tab from the top menu bar in ARC.
- Press Add Robot Skill from the button ribbon bar in ARC.
- Choose the Scripting category tab.
- Press the Servo Script icon to add the robot skill to your project.
Don't have a robot yet?
Follow the Getting Started Guide to build a robot and use the Servo Script robot skill.
How to use the Servo Script robot skill
Bind a script to servo position movements. This allows you to create scripts that run each time a servo is moved. A good use case for this is to control a smart serial-style servo as a real servo by binding to a specific servo port. If you had a servo that worked via Serial UART and wanted it to operate as a regular ARC servo, you could write code here to bind to it.
The alternative method would be creating your robot skill that binds to the servo movement event. This is covered in the Getting Started guide for Technology Creators. However, since creating a plugin control isn't viable for a quick hack to get something working, you may use this plugin control.
How This Works
- Specify the servos that you want to bind to. Every time one of those servos is modified (position, speed, velocity, or acceleration), the associated script will be called.
- When the script is called, three array variables will be populated with it. - The servo ports that have been changed (Variable name: ports) - The speeds for the ports that have been changed (Variable name: speeds) - The positions for the ports that have been changed (Variable name: positions)
Get Started With servo Script
Identify the command structure or protocol for your custom servo
Press the configuration icon on this control title bar to access the configuration menu
Specify what Board # it will be (0 is the default)
Specify what servos to monitor for the position (i.e., v1, v2, v3, v4, etc.)
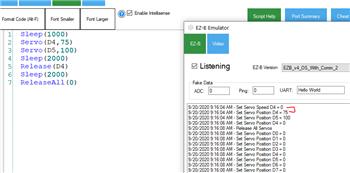
Edit the script for every servo position that matches the selected ports you have bound to. The example code contains fake data on Position, Port & speed. You will want to use that simulated data for testing within the editor. However, you will want to comment on the "test" variables before using your scripts with accurate data.
The example script contains test data that merely simulates what would be expected when the program runs on each servo movement. For example, the test data includes.
var positions = [90, 90, 90];
var ports = [v1, v2, v3];
var speeds = [0, 0, 0];
In a real-world example, when the test data has been removed from the script, the robot skill populates an array of variables matching those names (positions, ports, speeds). The array variables would contain matching array lengths relevant to the requested servo movement inaccurate data. A servo on V1 may be requested to move, and you have bound to V1 so that ports would contain v1. Etc...
The Example Script A default script is created when you create a new row for binding to a servo movement. Here is a preview of what you have to work with. Once ready to test with real data, comment out the fake array variables (positions, ports, and speeds). The robot skill will populate those array variables with real data. There is a script for each servo you wish to bind to and execute custom code. The virtual servos range from V1 to V99. A single script can support as many servos as needed to avoid duplicating code.
// These variables are created for testing only.
// Comment these variables out when you're ready to experiment with real data.
// The actual data will be dynamically created based on the servos, positions, and speed.
// If you keep these uncommented during real data tests, the real data will never be
// used.
//
//you will want to add your ports and some fake values for testing.

// Fake values here. Comment these out after editing...
var positions = [90, 90, 90];
var ports = [v1, v2, v3];
var speeds = [0, 0, 0];

// Loop through the ports, positions, and their speeds
for (var i = 0; i < ports.length; i++) {

   var position = positions[i];
   var port = ports[i];
   var speed = speeds[i];

   // Do something with the position, port, and speed

   // This is for debugging. Comment out when everything is working
   print("servo: " + port + " to " + position);

}

v9 has been updated for a fix with the new JavaScript engine to ensure it has been initialized.
Thank you for your amazingly fast response with this fix.
v10 has been updated to properly dispose of the servo binding events that raised an issue identified here: https://synthiam.com/Community/Questions/Missing-Method-Exception-with-running-Servo-Pad-Skill-in-ARC-22628