
How to add the Sound Servo (EZB) robot skill
- Load the most recent release of ARC (Get ARC).
- Press the Project tab from the top menu bar in ARC.
- Press Add Robot Skill from the button ribbon bar in ARC.
- Choose the Audio category tab.
- Press the Sound Servo (EZB) icon to add the robot skill to your project.
Don't have a robot yet?
Follow the Getting Started Guide to build a robot and use the Sound Servo (EZB) robot skill.
How to use the Sound Servo (EZB) robot skill
Use the volume/amplitude of the EZB's audio output to control servos! You can control many servos with this skill by using the Multi Servo option in the settings or adding multiple instances of the robot skill. Specify the scalar to increase the dynamic range of the audio about the servo's position. Don't worry if that sounds confusing; play with it and see what you get.Use this skill to move the mouth of your robot, for example. You can move your robot's mouth to the audio level if a track is playing.
Main Window
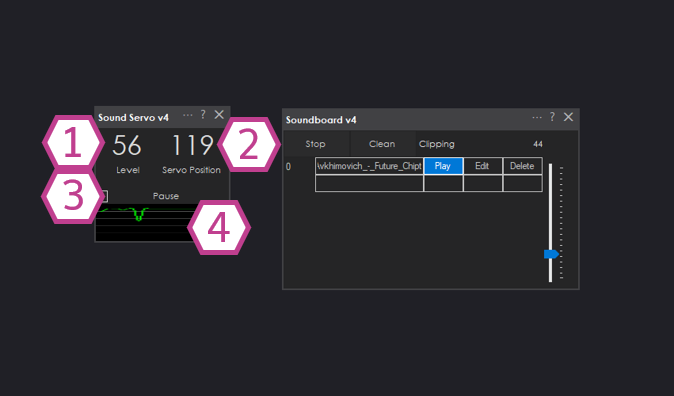
1. Level Value
This is the detected sound level being sent to the EZ-B.
2. Servo Position
Displays the current servo position between the maximum and minimum values in the Settings menu. This value is controlled by the level value multiplied by the scalar in the Settings menu.
3. Pause Checkbox
This checkbox pauses the capture of audio.
4. Audio Waveform
This gives visual feedback for your EZ-B's audio output.
Settings
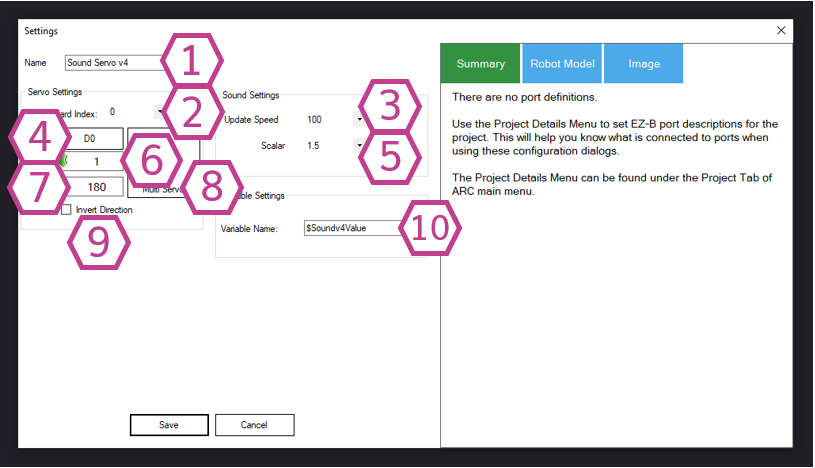
1. Title Field
This field contains the title of the skill. You can change it if you'd like.*Note: Changing the title will also change the title in the controlCommand() associated with this skill.
2. Board Index Drop-down
Select the EZ-B index number that your servo is connected to.
3. Update Speed Drop-down
This is the sample rate that the level that will be detected. The selectable range is 100 to 60000, and the default value is 100 milliseconds.
4. Port Drop-down
Select the digital port that your servo is connected to.
5. Scalar Drop-down
This selectable multiplier will scale the level value to a servo position. The selectable range is 0.25 to 9.75, and the default scale value is 1.5.
6. Minimum Position Adjust
Press the left mouse button to adjust the minimum servo position value. Right-click to enter it with the keyboard.
7. Maximum Position Adjust
Press the left mouse button to adjust the maximum servo position value. Right-click to enter it with the keyboard.
8. Multi Servo Edit Window
This window allows you to select multiple servos that you'd like to mirror the movement of the master servo.
9. Invert Direction Checkbox
This checkbox lets you invert the servo's direction when a position value is sent. For example, when a 180 position value normally makes the servo move all the way left, with the inverted directed checkbox enabled, it will move right when 180 is sent.
10. Variable Field
This variable is for the detected audio output level.


How would you use this to generate a PWM signal to control the intensity of an LED for when a robot talks and his mouth is just an LED?
The servo is a pwm variable voltage. Simply select the port and change the servo position range from 1 to 180
otherwise, you can write a script to loop and modify pwm commands manually
also, probably makes most sense to use the Talk servo skill