
Bluetooth control for UBTech Alpha1 servos via ARC: map Vx to servo IDs, enable servos, and integrate with ARC movement & LEDs.
How to add the Ubtech Alpha 1 Bluetooth robot skill
- Load the most recent release of ARC (Get ARC).
- Press the Project tab from the top menu bar in ARC.
- Press Add Robot Skill from the button ribbon bar in ARC.
- Choose the Movement Panels category tab.
- Press the Ubtech Alpha 1 Bluetooth icon to add the robot skill to your project.
Don't have a robot yet?
Follow the Getting Started Guide to build a robot and use the Ubtech Alpha 1 Bluetooth robot skill.
How to use the Ubtech Alpha 1 Bluetooth robot skill
Control UBTech Alpha robot via bluetooth and control servos. The Virtual Servos in ARC will control the UBTech Alpha robot servos. Use the configuration button on this skill to configure what servos are to be used. The Vx servos in ARC correspond to the servo IDs of the UBTech Alpha robot.
For example:
Main Window
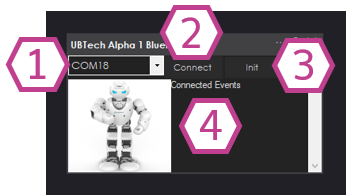
1. COM Port Drop-down Select the Bluetooth COM port that corresponds with the Alpha1 robot connected to your PC.
2. Connect Button Once the proper COM ports is selected, press the Connect button to connect ARC to the Alpha1 3. Init Button Initiates communication with the Alpha1 robot.
4. Status Display Displays text corresponding to what actions are happening with the skill.
Configuration
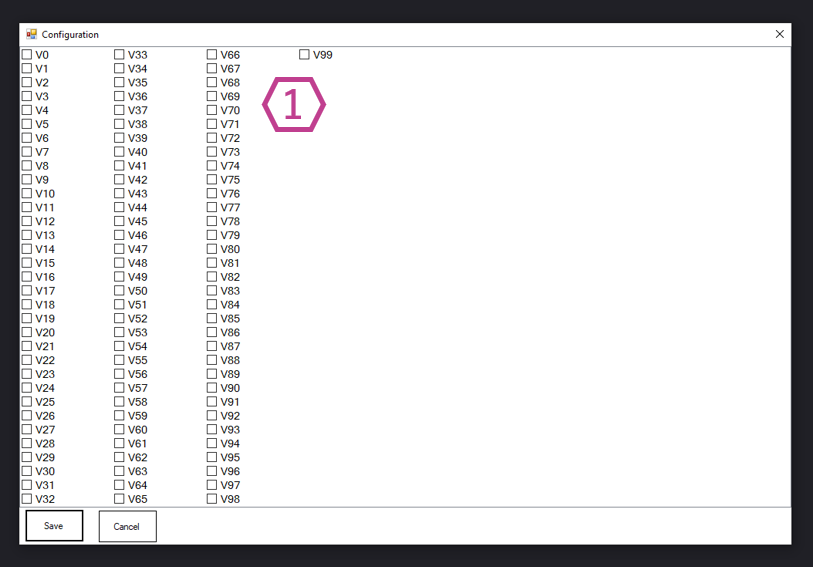
1. Virtual servo Checkboxes Check (enable) each virtual servo that corresponds to the servo ID's you have on your Alpha1. If you would like to control the servo, it will have to be enabled.
How to Use UBtech Alpha1 Bluetooth Skill
Connect your PC to the Alpha1 robot via Bluetooth.
Add the UBtech Alpha1 Bluetooth skill to your ARC project (Project -> Add Skill -> Movement panels -> UBtech Alpha1 Bluetooth).
Select the Bluetooth COM port for the Alpha1 robot and select CONNECT.
Use the configuration menu of this skill to select the servos you wish to control. Place a check in the box beside each servo to control.
Now that you have the skill configured, you may use any skills in ARC that support servos to move the Alpha1 robot. This includes Auto Position, Camera, Joystick, and more.
*Note: When editing scripts in other skills, use the Cheat Sheet or right-click in the editor to see available ControlCommand of this skill. You may connect, disconnect, and control LEDs.

I'm happy to collaborate with you ! I added the plug in . I 'm sending a photo of the screen. I clicked on com4 and on connect. "connect" became "disconnect". I don't know if this confirms the existence of an actual connection. Clicking test 1,2,3 caused no movement in the robot , only"test done" in the control box.
For some unknown reason the clipboard below says "it's windows NT" . Indeed it's win7. I know win7 is not recommended, but until now i never had problems with ezb with win7. Unfortunately now I have no win10 PC. I hope this is not a problem.
Do you have a servo connected to the alpha one that is on ID #1?
All 16 servos are connected to alpha native controller. Each servo has a label with its own id number . Numbers range from ID# 1 to ID#16. #1 is right shoulder.
I am reflecting about the fact that alpha and ezb work in a very different way.
EZB: frames and actions are programmed and stored in the PC . When you activate the control, each position is sent , at the right time, by wi-fi, to the robot controller that actuates each servo as required.
Alpha: frames and actions are programmed and saved in the PC in special files (.aesx files) that contain all the information required to perform the action. Such files must be transferred to the SD card in the robot (via usb cable or bluetooth). The robot controller only reads this card and actuates the servos as required to perform the action. The SD card may even be changed with another one containing different actions. Bluetooth is used to specify which action is to be activated or to transfer the files.
So how can you move the servos by bluetooth ? The controller can only move the servos executing the .aesx file in the memory card. I think you have to work around these files and their transfer to the robot.
Try the latest plugin please. Report any log messages as per previous instructions. Specifically, try the buttons for servo LEDs ON/OFF and see if the leds turn on or off when pressed.
Hi DJ. Here's what I see on the PC screen. A sequence of bytes is displayed with turn on, nothing is displayed with turn off. Nothing is added in the debug window. Nothing happens to the robot leds. All leds in the servos keep blinking and changing colors , as usual. The blue light in the head is always on. Leds always behave this way whenever they have 7,4 v power on them , even if non connected to a control signal. .
Have you read my post #4 ? what about it ?
Your post #4 doesn’t apply. The Bluetooth protocol documentation specifies servos can be moved individually, contrary to your experience with their app. The challenge I’m having is the documentation is poor and online examples are open source broken with evident errors that contradict the documentation.
I’ll try new changes with this plugin to see if there’s progress. Stay tuned
btw, that last test is great. The numbers are actually from the alpha. That’s the alpha responding to my commands. I have to take a look and see what they mean.
It seems there’s information that yield left out. Appears to be multiple versions of this robot. Each version has different command protocol. I need to know the version your robot. Is it alpha 1. Alpha 1s. Alpha 2. Alpha pro? Alpha blah blah...