Troubleshoot USB Connections
An EZB is any robot or microcontroller running ARC-compatible firmware that uses the ARC communication protocol. EZB connection types can include USB, Bluetooth, or Wi-Fi. This diagnostic page is specifically for USB-enabled EZBs. If you are not using a USB-enabled EZB, select your EZB connection type from the connection troubleshooting index page.
USB EZB Connection Diagnostic
Arduino and other USB controllers typically have setup tutorials in their respective manuals. For many USB devices, the most common connection issue is an incorrect baud rate. Make sure you have followed the Getting Started guide for your device and configured ARC with the correct baud rate. Also verify that the controller is receiving proper power, because insufficient or unstable power can prevent successful communication.
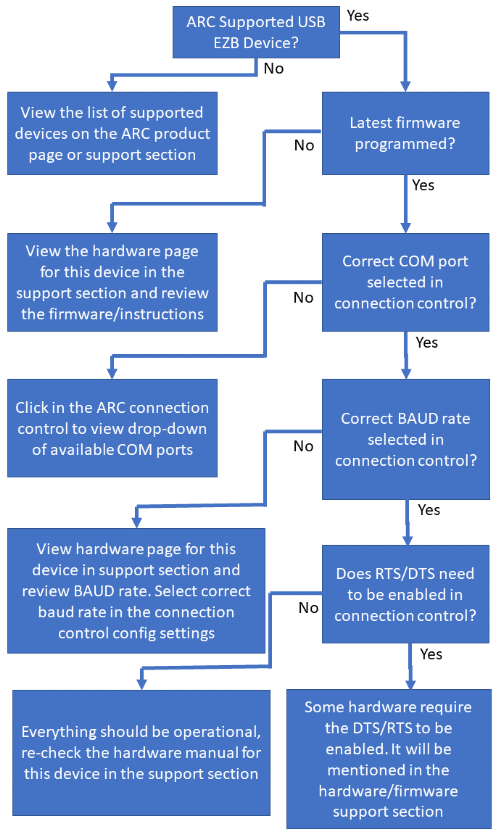
Connection Diagnostic Checklist
-
Is this an ARC-supported USB EZB device?
If No, view the list of supported devices on the ARC product page or in the support section. -
Is the latest firmware programmed onto the device?
If No, open the hardware page for the device in the support section and review the firmware and setup instructions. -
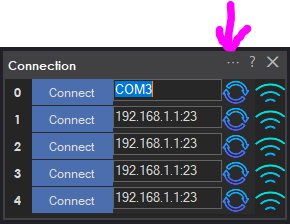
Is the correct COM port selected in the connection control?
If No, click the ARC connection control to view the drop-down list of available COM ports and select the correct one. -
Is the correct baud rate selected in the connection control?
If No, review the hardware page for the device in the support section and select the correct baud rate in the connection control configuration. -
Does RTS/DTS need to be enabled in the connection control?
If Yes, enable the required handshake options in the connection control configuration. Some hardware requires these settings, and the hardware or firmware page will mention it. - If everything appears correct but the device still does not connect, re-check the hardware manual and support documentation for the specific device.
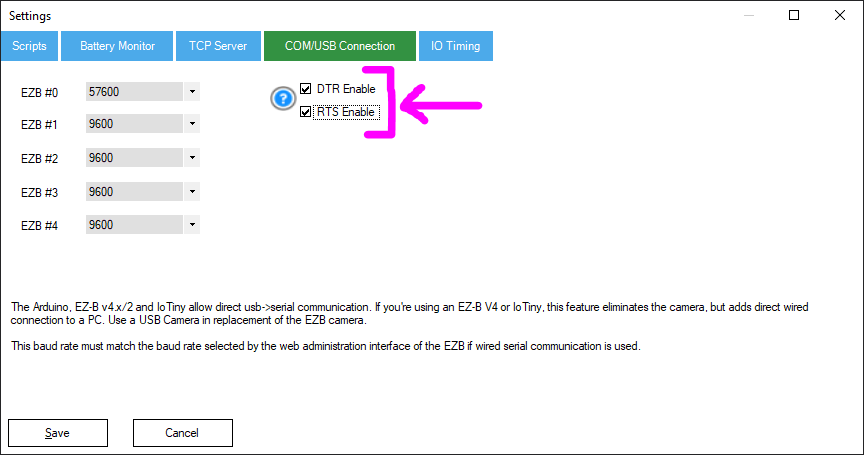
DTR/RTS Enable
Some USB devices require DTR and/or RTS to be enabled before communication will work correctly. These options can be configured for the selected EZB index in the connection control configuration screen.
To enable them, press the CONFIG button on the connection control, select the COM/USB Connection tab, and enable the DTR and RTS checkboxes as required by the device documentation.
UART <-> USB EZB Connections (EZB v4.x / EZB v2)
Some USB-enabled EZBs, such as the EZB v4.x and EZB v2, internally use a UART <-> USB bridge. ARC communicates with these devices over USB at the software level, but electrically the communication between the EZB and the USB interface is still TTL UART. This creates physical wiring limitations that are often overlooked.
UART is not intended for long cable runs. Unlike USB, Ethernet, or RS-485, UART does not provide differential signaling, clock recovery, or strong built-in noise rejection. Because of this, cable length, routing, shielding, and nearby interference all have a significant effect on reliability.
Recommended UART Cable Requirements
- Keep UART cables as short as possible, ideally under 12 inches (30 cm).
- Use shielded cable or twisted-pair wiring.
- Avoid straight, parallel ribbon or jumper wires for anything longer than a few inches.
- Do not coil excess cable length inside the robot shell.
Straight, untwisted wires can act like antennas. Inside a robot shell, they can easily pick up interference from:
- Motor noise and brush EMI
- Switching regulators and DC-DC converters
- Wi-Fi and Bluetooth radio emissions
- Static discharge and resonance from long wire lengths
This interference can corrupt UART data and cause problems such as:
- Random disconnects
- Partial or garbled commands
- Intermittent failures that appear to be software related
- Unstable or unreliable ARC connections
Using Twisted Pair with UART
When using twisted-pair cable, pair each signal with ground. This reduces loop area and greatly improves noise immunity.
- TX ↔ GND twisted together
- RX ↔ GND twisted together
This works because the return current flows beside the signal path, which helps cancel induced noise and reduces susceptibility to outside interference.
Grounding and Shielding Best Practices
- If using shielded cable, connect the shield to ground on one end only, preferably on the EZB side.
- Do not connect the shield on both ends, because that can create a ground loop.
- Ground unused conductors at one end so they do not act as floating antennas.
- Make sure the EZB and USB interface share a common ground reference.
Leaving extra conductors floating inside a robot can significantly increase EMI pickup. Grounding unused wires helps prevent resonance and reduces noise coupling into nearby signal wires.
Routing and Physical Placement
- Keep UART wiring away from motors, motor drivers, and high-current wiring.
- Avoid running UART wiring parallel to power cables over long distances.
- Cross power wiring at 90-degree angles when separation is not possible.
- Avoid tight loops, coils, or large circular wire paths.
Following these wiring practices will greatly improve connection stability, reduce unexplained communication errors, and eliminate many issues that are often incorrectly blamed on ARC, firmware, or drivers.
Guide: Posting in the Community for Help
If you still have trouble connecting to an EZB, you can ask for help in the community support forum. Before posting, work through the troubleshooting steps above. When you are ready to post in the community, include answers to the questions below so others can help you more effectively.
- What product are you connecting to? (For example: Arduino, ESP32, EZ-Robot JD, Raspberry Pi, Robotis Bioloid, and so on.)
- What power source is powering the robot? (Battery, wall adapter, voltage, amperage, and similar details.)
- Does the robot make a startup sound when powered on, if applicable? Does it speak a startup message on boot, if applicable? Have you checked the product manual?
- If the device also supports Wi-Fi, are you connected to the correct Wi-Fi network for that EZB or robot?
- Do you have two network adapters? (For example, one for internet access and one for the robot.)
- What error message is displayed in the status window at the bottom of ARC? Press the COPY button in the status window and paste the contents into your forum post.