
Overlay image packs onto camera feed and map images to control-variable ranges with auto/manual assignment, position and sizing options.
How to add the Camera Variable Overlay robot skill
- Load the most recent release of ARC (Get ARC).
- Press the Project tab from the top menu bar in ARC.
- Press Add Robot Skill from the button ribbon bar in ARC.
- Choose the Camera category tab.
- Press the Camera Variable Overlay icon to add the robot skill to your project.
Don't have a robot yet?
Follow the Getting Started Guide to build a robot and use the Camera Variable Overlay robot skill.
How to use the Camera Variable Overlay robot skill
Overlay image packs onto the camera and control them using a specified control variable.
GENERAL USE Choose an image pack from the drop down menu next to the Overlay button. Set the x and y positions, the width and height, and the variable that will control this image pack. In the Auto Assign tab set the min and max values of the control variable. Press Auto Assign. Start the camera. Press the Overlay button. Press the Start button.
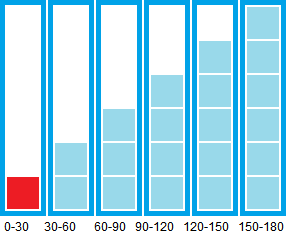
IMAGE PACKS Image packs consist of a number of images. Each image represents an interval of a variable. For example, this image could represent a servo that has an angle from 30-60.

Image packs are stored in folders which are stored in the Overlays folder under C:\ProgramData\ARC\Plugins\03c529f5-10ec-42a6-b86d-a26806703510\Overlays. There are two examples already in this folder.
AUTO ASSIGN The auto assign function automatically evenly distributes min and max values to each image in the image pack. That means with an image pack consisting of 6 images and a control variable ranging from 0 to 180, each image will receive an interval of 30. The first image will range from 0-30, the second from 30-60, etc... If the lower limit checkbox is checked, the image will not display if the control variable goes below/above the min value specified. If the lower limit checkbox is unchecked, the image will display the image assigned with the first interval (in the example above it would be 0-30) when the variable goes below/above the min value specified.
If the upper limit checkbox is checked, the image will not display if the control variable goes above the max value specified. If the upper limit checkbox is unchecked, the image will display the image assigned with the last interval (in the example above it would be 150-180) when the variable goes above the max value specified.
If the upper and lower limit checkboxes are checked:
If the upper and lower limit checkboxes are unchecked:
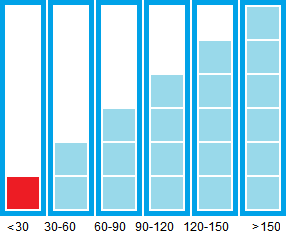
Note If Auto Assign is used, images must be numbered in ascending order so that they are assigned properly. This means that the image that you want to represent the lowest interval of the control variable should begin with the number 0, and the next image should begin with the number 1, and so on...
MANUAL ASSIGN The manual assign function allows you to manually assign min and max values to each image. By entering the letter L for the min, any control variable value that is below the lowest min specified will cause that image to show. Has the same effect as unchecking the lower limit checkbox has on the image assigned with the first interval. By entering the letter G for the max, any control variable value that is above the great max specified will cause that image to show. Has the same effect as unchecking the upper limit checkbox has on the image assigned with the last interval.
