

Multi-language ARC Script: build, run and debug Blockly, JavaScript, EZ-Script or Python with Intellisense, run/save/load and Roboscratch support
How to add the Script robot skill
- Load the most recent release of ARC (Get ARC).
- Press the Project tab from the top menu bar in ARC.
- Press Add Robot Skill from the button ribbon bar in ARC.
- Choose the Scripting category tab.
- Press the Script icon to add the robot skill to your project.
Don't have a robot yet?
Follow the Getting Started Guide to build a robot and use the Script robot skill.
How to use the Script robot skill
The Script robot skill lets you add custom behavior to your Synthiam ARC project by writing a program (“a script”). A script can control or read from many other ARC skills (servos, cameras, speech, sensors, Auto Position, etc.) and can be used for anything from simple tests (like “say hello”) to full robot routines.
The Script skill supports these programming options:
- Blockly (drag-and-drop, best for beginners)
- JavaScript (powerful, common language)
- EZ-Script (ARC’s classic scripting language)
- Python (popular and readable)
Before You Start (Quick Checklist)
- Add the Script skill to your project: Project → Add Skill → Scripting → Script
- Add the robot skills you want to control (example: a servo controller, a camera, speech synthesis, etc.). Your script will send commands to those skills.
- Open the Script skill’s settings, pick a language, create your script, and save.
Main Window
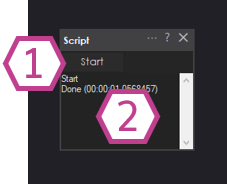
Starts or stops the script assigned to this skill. Use Start to run your program and Stop to halt it.
Tip: If nothing happens when you press Start, open Settings and confirm you saved your script and selected the correct language tab.Shows messages from your script and the current state (running, stopped, errors, etc.). When troubleshooting, check here first—syntax mistakes and missing skills often show up as status messages.
Settings (General Concepts)
In Settings, you choose the script language and edit your program. Each language view includes tools to help you test and manage your script.
- Save often: Save your work after changes so the main window runs the latest version.
- Use Run/Test: Some editors include a Run button so you can test before saving.
- Use the built-in manuals: The Script skill includes helpful documentation within the settings for programming and ARC commands.
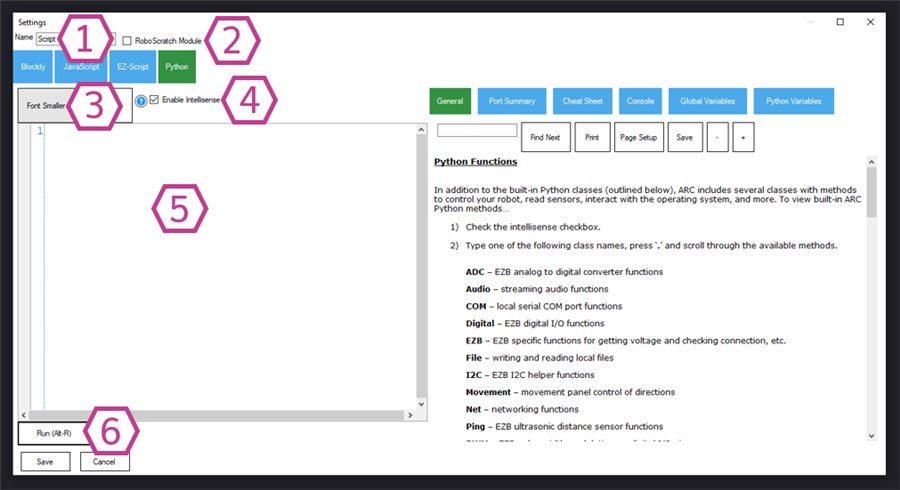
Settings - Blockly
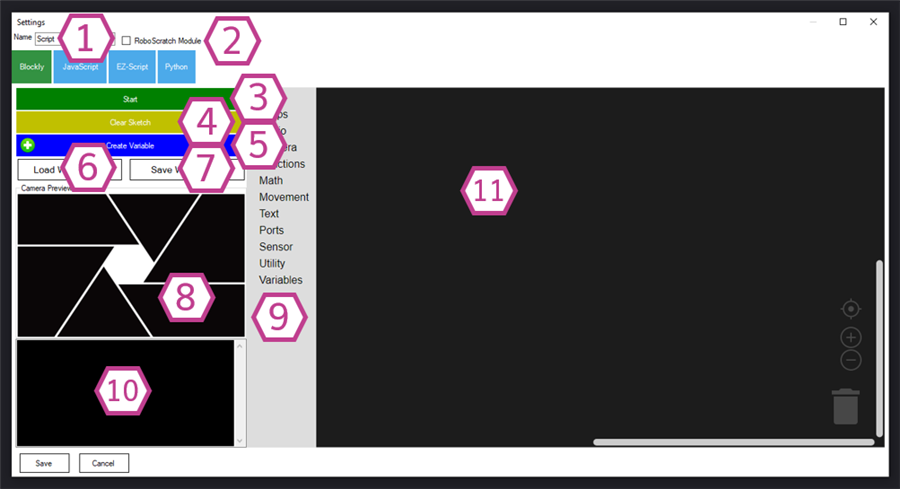
Sets the name of this Script skill as it appears in your ARC project. You can rename it to something descriptive (example: Dance Routine or Greeting Script).
Note: Changing the title also changes the name used by controlCommand() calls that reference this skill.Enables this script to be used as a module by Roboscratch. Leave this unchecked unless you know you are building a Roboscratch module.
Runs or stops your Blockly program directly from the Settings screen. This is handy while you’re building and testing.
Clears the Blockly workspace (your blocks). Use this if you want to start over.
Tip: Save first if you might want to restore your work later.Creates a new variable you can use in your blocks. Variables let you store values (like a counter, a distance reading, or a servo position) and reuse them.
Loads a previously saved Blockly worksheet (your block layout). Useful for reusing programs across projects or restoring older versions.
Saves the current Blockly worksheet so you can reopen it later.
Shows the configured camera feed. This is especially useful when your Blockly program uses camera-based skills (tracking, object recognition, etc.).
The toolbox containing available blocks. Choose categories (movement, logic, variables, etc.) and drag blocks into the worksheet.
Shows messages from the Blockly script while it runs (progress, errors, debug messages). If something does not work, check this area for hints.
The workspace where you build your program by snapping blocks together. Start with simple sequences (do A, then do B), then add logic (if/then) and loops (repeat).
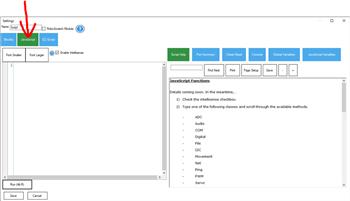
Settings - JavaScript
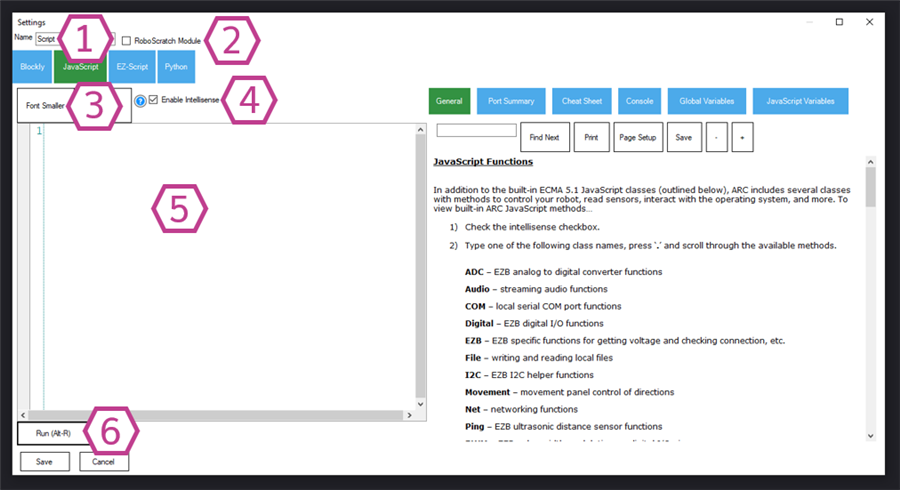
Sets the name of the Script skill. Use a clear name that matches what the script does (example: Patrol Mode).
Turns this script into a Roboscratch module. Beginners usually leave this unchecked.
Adjusts editor text size for comfort. Increase the font if you are reading on a small screen.
Shows auto-complete suggestions and helpful hints while typing. This is strongly recommended for beginners because it reduces typing mistakes.
Where you write JavaScript code. Use the ARC JavaScript API to interact with other skills and the robot hardware.
Runs the script in the editor without committing it as your saved version. Use this to test changes quickly before saving.
Tip: If the Run button shows errors, correct them first—then save and run from the main window.Settings - EZ-Script
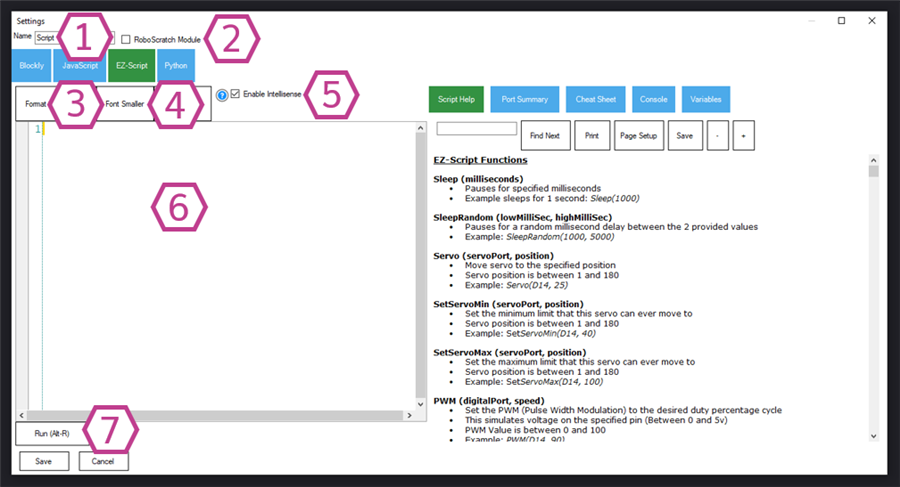
Names your Script skill. Naming scripts clearly helps when you have multiple Script skills in one project.
Enables Roboscratch module behavior. Leave unchecked unless you are intentionally creating a module.
Automatically formats (tidies) your script for readability. This helps beginners spot missing lines, indentation problems, or messy code.
Changes editor font size.
Enables auto-complete and command suggestions while typing. This is helpful when learning EZ-Script commands.
Where you write EZ-Script commands. EZ-Script is designed for ARC and is often very direct for robot actions and automation.
Tests the script currently in the editor before saving. Use it to confirm your changes behave correctly.
Settings - Python
Names the Script skill instance. Choose a descriptive name so you can quickly identify it in larger projects.
Enables use as a Roboscratch module. Most beginners can ignore this option.
Adjusts font size in the editor.
Shows coding suggestions and auto-complete while you type. This helps prevent spelling mistakes and speeds up learning.
Where you write your Python code. Use the ARC Python API to call robot commands and interact with other skills.
Runs the current editor code to test it before saving. If your script errors, use the status/output area to identify what went wrong.
How to Use the Script Skill (Beginner Walkthrough)
-
Add the Script skill:
Project → Add Skill → Scripting → Script
-
Open Settings and pick a language:
- Choose Blockly if you want drag-and-drop programming.
- Choose JavaScript / Python if you want a general-purpose coding language.
- Choose EZ-Script if you want ARC’s classic scripting style.
-
Create your first script:
- Start with a simple action (example: speak a phrase, move a servo, wait 1 second).
- Add one change at a time so you can easily tell what caused a problem.
- Test using the Run button (if available in that editor), then Save.
- Run from the Main Window: press Start to execute the saved script and watch the Status Display for progress or errors.
- If the script can’t find a device/skill, confirm that skill is added to your project and configured.
- If nothing happens, check the Status Display for errors and confirm you saved after editing.
- If you’re learning, keep scripts short and test often.
Control Commands for the Script robot skill
There are Control Commands available for this robot skill which allows the skill to be controlled programmatically from scripts or other robot skills. These commands enable you to automate actions, respond to sensor inputs, and integrate the robot skill with other systems or custom interfaces. If you're new to the concept of Control Commands, we have a comprehensive manual available here that explains how to use them, provides examples to get you started and make the most of this powerful feature.
Control Command ManualScriptStart
Starts the script to run in the background
Example:
controlCommand("Script", "ScriptStart")
ScriptStartWait
Starts the script and waits for it to complete
Example:
controlCommand("Script", "ScriptStartWait")
ScriptStop
Stop the script from running
Example:
controlCommand("Script", "ScriptStop")
GetStatus
Get the status if the script is running.
- Returns: Boolean [true or false]
Example:
controlCommand("Script", "GetStatus")
Related Tutorials
Detect Multiple Colors

Rgb Array Tutorial

Mobile App Developer Tutorial

Randomizing Answers In Speech Recognition
Using Exec() Commands To Help Make A Game

How To Make A Wide Angle Ir Non Contact Bumper
Related Hack Events

Treat-O-Matic 2020 Live Hack Part #6 The Finale
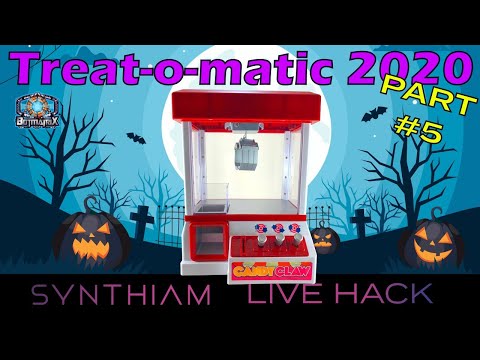
Treat-O-Matic 2020 Live Hack Part #5
Related Questions
Code To Turn Controller Off
Real-Time Module
Scripts, Add Java Script

Upgrade to ARC Pro
Get access to the latest features and updates before they're released. You'll have everything that's needed to unleash your robot's potential!