I designed a wide angle IR (non contact) bumper for robots a while back but never used it. It may be useful to the folks here on the forum so I thought I would post it.
The neat thing about this IR bumper is that it will detect most objects in front of it without any scanning like using a rotating servo plus ranger so no moving parts and its very fast. It also reports back the position of smaller objects...
Step 1
I designed a wide angle IR (non contact) bumper for robots a while back but never used it. It may be useful to the folks here on the forum so I thought I would post it.
The neat thing about this IR bumper is that it will detect most objects in front of it without any scanning like using a rotating servo plus ranger so no moving parts and its very fast. It also reports back the position of smaller objects and also the rough width of close obstructions.
Here is the circuit diagram
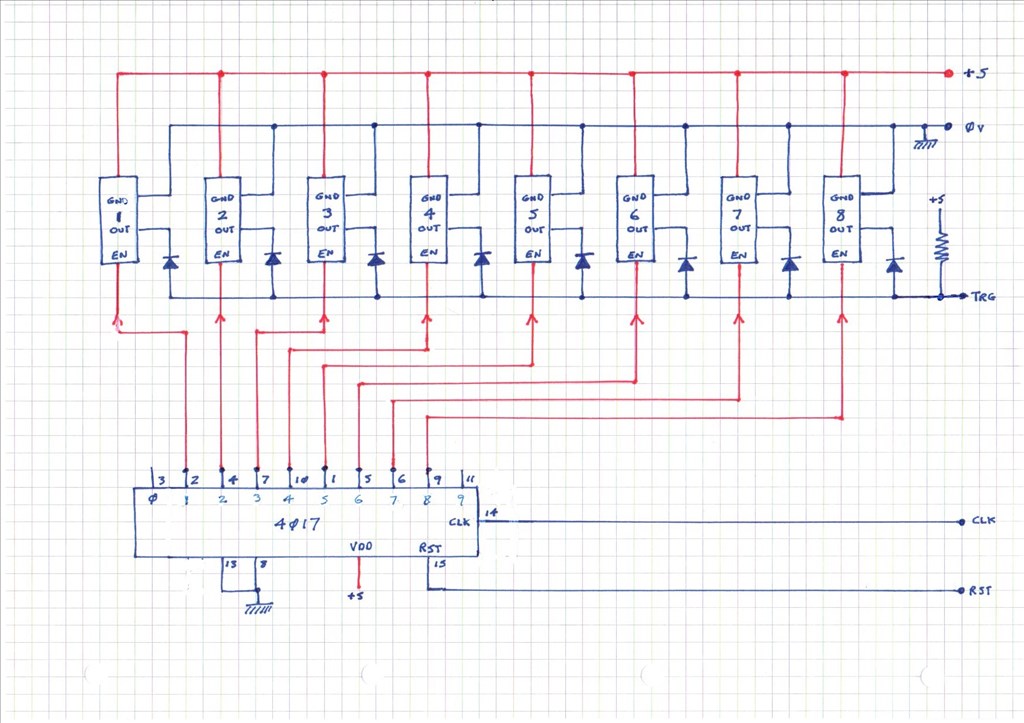
It uses the Pololu 10 cm ranger modules https://www.pololu.com/product/1134
The forward detection range is 2 cm to 10 cm but its also possible to get another module that does 5 cm to 15 cm.
The design does not need to have 8 detectors (as shown) it would work with any number up to 9 but with lower numbers the detect gaps would get bigger. When building the cct you need to modify the IR modules so that the ENABLE line is broken out, this is detailed on the products web page.
The bumper requires 3 port lines on the EZB these are RST (output), CLK (output) and TRG (input)
How it works is first you reset the 4017 (decade counter) so the counter output = 0 which has no sensor attached.
Now clock one pulse on the CLK line and (only) sensor number one is enabled - now look at the TRG (trigger) line to see if it is low, if it is low then this sense zone has an obstruction.
Now clock one pulse and sensor number two is enabled - now look at the TRG (trigger) line to see if it is low (you may need a small delay of a couple of milliseconds here to get a steady output state), if it is low then this sense zone has an obstruction.
Repeat this until all sensors have been enabled in the line - you then have a crude picture of whats in front, where it is in the bumpers length and also how big (wide) it is horizontally.
With this bumper the robot can get a feel of the size of the object in its way - a small object in front of the bumper will show up as one or two detects a large object (say a wall) in front will show up as all 8 detects etc.
Disclaimer, I never got around to building this, but it is a pretty simple cct so it should work fine.
Hope someone finds this of use.
Tony
