
Custom Movement Panel maps directional commands to scripts, adjusts per-wheel speed (0-255), and integrates with joysticks for unsupported motors
How to add the Custom Movement Panel robot skill
- Load the most recent release of ARC (Get ARC).
- Press the Project tab from the top menu bar in ARC.
- Press Add Robot Skill from the button ribbon bar in ARC.
- Choose the Movement Panels category tab.
- Press the Custom Movement Panel icon to add the robot skill to your project.
Don't have a robot yet?
Follow the Getting Started Guide to build a robot and use the Custom Movement Panel robot skill.
How to use the Custom Movement Panel robot skill
The Custom Movement Panel skill is used when your robot has a motor driver or movement controller that does not have a built-in ARC movement panel. Instead of ARC directly driving your motors, you will write scripts that run when you press: Forward, Reverse, Left, Right, and Stop.
This skill also includes a global speed system. Joystick-style controls (like the ARC Mobile Interface joystick or the Joystick Control skill)
can change the speed value. Your scripts can read the current speed (left/right) and react to it, or you can set it with SetSpeed(value).
Main Window
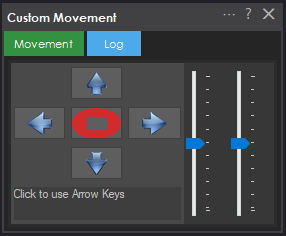
1. Movement Panel (Direction Buttons)
These buttons control the robot’s movement: Forward, Reverse, Left, Right, and Stop. When you click one, ARC runs the script you assigned for that direction in the skill’s settings.
2. Speed Sliders (Left / Right)
These sliders set the movement speed values used by the skill. Speed ranges from 0 to 255:
- 0 = no movement (effectively “off”)
- 255 = full speed
You can set different left and right speeds to help correct a robot that drifts because one motor is stronger than the other. Whenever you move a slider, the Speed Changed script can run (if you’ve configured it).
Settings
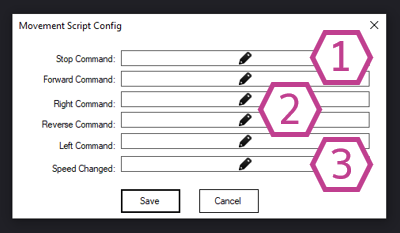
1. Stop Script
This script should immediately stop your robot. It runs when you press the Stop button and also when the
Stop() command is called from another script.
Make sure this script is reliable—stopping is a safety feature.
2. Direction Scripts (Forward/Reverse/Left/Right)
These scripts define what your robot does for each direction.
They run when you click the movement buttons and also when movement commands are called from scripts
(for example: Forward(), Left(), etc.).
3. Speed Changed Script
This script runs whenever the speed changes—either from moving the sliders or when SetSpeed(value) is used.
Use this if your hardware needs to be updated immediately when the speed changes (for example, sending a new speed value to your motor controller).
How to Use the Custom Movement Panel (Step-by-Step)
-
Connect your hardware.
Power your robot and connect your controller (for example, an EZ-B) to ARC. -
Add the skill to your project.
In ARC, go to: Project → Add Skill → Movement Panels → Custom Movement Panel. -
Open the skill settings and enter scripts.
Add a script for each direction and for Stop. Each script should send the correct commands to your motor driver/controller. -
Test movement using the main window buttons.
Click Forward/Reverse/Left/Right and confirm the robot moves correctly. If a direction is backwards, fix it by adjusting the script for that direction (for example, swapping motor directions). -
Fine-tune speed using the sliders.
Reduce speed if the robot is too fast, and adjust left/right balance if the robot pulls to one side.
Code Samples (EZ-Script)
These functions let you read the currently selected speed values. This is helpful if you want your movement scripts to automatically use whatever speed the user selected on the sliders (or from a joystick skill).
GetSpeed()
# Returns the global Movement Speed value (0-255)
# Example:
$x = GetSpeed()

GetSpeedLeft()
# Returns the global Movement Speed value for the left wheel (0-255)
# Example:
$x = GetSpeedLeft()

GetSpeedRight()
# Returns the global Movement Speed value for the right wheel (0-255)
# Example:
$x = GetSpeedRight()About SetSpeed(value)
You can also change the speed in code using SetSpeed(value).
This will update ARC’s movement speed value and can trigger the Speed Changed Script (if configured).
Resources
Read more about how Movement Panels work in ARC: https://synthiam.com/Docs/ARC-Overview/movement-panels.
Related Tutorials
The Robot Program Episode 006: Introducing ARC

Control More Than One Robot
Related Robots
Related Questions
JSON To Mjbots Quad Robot Series
Adjusting Encoders On A Roboclaw 2X15

HELP NEEDED FOR 21DOF EZB HUMANOID ROBOT
Movement Panel With Servo Control

Upgrade to ARC Pro
Don't limit your robot's potential – subscribe to ARC Pro and transform it into a dynamic, intelligent machine.
Hello @DJ
I'm working with mecanum wheels and it's a lot of fun! The custom Movement Panel works great for controlling 2 H-bridges with individual wheel control.
But I had a few questions for you:
Here's a picture of all the movements mecanum wheels can do:
This would be a bonus, that couldn't work with the joystick, but is it also possible to have buttons to activate: Turning left, turning right, and curved trajectories?
The custom Movement Panel requires you to write that in your code. Read what a Movement Panel is.
forward is forward but with a left and right speed. That’s how you get diagonal.
Use another Movement Panel to see how the joystick behaves. You’ll notice diagonal and everything you asked for exists. So write that in your own custom movement panel.
Did you figure it out yet? Here's some help to get you going...
Here's a project with a Movement Joystick and Custom Movement Panel. You don't have to use a movement joystick, you can use a real joystick or whatever you want. This example is showing this. They're all compatible though because the custom Movement Panel takes care of it.
When the movement joystick is pushed forward all the way, you'll see the speed on the custom Movement Panel go to the max value. The max value can be specified by the movement joystick or whatever joystick robot skill you use. See how it's going forward with both speeds at 255.
Now let's go diagonal North-East direction. See how the LEFT speed maintained 255 and the RIGHT speed lowered, but we're still going "Forward". That's because we're going forward at an angle.
So what you're code can do is take the speed from using Movement.getSpeedLeft() and Movement.getSpeedRight() and turn that into a speed for your robot controller. If your robot controller accepts some value between 0-100, then you'll have to map the ARC speed (0-255) to 0-100. That's easy using the Map Range command.
Mapping a range to another range is easy like this... So we'll pretend that your Forward Custom Movement Panel script needs to map ARC 0-255 to 0-100. Then you do this...
In the example above, your variables newSpeedLeft and newSpeedRight contain the newly mapped speed value for the controller.
Thank you very much @DJ,
Sorry I didn't reply. I did get it figured out on Sunday night. I wanted to post today but ran out of time. After you mentioned using the speed values I started messing around with the Joystick and seeing the speed values change (just as you described above). The key discovery for me was figuring out where to grab the speed values. I finally noticed the "Speed Changed" Script area and placed the following code into there:
I then placed those speed values into PWM commands (0-255) for the 2 x Dual H-Bridge enable lines, for example:
After I got that figured out I went back to try using the keyboard and had to reset the Speed value for left and right manually. Obviously, the Joystick skill sets the speed values to zero after it springs back to the center. I guess I could disable the check box in the Joystick settings that resets it to center when released.
After doing some fooling around with the Joystick control I found that changing the speeds could allow the mecanum wheel robot to move in a curved trajectory when moving forward-right, forward-left, backward-right, and backward-left.
I love the strafe movement that mecanum wheels allow you to do, so it felt like I was still missing the strafe movements for the diagonal movements of forward-right, forward-left, backward-right, and backward-left.
I know I can just script those motions to happen by disabling the corresponding wheels in code but in order to switch between "Strafe mode" and "Curved Trajectory Mode" I would need to create some more scripts. I would also need to devise a way to switch between the modes. It seems that it would be a one or the other scenario, Strafe or Curved Trajectory mode.
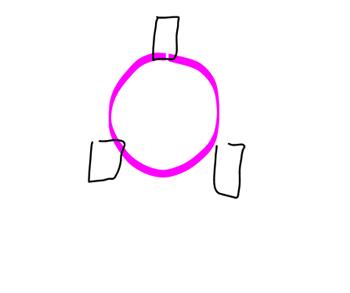
In my journey, I found that the Movement Panel skills don't allow for multiple arrow keys to be detected, only the first detected key. Is that a windows thing? I would love to have the ability to activate the diagonal movements with the keyboard. I know that would require diagonal buttons (NW, NE, SE, and SW), pictured in yellow, and corresponding script sections for each. I'm not sure if that is even possible but I would love it!
*Edit: Whoops just noticed that PWM takes (0-100) values so yes, I would need to remap the values as you suggested in your post.
*Edit 2: I forgot to mention that I noticed that if you enter the speed values in the "Left Speed" and "Right Speed" sliders of the Custom Movement Panel skill manually by right-clicking and entering the values with your keyboard (making sure to hit "enter" to confirm the change) the values don't take. If you use the sliders themselves it works, but using the keyboard to enter values seems to be not working for me.
Use key code control if you need multiple keys down. Not sure how you’ll do it though. Maybe just add Q and E for northwest and northeast. And wasd for regular forward left right reverse.
key control: https://synthiam.com/Support/Skills/Navigation/Key-Control?id=16058
Excellent suggestion @DJ! I used the Key Control Skill with keys Q, W, E, A, S, D, Z, X, & C to control all the strafe directions (NW, N, NE, W, Nothing, E, SW, S, & SE). I actually used X for reverse instead of S because it made a bit more sense with all the directions. I'm now happy for time being with this kind of user control
I have question of the main window panel shown above. The above pictures show the movement panel two speed indicators in digital format next to the directional arrows. My custom Movement Panel ( yes I just updated to the lates10.3.2021 version) still shows two slider bars bext to the directional arrows. Which one is the correct latest one and how I get it? Thanks
Show us a screenshot. I don’t think it’s a custom movement panel.