
Windows Speech Recognition skill: detect custom phrases via PC mic, trigger configurable scripts/actions with adjustable confidence.
How to add the Speech Recognition robot skill
- Load the most recent release of ARC (Get ARC).
- Press the Project tab from the top menu bar in ARC.
- Press Add Robot Skill from the button ribbon bar in ARC.
- Choose the Audio category tab.
- Press the Speech Recognition icon to add the robot skill to your project.
Don't have a robot yet?
Follow the Getting Started Guide to build a robot and use the Speech Recognition robot skill.
How to use the Speech Recognition robot skill
The Speech Recognition robot skill uses the built-in Microsoft Windows Speech Recognition Engine to listen for known phrases using your computer’s default audio input device (microphone). Phrases are configured manually in the Settings, and each phrase can trigger a custom action using scripts and commands.
Most robots generate significant noise from motors, servos, fans, and room echo. Because of this, placing the microphone on the robot is often impractical. For best results, place the microphone on the controlling PC/laptop, on yourself, or elsewhere in the room closer to your mouth and farther from the robot. Increasing microphone gain can help detect speech across larger rooms, but it also increases false positives, so keeping the microphone closer to your mouth is ideal. A headset or Bluetooth microphone will generally provide far better results than a built-in laptop microphone.
Main Window
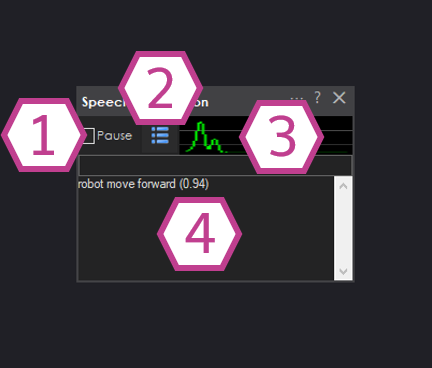
1. Pause Button
Pauses audio detection. While paused, the skill will not recognize phrases and no configured actions will execute.
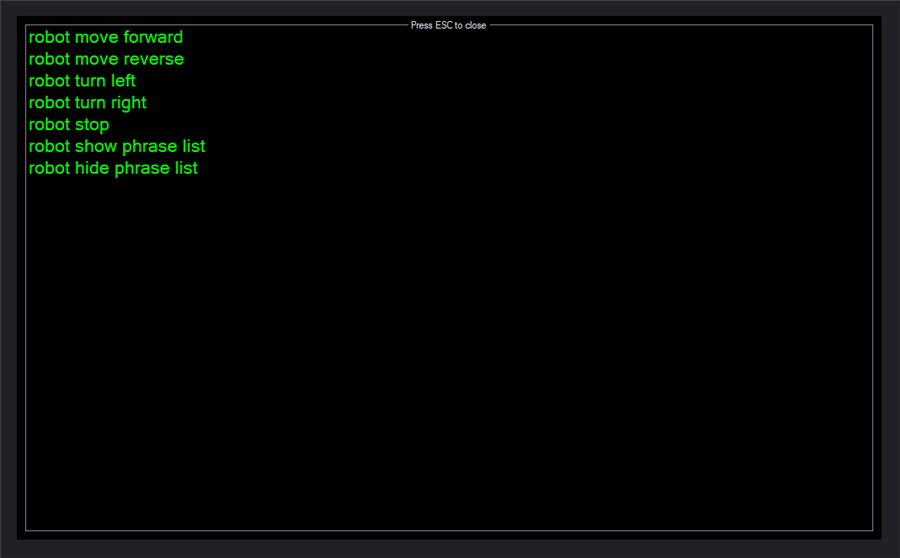
2. Phrase List Button
Opens the phrase list configured in the Settings. This allows you to quickly review what phrases the skill is currently listening for.
3. Audio Waveform
Displays live audio waveform feedback to confirm your microphone is configured correctly and actively receiving sound.
4. Response Display
Shows detection and execution feedback. When a phrase is recognized, the log will display the matched phrase (and confidence),
along with the action/script that was executed.
Settings
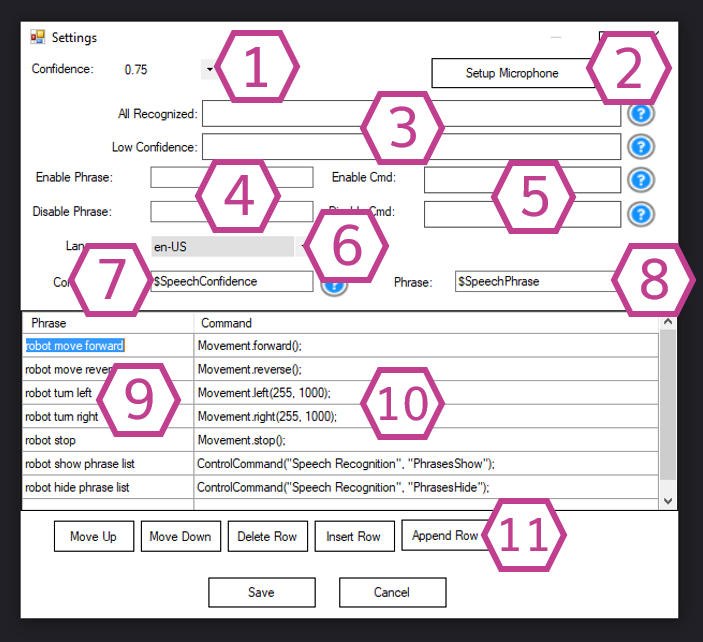
1. Confidence Drop-down
Sets the minimum confidence required for a phrase to be accepted. Phrases detected below this threshold are ignored.
If your phrases are not being detected reliably, reduce the confidence setting. When a phrase is detected, the confidence value
appears in brackets in the Response Display.
Note: Lower confidence thresholds increase the chance of false positives.
2. Setup Microphone Button
Opens the Windows microphone device properties dialog. Use this to verify the correct input device is selected and to confirm the audio meter responds when you speak.
3. Recognition Scripts
Scripts that run when a phrase is recognized at or above the confidence level (All Recognized),
and when a phrase is detected with low confidence. These are useful for logging, diagnostics,
or responding differently based on recognition quality.
4. Enable / Disable Phrase Fields
Phrases used to pause and unpause speech detection. These act as voice-controlled toggles for enabling or disabling recognition.
5. Enable / Disable Command Scripts
The scripts executed when the Enable/Disable phrases are recognized. This is commonly used to control robot behavior
such as entering a “listening mode” or disabling speech during loud activities.
6. Language Drop-down
ARC uses the speech recognition capabilities built into Windows. Any language supported by Windows Speech Recognition is also supported by ARC.
ARC will default to EN-US if installed, otherwise it will use the first installed language that supports speech recognition.
If multiple supported languages are installed, select the desired language here.
For more information on installing additional speech recognition languages, view:
https://www.tenforums.com/tutorials/120631-change-speech-recognition-language-windows-10-a.html
Here is how to add a new language pack:
- Go to Start and open Settings.
- Select Time & language > Language.
- Select the language you want to add speech to, then select the Next button.
- Select the speech options you want included with the language.
- Sign out and sign back in for the new speech pack to be added to speech options.
- Go back to Settings > Time & language > Language, select your new language, and move it to the top to make it default.
- Go to Speech and ensure the Speech language setting matches your new default language.
- Sign out and sign back in for the new settings to take effect.
- Select the desired language from the ARC Speech Recognition configuration menu.
7. Confidence Variable
The variable that stores the confidence value (decimal format) of the last recognized phrase.
8. Phrase Variable
The variable that stores the text of the last recognized phrase.
9. Phrase List
The list of phrases to recognize. You can customize the defaults and add additional phrases.
10. Command List
The command/action corresponding to each phrase in the same row. You can customize commands and add additional rows.
11. List Management Buttons
Buttons for managing phrase rows: move up/down, insert, append, and delete.
How to Use Speech Recognition
- Install, configure, and test your audio input device (see Resources below).
-
Add the Speech Recognition skill to your ARC project:
Project → Add Skill → Audio → Speech Recognition.
Note: This is different from Advanced Speech Recognition. - In Settings, configure your phrases and the corresponding commands/scripts.
- Save your settings, then speak your configured phrases into the microphone to trigger the actions.
Requirements
Headset or External Mic
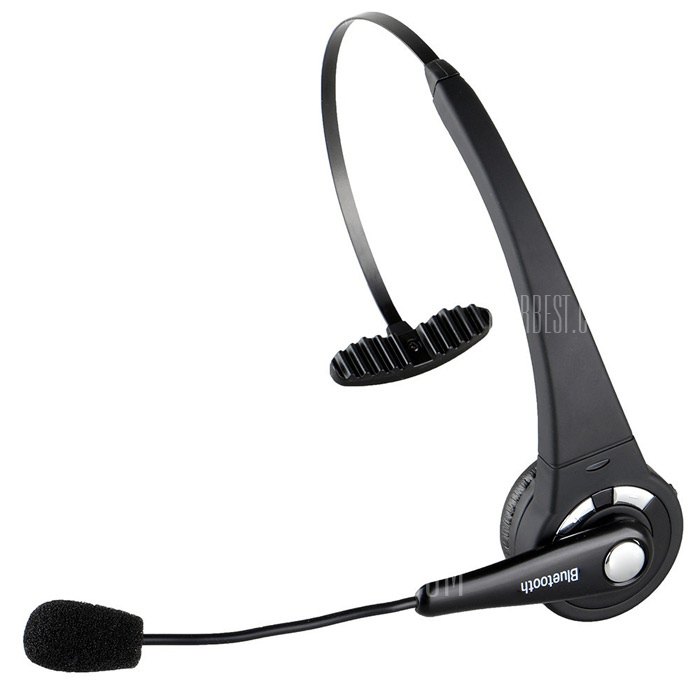
A headset or external microphone produces better results than a built-in PC/laptop microphone. It helps the recognition engine capture your voice clearly with less background noise. Laptop fans, motors, radio interference, and room echo can cause false positives (the skill recognizes an incorrect phrase). An external mic also helps prevent the speech engine from hearing the robot’s own speaker output.
Resources
Configure Audio Input Device
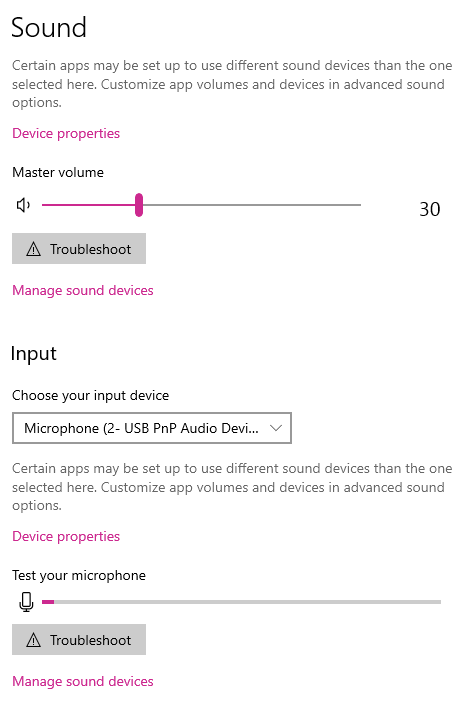
You may need to adjust your microphone input volume/gain. Use the Windows Volume Mixer and ensure you have selected the correct input device. Some systems have multiple microphones (for example: webcam microphone, headset microphone, Bluetooth microphone). Follow these steps:
- Right-click the speaker icon in the system tray.
- Select Open Sound Settings.
- In the Input section, confirm the correct microphone is selected and that the VU meter moves when you speak.
- Click Device Properties and adjust the volume slider. We often use a value around 78, but your setup may differ.
- Adjust volume so normal speech peaks near the middle of the VU meter. If the gain is too high, audio distorts and recognition quality drops.
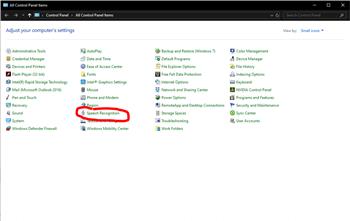
Voice Training
You can train Windows Speech Recognition using the built-in training wizard. Open the Windows Control Panel, search for Speech Recognition, and run the training wizard to improve accuracy for your voice.
Troubleshooting
- If you receive an error that the input device could not be opened, Windows privacy/security settings may be blocking microphone access for Synthiam ARC. Follow this guide to enable microphone access: https://synthiam.com/Support/troubleshooting/camera-audio-microphone-issues .
-
If you receive an error stating Voice Recognition was unable to start (invalid OS or missing device), verify:
- A microphone is set as the default recording device in Windows sound settings.
- A Windows language pack is installed that supports Windows Speech Recognition.
To confirm Windows Speech Recognition is working, open the built-in Windows Speech Recognition application: click the Start button and type Speech Recognition. Launch Windows Speech Recognition to verify your microphone, operating system, and language support. This Microsoft tool includes diagnostic dialogs that ARC does not provide.

Video
Related Tutorials

Randomizing Answers In Speech Recognition

Speech Recognition Say It Didn't Understand You

Speech Recognition Tutorial

Synbot Plugin Tutorial - Interface To Syn Bot Software
Vision Training: Object Recognition
Related Hack Events
Related Questions
Brazilian Speech Recognition
Speech Recognition Screen Popping Up.

Upgrade to ARC Pro
ARC Pro is your gateway to a community of like-minded robot enthusiasts and professionals, all united by a passion for advanced robot programming.
Hi, I am not trying to interfere between you and DJ (he knows the best) but it looks like to me you don't have a mic setup.
If you are using Windows 10:
Did you check your windows program and make sure it is setup like the information above?
Also check your in windows, Resources - Configure Audio Input Device
in Control Panel\All Control Panel Items - there is sound item for you to adjust to the correct levels (playback and recording)
Make sure, in the "sound item" you microphone is "enabled" in "recording"
I did the test, disabled it and it looked your your example above,
then "restart ARC" - I enabled the mic in sound, all good in speech recognition. ( you can do this also in the speech recognition, setup mic)
EzAng
Do you have an icon in the system tray that shows the mic being used?
windows controls what apps can use the mic and shows when it’s in use.
Thankfully, it's not ARC that cancels. It's the speech recognition script I am running. When the pause button on the speech recognition tab is not activated, background noise is still able to be picked up by the software and in some cases, the "robot stop" command is accidentally triggered causing my voice recognition program script to terminate before it has completed its run.
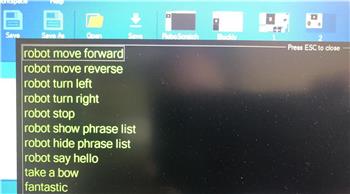
At the time this snapshot below was taken, I was not talking at all, yet as you can see, for some reason, robot stop was still detected. I have been avoiding this by clicking the pause button and that way the background noise isn't detected.
Yes - that’s a challenge with speech recognition across the world
are you using a lapel style mic as described in the speech recognition manual?
a Microphone that listens to the entire room is going to have a very very very very difficult time understanding noise vs commands. There’s no consciousness that can relate the current activity to what noises to focus on in a computer vs animal life. We take for granted the number of things our brain does to "focus" on particular events around us and filter out things that don’t matter to the current situation.
you can help A robot focus by limiting the sensory input. In this case using a microphone that has shorter range such as a lapel or Bluetooth headset etc
also, if you weren’t talking and stuff is being picked up - looks like the mic volume might be cranked because you’re attempting to use a laptop microphone
this conversation should be in the correct thread, not soundboard. This should be in the speech recognition skill for proper categorization. I moved it for you
Is there a way to script the pause to unpause per say ? every time i boot the robot and ARC autoloads the pause is activated on the app, i tried ControlCommand("Speech Recognition", "UnpauseListening") it doesnt work ?
Thanks :-)
You can see the list of controlcommands for each robot skill. There is one to unpause but I’m on my phone so can’t look it up. Here’s the manual page for how to see the list: https://synthiam.com/Support/Programming/control-command
strange that it’s paused though. I know there was a bug with Microsoft Windows for a while that caused something similar. Hopefully the bug didn’t return
Try manually unclicking the pause button then save your project and reboot the computer.
Additionally you can place the ControlCommand unpause command in an INT script that starts automatically every time a windows desktop shortcut is clicked.
when installing, starting, writes the following error:
The microphone works, in the settings I see a green bar jumping.