

Displays HC-SR04 ultrasonic distance readings in ARC; scriptable via GetPing(), pausable, sets a variable with multiplier, optional NMS output
 Hardware Info
How to add the Ultrasonic Distance robot skill
- Load the most recent release of ARC (Get ARC).
- Press the Project tab from the top menu bar in ARC.
- Press Add Robot Skill from the button ribbon bar in ARC.
- Choose the Ultrasonic category tab.
- Press the Ultrasonic Distance icon to add the robot skill to your project.
Don't have a robot yet?
Follow the Getting Started Guide to build a robot and use the Ultrasonic Distance robot skill.
How to use the Ultrasonic Distance robot skill
What this skill does NOT do: It does not automatically steer, stop, or avoid obstacles. For navigation/avoidance, use the Ultrasonic Radar skill.
Ultrasonic sensors measure distance using sonar (sound navigation ranging)—they send out a quick burst of sound and listen for the echo. The time it takes for the echo to return is used to estimate how far away an object is. This is similar to how bats and dolphins “see” with sound.
Good to Know (Beginner Tips)
- Works well on hard surfaces (walls, wood, plastic, boxes).
- Less reliable on soft or angled surfaces (fabric, carpet, curtains, plush items) because they absorb or deflect the sound.
- Unlike many IR sensors, ultrasonic sensors are generally not affected by sunlight or black materials.
- Temperature and voltage can affect readings (sound travels differently in warm vs. cold air).
When an HC-SR04 (or equivalent) Ultrasonic Distance Sensor is wired to your EZB and configured in this skill, the skill will display a distance value for whatever is directly in front of the sensor.
How Readings Work (Important)
The value shown by this skill is typically 0–255. This number is a raw sensor value and is not automatically “cm” or “inches”. The raw value can vary depending on the sensor model, input voltage, the surface you’re detecting, and even room temperature.
Main Window
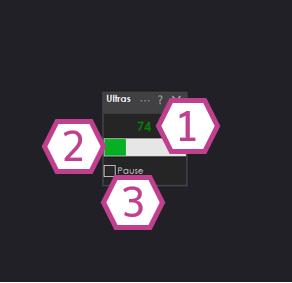
What You See
1. Ultrasonic Distance Value
- Shows the current distance reading (usually 0–255).
- Higher/lower values represent farther/closer objects depending on sensor and configuration.
2. Bar Display
- A quick visual way to see changes in distance without watching the number.
- Helpful for testing wiring and sensor direction (point it at a wall and move closer/farther).
3. Pause Checkbox
- When checked, the skill stops continuously sampling the sensor.
- This is useful if you only want readings on demand from a script (see next section).
Using This Skill with Scripts (GetPing)
This skill integrates with ARC scripting. If the Pause checkbox is checked, the skill will not constantly poll the sensor.
Instead, it will update when your script calls GetPing() (as long as the skill’s configured ports match your wiring).
Why pause + GetPing() is useful
- Reduces unnecessary communication traffic to the EZB.
- Lets you control exactly when a reading is taken (for example, only when the robot is moving forward).
- You can keep the skill paused permanently and still see updated values whenever
GetPing()is called.
Settings
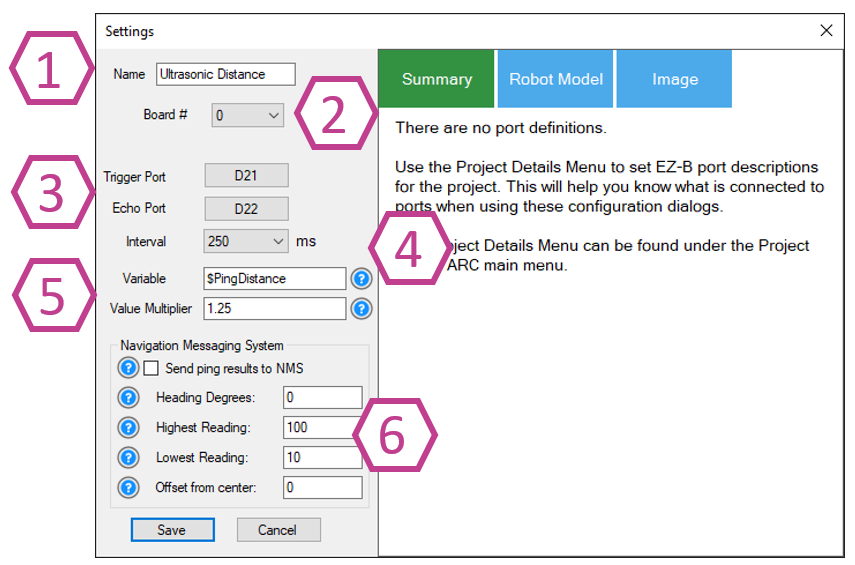
Sets the name shown on the skill’s window. You can rename it to match where it’s installed (example: “Front Ultrasonic”).
Note: Changing the title also changes the name used in the controlCommand() reference for this skill.
Choose which EZB you are using (example: EZB #0). If you only have one EZB connected, it is usually 0.
- Trigger port: the digital pin used to send the ultrasonic “ping”.
- Echo port: the digital pin used to listen for the returning echo.
- 3-wire sensors: some combine trigger/echo into one signal wire—when using that type, set Echo to the same port as Trigger (as required by the sensor design).
Controls how often the skill samples the sensor (in milliseconds). Range: 100–60000 ms. Default: 250 ms.
- Smaller number = faster updates (more frequent readings).
- Larger number = fewer updates (less traffic and CPU usage).
Variable
- Stores the most recent reading into a variable automatically.
- This can reduce the need to call
GetPing()repeatedly, which can add unnecessary communication overhead.
Multiplier
- Scales the raw value into a more useful unit.
- Example: the default multiplier of 1.25 is commonly used to convert the reading into centimeters (depending on the sensor and setup).
- For best accuracy, calibrate: measure a known distance with a tape measure, compare to the raw value, then adjust the multiplier until it matches.
Optionally pushes distance data into the NMS (Level #3, Group #1) so other navigation skills (such as The Navigator) can use it. If you are new, you can leave this disabled until you start working with navigation behaviors. Use the ? help icons in ARC and the NMS manual for details on each option.
Wiring Diagram
Ultrasonic distance sensors commonly come in two styles: 3-wire (trigger+echo combined) and 4-wire (separate trigger and echo). Some versions include a voltage regulator (inline or built-in).
If your ultrasonic sensor has a regulator, it typically needs +6V or higher (often connected to Vin).
If it does not have a regulator, it typically needs +5V.
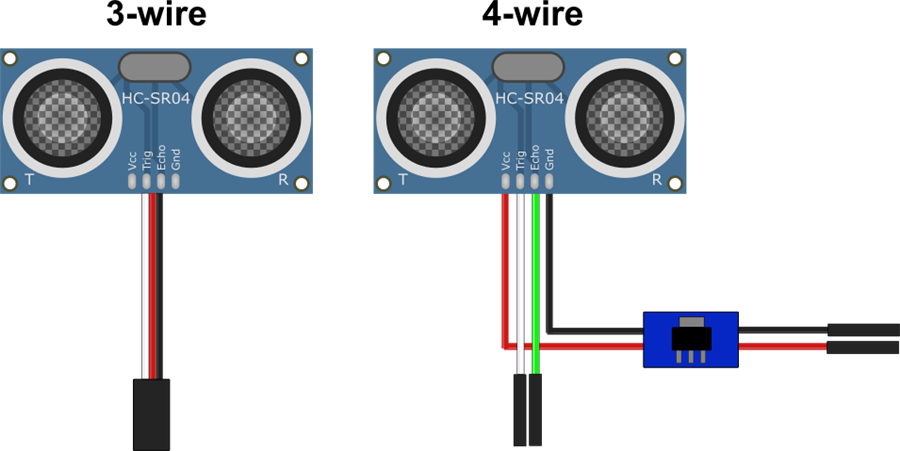
3-wire Wiring (with built-in regulator)
- Ground: Black wire to GND
- Power: Red wire to Vin
- Trigger/Echo: White wire to a Digital pin
4-wire Wiring (with regulator)
- Ground: Black wire from regulator to GND
- Power: Red wire from regulator to Vin
- Trigger: White wire to a Digital pin
- Echo: Green wire to a second Digital pin
Beginner Troubleshooting Checklist
- No reading / stuck value: confirm GND and power wiring, then confirm the configured digital ports match where you plugged in trigger/echo.
- Reading seems random: try changing the Interval to a slower value (e.g., 500–1000 ms), and test with a flat wall 30–100 cm away.
- Always detects “something”: check for nearby surfaces that could reflect sound (robot body panels, brackets), and see the “Fix Resolution” section below.
- Inconsistent on fabric: test with a hard surface; fabric often absorbs sonar.
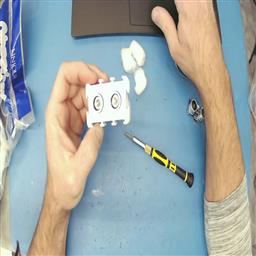
Fix Resolution (False Positives on Some Housings)
If you use an EZ-Robot ultrasonic distance sensor, you may occasionally see false positives caused by the ping echoing inside the sensor casing. A common fix is placing a few small cotton balls inside the case around the sensors to dampen internal reflections.
Tech Details (Video)
Resources
Synthiam’s ultrasonic hardware reference design is available here.
Related Tutorials
Related Robots
Related Questions
Wire Length For The EZB Ultrasonic Sensor
How Do I... Not Be Hopelessly Lost?

Upgrade to ARC Pro
Unleash your creativity with the power of easy robot programming using Synthiam ARC Pro
as long the other 7 are working on the ezbv4 ,then you have made one for arduino special edition .
Well Thomas, I pulled out all the stops for you.
Thank you for mentioning the voltage and swapping the jumpers.
I reached deep into my HC-SR04 Collection and tested 3 different sensors. The top 2 look similar but they do have minor differences you can see that the crystals and the "HC-SR04" silk screen have slightly different fonts on them.
You could compare your sensors to mine and see if they match the sensors I have.
I tested all the sensors with your EZ-Script code - All 3 were good, super low numbers with objects in close proximity and higher numbers around 100 when aimed at my ceiling.
I tested them with a lower voltage - All three were good down to 4.7V, and the bottom sensor surprised me with accurate readings down to 3.6V. This proves that there are differences between brands.
I had a hunch that maybe you bought a certain brand of HC-SR04 that requires a slightly different trigger pulse than ARC produces but from the spectrum of sensors I own, it seems that this is not the case. If your sensors do look quite different than mine, maybe there is validity to the hunch.
Do you know the exact trigger pulse width that the Arduino produces? If not, do you have an oscilloscope?
Can you move a servo with the d0 and d1 ports of that ezb?
disconnect the ping sensor, start a new ARC project, add a horizontal servo control, move the servo. Can you move a servo on those ports with that ezb?
Thomas, I feel for you man. I know how frustrating something like this is. It sounds like you have tried everything.
When I get to this point (and I do at times) I shot gun everything and start new with as many new parts I can. In your case that may not be feasible.
One thing occurred to me. It's possible that you may have a broken jumper wire, connector, header pin that only makes contact when moved in a certain direction. These are hard to find and oddly and randomly intermittent. I just had this issue a couple weeks ago and it was driving me crazy. I found it after DJ suggested a lose connection and I did some continuity tests.
Troubleshooting is an art and very methodical. It's tedious at times and frustrating. I have a few steps to suggest. Some of the steps may seem redundant or silly but you would be surprised how many times I felt the same way only to try it and uncovered a hint as to what is going on. You may have already done these things but I'll list them anyway. When I say test below I mean a continuity test. *Pull all the wiring apart. Do a continuity test on each wire from tip of connector to tip of connector. Do this while moving the wire and connector around. Be aggressive. Make sure you have a good positive connection from the tip of each wire to your testing meter. *Put the wiring back together and test continuity from feed to source. Again while moving the circuit around. *After wiring is in place test form header pin solder joint on the boards to header pins solder joint on the board if possible. I've seen many cracked solder joints or even cold solder joints on boards. I repair old pinball machines from the '80's and 90's and this is a common problem. This translates to robotics. Again, move the connection and wires around. *New jumpers and connectors can also have broken or bad connectors so don't assume just by replacing the wiring you have solved your problem. *Move the confirmed good wiring to different ports on the EZB. Remember to change the port assignment in ARC in your script. Double check your settings. Triple check your settings. *I've had scripts in ARC stop working when I was working on them or rewriting them. It's happened rarely but it happened. The only way I was able to get the script working again was to totally delete it, reboot ARC, open up a new script and rewrite it from scratch. *Move the voltage regulator to before the EZB and feed the EZB through it. Then attach the positive and neg of the sensor directly to the EZB power pins. Power up and move the regulator around aggressively. See if the EZB browns out, reboots or flickers. *Run power directly to the sensor through a known good regulator and not through the EZB. Run a different power feed to the EZB. *If you have a different (maybe even adjustable) voltage regulator try using it. *Double check the input voltage requirements of you're regulator and make sure you are feeding it within the spread. I know the EZB Ping Sensor that you say you tried has a input voltage of between min 6.2v, max 20v. Your little 6v battery pack was probably not giving it enough power. *Replace your batteries with new ones. *Try a different power source. I hate those little battery packs. I know you're not drawing a big load but we're troubleshooting here. Give it more overhead. Do you have a switching power supply like a computer power supply? Try it and feed it 12 volts and buck the voltage down to within the sensors specified voltage with an adjustable converter. *Double check, triple check all your wiring and connections. *Maybe you have two simple issues that are popping up different times making this look completely broken.
If you're totally frustrated you may be missing something or even simply overlooking a simple detail. Man, I've been there. Maybe a fresh set of eyes would help. If you are open I'd be happy to look at it personally. Just ship the components you're having trouble with to me and I'll try my luck. I'm no expert but I may be able to see a thing or two you have missed. I do not want your money. My email is [email protected].
@Thomas I definitely back up what @DJ and @Dave are saying.
When executing your script you should hear the clicking (pulsing) of the Ultrasonic, even if you reverse the trigger and echo pins you'll still hear the Ultrasonic clicking if you place the sensor close to your ear. If you can't hear anything then move then check continuity and voltages as Dave was mentioning, and wiggle wires around if you have to. I do find that those AA battery holders do have flimsy wires that break every once and a while.
If it's not a bad jumper wire and 5V regulated voltage is getting to the Ultrasonic (check with a multimeter at the sensor pins), then it seems like it could be the EZ-B ports. You could try what @DJ mentioned and test the EZ-B pins in particular by simply using a servo on them.
I did find that one of my Ultrasonic sensors was reading 255 all the time, turns out that it had a broken capacitor. As you can see here directly in the middle of the photo.
DJ & Jeremie,
I am using d1 and d2. I hooked up a servo to d1 and it works fine. I then moved it to d2 and that worked fine as well. The ports work fine. See Video.
https://youtu.be/20St84CSUyQ
Also, my sensors are nothing like Jeremie's. Tonight I tried an old (10 year old?) VEX ping sensor that I had and IT WORKED! I'm thinking there may be a compatibility issue with my new sensors. You see, I recently bought 10 "Smraza" brand ultrasonic sensors from Amazon.com (They were cheap!) https://a.co/d/9RyU9PH . Those 10 are the ones that are NOT working with an EZ-B. Again, they work with an Arduino.
Can you recommend some (not too expensive) ping sensors that have worked for you two?
Dave,
Thanks! I think I might have solved the issue.
Thomas
My cheap "Smraza 5pcs Ultrasonic Module HC-SR04" sensors:
Awesome! Thanks for checking that Thomas, looks like maybe my hunch in post #58 was correct.
I've ordered the Smraza sensors to try here in the EZ-Robot lab and they will be here on Thursday.
I have also ordered the next cheapest Elegoo HC-SR04 sensors and they will be here today (Wednesday). My hope is that the Elegoo sensors will work natively with the EZ-B and you could switch over to those.
What code do you use on the arduino for that sensor to work. Copy and paste an example code snippet so we can see.