T265 VSLAM for ARC: SLAM-based mapping and precise way-point navigation, low-power tracking, and NMS telemetry.
How to add the Intel Realsense T265 robot skill
- Load the most recent release of ARC (Get ARC).
- Press the Project tab from the top menu bar in ARC.
- Press Add Robot Skill from the button ribbon bar in ARC.
- Choose the Navigation category tab.
- Press the Intel Realsense T265 icon to add the robot skill to your project.
Don't have a robot yet?
Follow the Getting Started Guide to build a robot and use the Intel Realsense T265 robot skill.
How to use the Intel Realsense T265 robot skill
With its small form factor and low power consumption, the Intel RealSense Tracking Camera T265 has been designed to give you the tracking performance for your robot. This ARC user-friendly robot skill provides an easy way to use the T265 for way-point navigation.
The T265 combined with this robot skill provides your robot a SLAM, or Simultaneous Localization and Mapping solution. It allows your robot to construct a map of an unknown environment while simultaneously keeping track of its own location within that environment. Before the days of GPS, sailors would navigate by the stars, using their movements and positions to successfully find their way across oceans. VSLAM uses a combination of cameras and Inertial Measurement Units (IMU) to navigate in a similar way, using visual features in the environment to track its way around unknown spaces with accuracy. All of these complicated features are taken care of for you in this ARC robot skill.
Update Firmware The device sensor may require a firmware update.
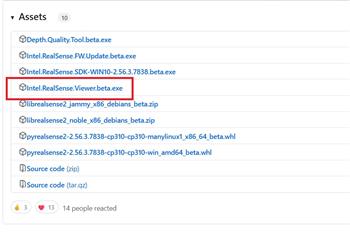
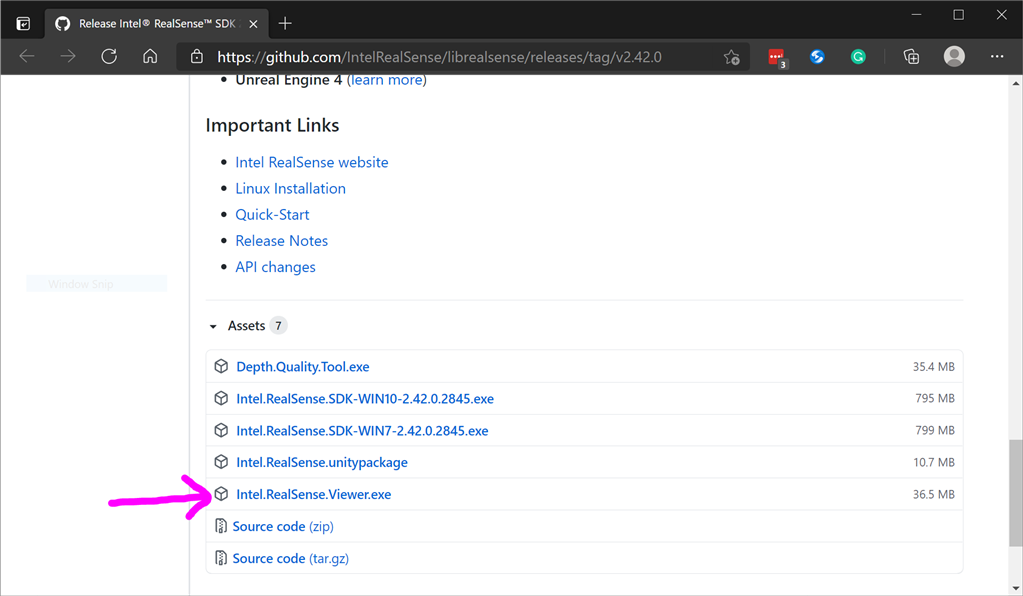
Visit the Realsense GitHub page, scroll to the bottom of the page, and install the Intel.Realsense.Viewer.exe from here: https://github.com/IntelRealSense/librealsense/releases/latest
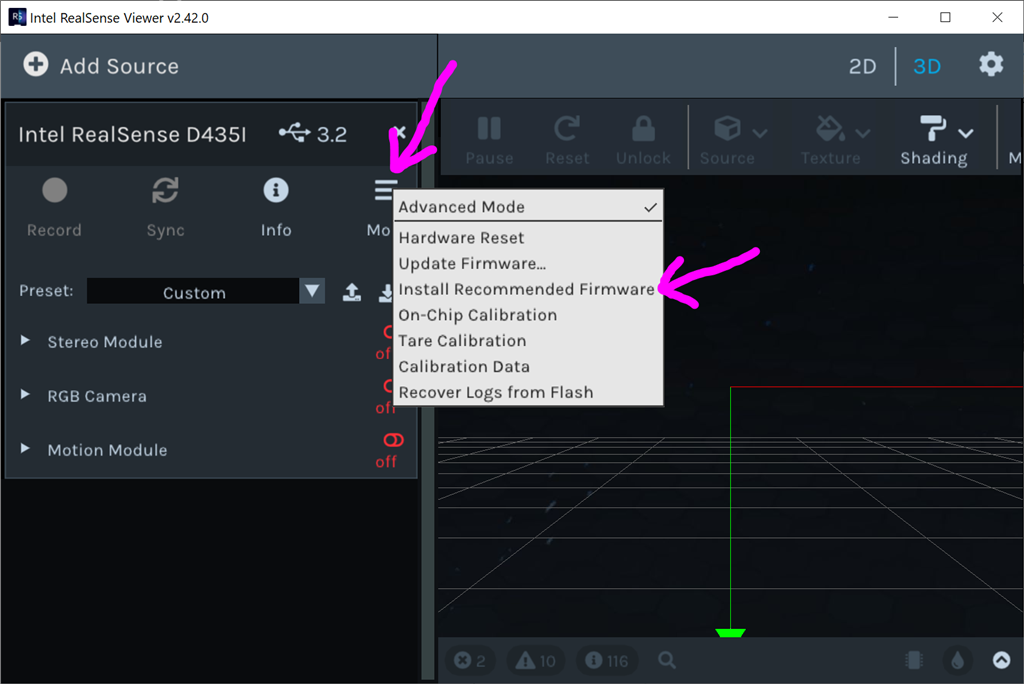
Click the hamburger settings icon and select Install Recommended Firmware
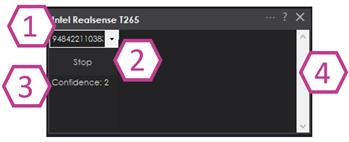
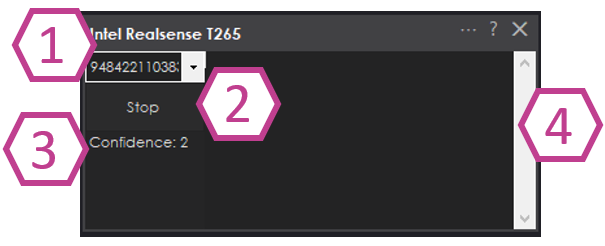
Robot Skill Window The skill has a very minimal interface because it pushes data in the NMS and is generally used by other robot skills (such as The Navigator).
Drop-down to select Realsense device by the serial number. This is useful if there are multiple devices on one PC.
START/STOP the Intel T265 connection.
The confidence of the tracking status between 0 (low) and 3 (highest). In a brightly lit room with many points of interest (not just white walls), the tracking status will be high. Tracking will be low if the room does not have enough light and/or detail for the sensor to track.
Log text display for errors and statuses.
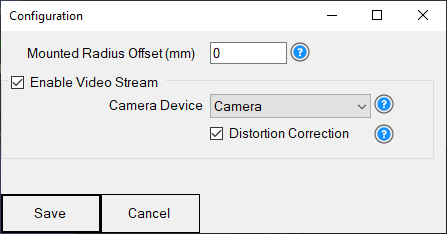
Config Menu
1) Mounted Radius Offset (mm) is the distance in mm of the T265 from the center of the robot. A negative number is toward the front of the robot, and a positive number is toward the rear. The sensor must be facing 0 degrees toward the front of the robot. The sensor must not be offset to the left or right of the robot.
Enable Video Stream will send the fisheye b&w video from the T265 to the selected camera device. The selected camera device robot skill must have Custom specified as the input device. Also, the camera device will need to be started to view the video.
Distortion Correction will use a real-time algorithm to correct the fisheye lens, which isn't always needed and is very CPU intensive.
Video Demonstration Here's a video of the Intel RealSense T265 feeding The Navigator skill for way-point navigation
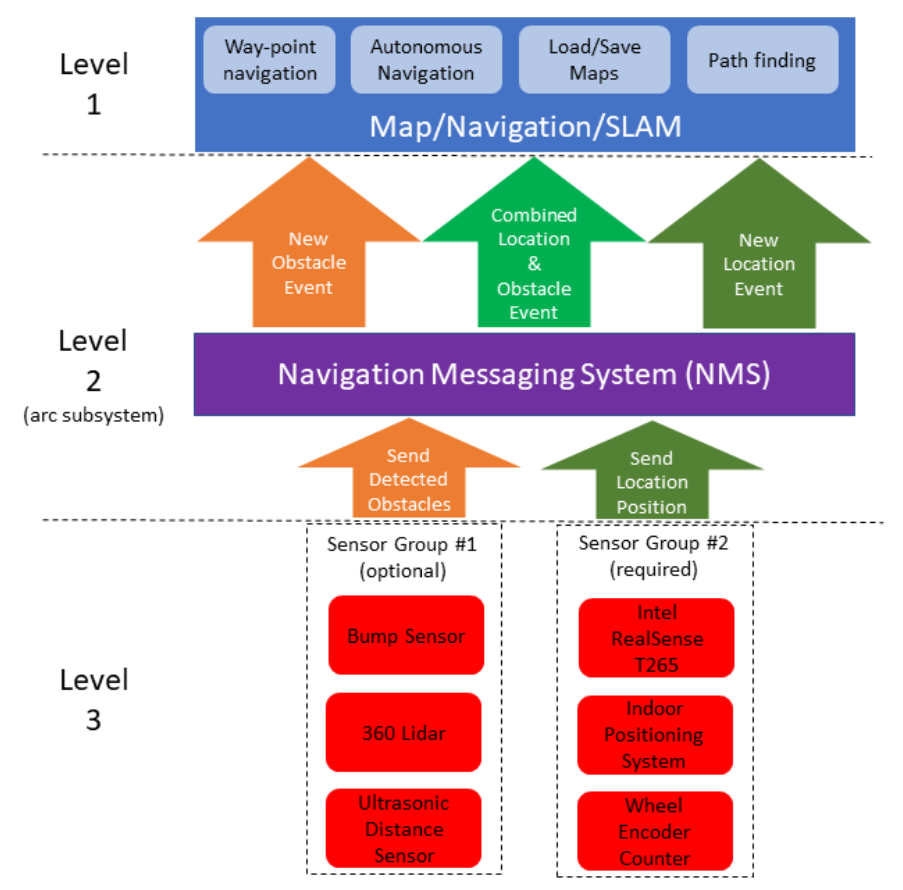
ARC Navigation Messaging System This skill is part of the ARC navigation messaging system. It is encouraged to read more about the messaging system to understand available skills HERE. This skill is in level #3 group #2 in the diagram below. This skill contributes telemetry positioning to the cartesian positioning channel of the NMS. Combining this skill with Level #3 Group #1 skills for obstacle avoidance. And for Level #1, The Navigator works well.
Environments This T265 will work both indoors and outdoors. However, bright direct light (sunlight) and darkness will affect performance. Much like how our eyes see, the camera will is also susceptible to glare and lack of resolution in the dark. Because the camera visual data is combined with the IMU, the camera must have reliable visible light. Without the camera being able to detect the environment, the algorithm will be biased to use the IMU and will experience drift, which greatly affects the performance of the sensor's accuracy.
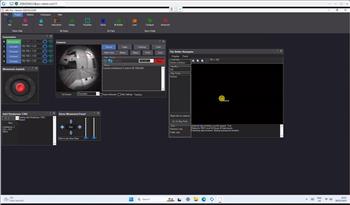
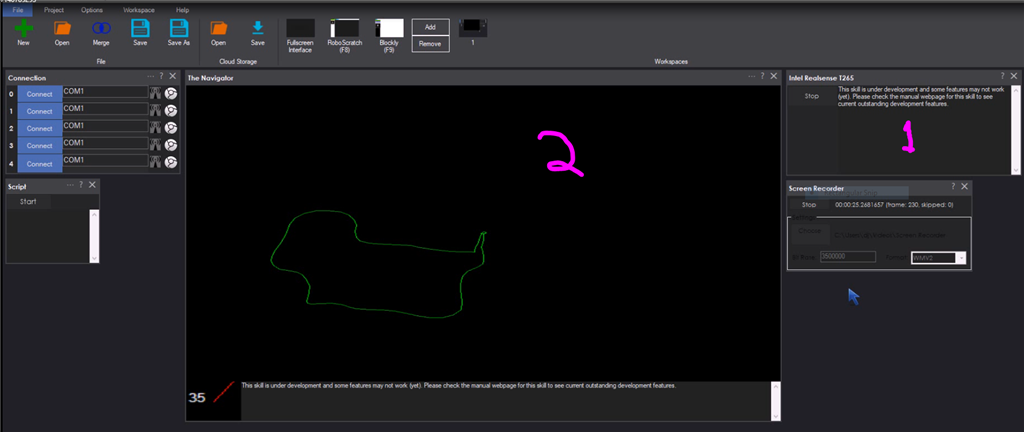
Screenshot Here is a screenshot of this skill combined with The Navigator in ARC while navigating through a room between two way points.
Starting Location The T265 does not include a GPS/Compass or any ability to recognize where it is when initialized. This means your robot will have to initialize from a known location and direction to reuse saved maps. Make sure you mark the spot on the ground with masking tape where the robot starts from.
How To Use This
Connect your Intel RealSense T265 camera to the computers USB port
Load ARC (version must be >= 2020.12.05.00)
Add this skill to your project
Now we'll need a Navigation skill. Add The Navigator to your project
Press START on the Intel RealSense skill and data will begin mapping your robot's position
How Does It Work? Well, magic! Actually, the camera is quite interesting and it breaks the world down into a point cloud of features. It remembers the visual features so it can re-align itself on the internal map. It uses a VPU, is what Intel calls it. Here's a video of what the camera sees.
Related Hack Events

A Little Of This, A Little Of That

DJ's K8 Intel Realsense & Navigation
Related Questions
T265 Realsence Viewer.Exe On An Upboard
Navigator With Mecanum (Omni) Wheel Robot Platforms
Questions Regarding Navigation
In The Better Navigator No Movement From The T265
Upgrade to ARC Pro
ARC Pro is more than a tool; it's a creative playground for robot enthusiasts, where you can turn your wildest ideas into reality.

 Hardware Info

@Nink, I mentioned previously that I'll add a ControlCommand for you - it is on the list todo. However, I don't think it's going to help you and will cause much larger challenges to face. But that being said, I'm interested in how you'll overcome them.
You see, the T265 requires a cartesian X/Y and Heading Degree for mapping. This means you will have to specify the absolute exact coordinate (including heading degree). I'm sure there's a way you can calculate it with a glyph size and such. But be forewarned that it won't be as simple as you may think.
*PS Note: moved the above comment into this thread because it's regarding the Intel T265 and now a robot build.
OK thanks @DJ. BTW I tried telling the robot to goto a spot close to dock, then go seek dock then stop realsense camera and start Realsense again to recalibarate but after a couple of times doing this it will just hang. If I unplug realsense wait 30 second and plug back in again it will work when you tell it to start again.
Question Can you Disable and Enable a USB port in ARC to reinitialize the driver or can you call a batch file to potentially use something like devcon to disable port in windows and then re-enable the USB port so it resets each time you stop and start it?
I use the same method. I found this code, duno if it helps...
https://github.com/ralight/usb-reset/blob/master/usb-reset.c
Bye the way, i have a Ryzen 5 with 16GB onboard my roomba and the T265 does not drift anymore.
Thanks I am not sure how to execute that code from ARC. I did a google and found I can disable and enable with the PNPUTIL command but windows wants to reboot in between ( I guess they forget what the PNP in PNPUTIL stands for) example for my device pnputil /disable-device "USB\VID_8087&PID_0B37\952322111114"
I could always just create a USB hardware add-on that allows me to turn it on and off with a relay (this is actually starting to sound like easiest method)
With regards to drift, I played with offset for a while and concluded -160 was a good level (When I go into a spin it doesn't create a donut) but yeah drift is still a problem.
Ryzen 5 must chew some power. What are you using for battery. I have blown out 4 Lipos running all this stuff (My 4S is now a 3S and my 3S's are now 2S's). I have now switched back to an old Sealed lead battery and plug in when docked so computer is always on. This seams to work OK and I get about 2 hours of play time. I am going to add some springs and magnets so it will auto charge (just a matter of finding parts) this week.
I really want to get this as autonomous as possible.
Great idea with the relay. The code is just an example i found. I think it is written C+. My setup with this mboard is recent and i am still in the build phase. I use 2 Xunzel SOLARX-8 gel batterys in parallel.
heh I found out how to fix camera hanging when you turn off Realsense and turn it back on. Put a 1 minute delay in the script between turning off and on. Sometimes it is quick sometimes slow but 1 minute seems to work all the time for me. More testing.
I need to work on distance sensors maybe laser sensors as these ultrasonics are garbage. Will smash into something or see something that is not there. Also I think we need a way to navigate with individual sensors, if something towards left turn right, towards right turn left. directly in front stop. When you have sensors directly on side you really don't care as much about distance from wall beside you, also when you are going fast they don't work as well as slow.
I also really need to add a panic button off an Arduino accelerometer to shut off roomba battery if it starts to go crazy. That seems to happen a lot :-)
Nink, i use the roomba built in IR sensor array to avoid obstacles coming from left, right or front and try to navigate past it. It is very crapy code and is still in "beta" but works.