

Add and manage up to 255 EZ-B I/O controller connections in ARC, select COM/IP ports or device addresses to connect or remove devices.
How to add the EZB Connections robot skill
- Load the most recent release of ARC (Get ARC).
- Press the Project tab from the top menu bar in ARC.
- Press Add Robot Skill from the button ribbon bar in ARC.
- Choose the Communication category tab.
- Press the EZB Connections icon to add the robot skill to your project.
Don't have a robot yet?
Follow the Getting Started Guide to build a robot and use the EZB Connections robot skill.
How to use the EZB Connections robot skill
ARC’s standard connection control supports up to 5 connections. This skill expands that to as many as 255 total connections (connection numbers #5 through #255).
If you are new to connecting EZ-B devices in ARC, read the main Connection documentation first: Connection skill page.
Main Window
The main window lists each extra connection you add. Each row represents one additional EZ-B that ARC can connect to. You will choose how to reach that EZ-B (for example: a COM port or an IP address), then press Connect.
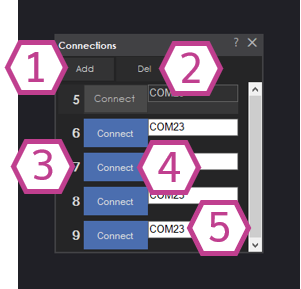
Screen Guide (numbers match the image)
Adds a new connection row to the list. Each time you click Add, ARC creates the next available connection number. You can add connections up to index #255.
Tip: These extra connections start at #5 because the standard ARC connection control covers connections #0–#4.Removes connection rows starting from the highest connection number (the last one in the list). Use this if you added too many connections or want to simplify your project.
Tip: If you want to remove a specific connection in the middle, you may need to delete down to it and re-add what you need.Shows the assigned connection number for that row (from 5 up to 255). This number matters because ARC uses connection numbers to know which EZ-B a control or script command should talk to.
Example: You might connect a “head” EZ-B on connection #0 and an “arm” EZ-B on connection #5.Connects ARC to the EZ-B for that row. Before clicking it, select the correct COM port or IP address in the drop-down (item #5).
Tip: If it fails to connect, double-check you selected the right port/address and that the EZ-B is powered on and reachable.This is where you choose how ARC will reach your EZ-B:
- COM Port (common for USB/serial devices): pick the COM port that your EZ-B is using.
- IP Address (common for WiFi/Ethernet devices): pick or enter the IP address of the EZ-B on your network.
Beginner Workflow (Quick Steps)
- Connect and power your additional EZ-B(s).
- In ARC, open the EZB Connections skill.
- Click Add until you have one row for each additional EZ-B you want to use.
- For each row, choose the correct COM port or IP address from the drop-down.
- Click Connect on that row and verify it connects.
- Repeat for each additional EZ-B.
Videos
These videos demonstrate how to set up and use multiple EZ-B connections in ARC. Watch them while following along in your own project.
Requirements
- One or more EZ-B I/O controllers.
- A PC running Synthiam ARC.
- The correct connection method for each EZ-B (for example: USB/serial COM port or network IP address).
Related Tutorials

How To Choose Correct Battery(S).
Setting Servo Speeds And Initialization Script Tutorial
Related Questions

Upgrade to ARC Pro
Don't limit your robot's potential – subscribe to ARC Pro and transform it into a dynamic, intelligent machine.
I've added this skill but it doesn't seem to have a scan for auto discovery, kind of need this when you are using the EZ-Bs in client wifi mode.