
Connects EZ-B I/O controllers to ARC via COM or IP (5 connections). Supports init scripts, battery monitoring, TCP/EZ-Script server and serial/I2C.
How to add the EZB Connection robot skill
- Load the most recent release of ARC (Get ARC).
- Press the Project tab from the top menu bar in ARC.
- Press Add Robot Skill from the button ribbon bar in ARC.
- Choose the Communication category tab.
- Press the EZB Connection icon to add the robot skill to your project.
Don't have a robot yet?
Follow the Getting Started Guide to build a robot and use the EZB Connection robot skill.
How to use the EZB Connection robot skill
The Synthiam ARC EZB Connection skill is how ARC connects to an EZ-B I/O controller (or compatible hardware) so ARC can control servos, read sensors, run I2C/UART devices, and more. You can connect using either a COM port (USB/Serial) or an IP address (Wi-Fi/Network).
This skill provides 5 connection slots (connection indexes 0–4). If your robot needs more than 5 connections, use the EZB Connections skill. ARC supports many I/O controllers and robot products—see supported EZB hardware here.
Before You Start (Beginner Checklist)
- Power the EZ-B with the correct battery/power supply.
- If using USB/Serial, plug the device into your PC and ensure the driver is installed (Windows Device Manager should show a COM port).
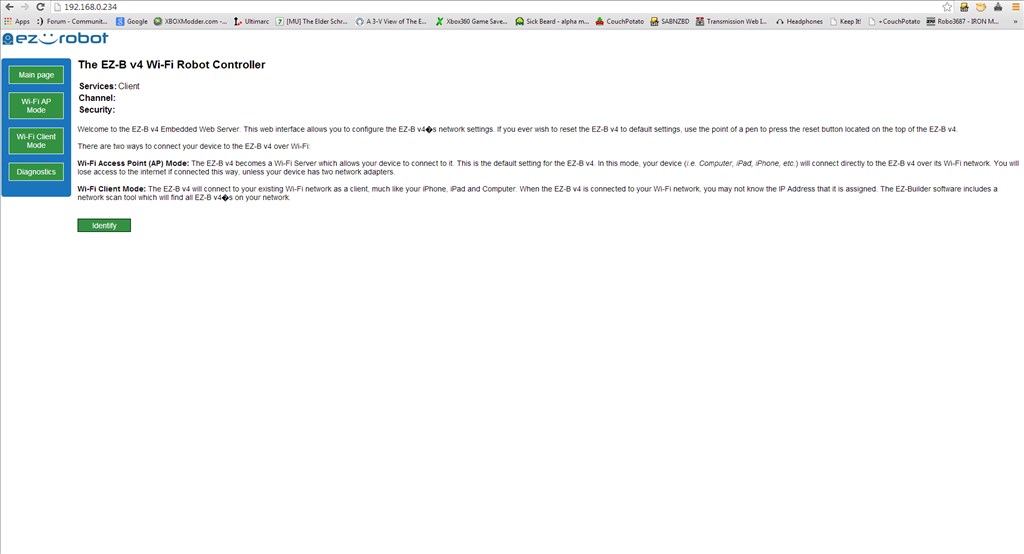
- If using Wi‑Fi/Network, make sure the EZ-B is on the same network as your PC (or is configured for a client connection).
- Know which connection slot you will use. Most ARC skills default to Connection Index 0.
Main Window
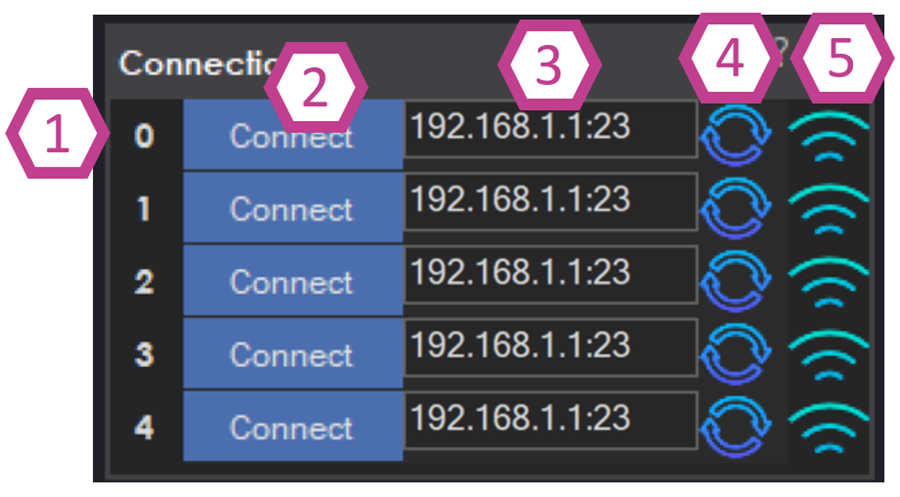
What you do here: pick a connection index (0–4), enter/select a COM port or IP address, then press Connect.
1. EZB Board Index
Each row is a separate connection slot called an index (0, 1, 2, 3, 4). Many ARC skills assume your main controller is on index 0, especially if you are just starting out.
Beginner tip: If you only have one EZ-B, use index 0 so you don’t have to change other skills later.2. Connect Button
After selecting a COM port or typing an IP address, click Connect to connect that specific index to ARC. If you have multiple controllers, you can connect more than one row.
If it fails to connect: confirm power, confirm the correct port/IP, and make sure no other program is already using the COM port.3. Device Address or Port Drop-down
This editable field is where you choose how ARC will reach your hardware:
- USB/Serial: pick a COM port (example:
COM3). - Network/Wi‑Fi: type the device IP address (example:
192.168.1.50).
4. Port Refresh
Refreshes the COM port list. This is helpful when you plug in or unplug USB devices (Arduino boards, USB UART adapters, etc.).
5. I/O Scan Button
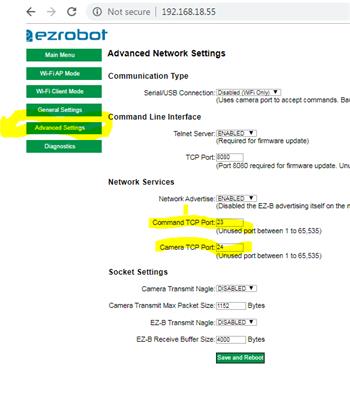
Some network-capable controllers can broadcast/discover their IP address on your network. The scan button helps you find devices without manually typing an IP. This is commonly used with an EZ-B client connection.
If scan doesn’t find anything, confirm your PC and controller are on the same network and that network discovery/broadcast is allowed.Settings - Scripts

These scripts run automatically when a specific connection index successfully connects. This is one of the most beginner-friendly ways to make your robot “start up” correctly every time.
1. Connection Established Scripts
When ARC connects on an index (0–4), the matching script runs. Common uses:
- Center or park servos to safe positions
- Set LED states (on/off, colors)
- Initialize variables your project expects
- Start other scripts (for example, sensor polling loops)
Servo initialization is a very common first step—read more here.
Beginner safety tip: If your robot has arms/wheels, initialize to a safe position first to avoid sudden movement when the connection comes online.
Settings - Battery Monitor
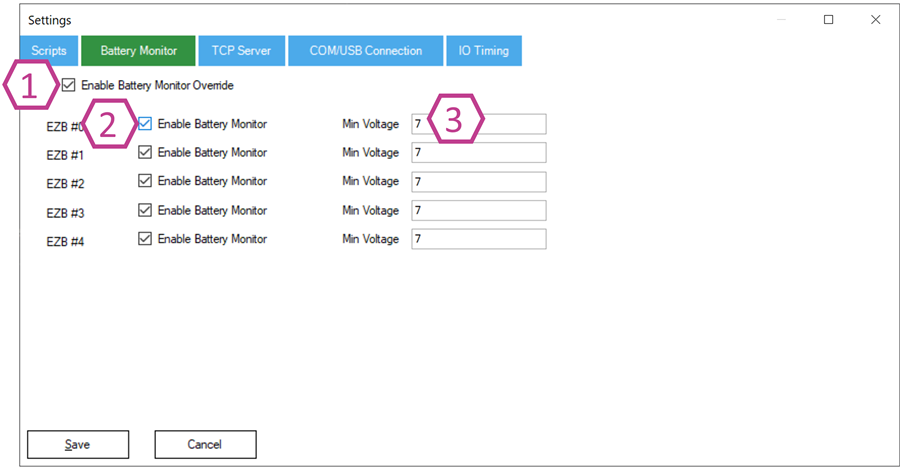
Battery monitoring helps protect rechargeable batteries from being drained too low. Draining lithium batteries below their safe voltage can permanently damage them.
1. Battery Monitor Override Checkbox
ARC has a built-in battery monitor that is enabled by default. When the battery voltage drops below the configured minimum, ARC can command supported controllers to reduce/turn off I/O output to conserve power. Enable Override only if you have your own protection solution or you know the default behavior does not match your power system.
2. EZB Battery Monitor Enable Checkbox (per connection index)
These checkboxes enable/disable battery monitoring for each of the 5 connection indexes. If disabled, ARC will not protect that connection from low voltage conditions. USE AT YOUR OWN RISK.
3. Minimum Voltage Field
Set the minimum safe voltage for your power source. Example: 7.0V is commonly used as a safety threshold for a 7.4V (2S) LiPo. If the controller reports voltage below this value, ARC can trigger protect mode.
If you are unsure what value to use, check your battery’s specifications (chemistry and cell count) and use a conservative threshold.Settings - TCP Server
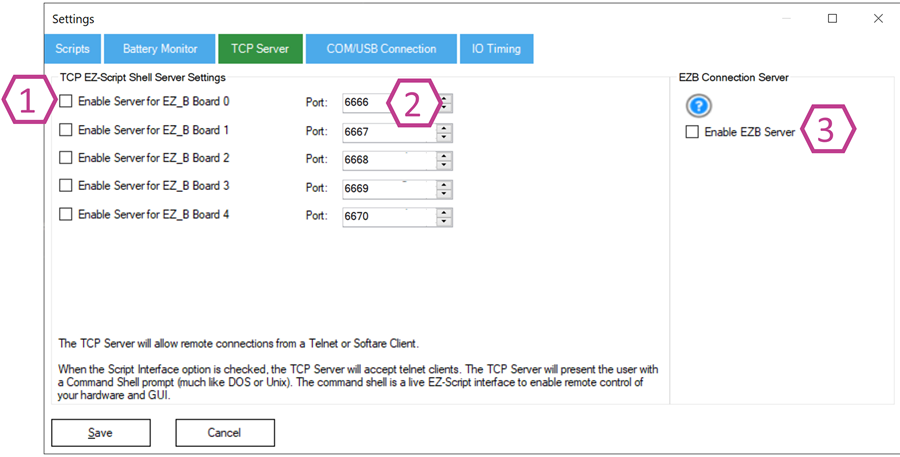
The TCP Server allows other software (on the same PC or on another computer) to send EZ-Script commands into ARC over the network—useful for integrations, automation, and third-party apps.
1. Enable TCP Shell Server Checkbox
When enabled, ARC runs an EZ-Script “shell” server that accepts TCP (Telnet-style) connections. Connected clients can send EZ-Script commands (set variables, start/stop scripts, control servos, etc.) and receive responses.
- Monitor connected clients with the TCP Clients skill.
- Common integration example: RoboRealm.
- For advanced integrations, combine with the HTTP Server to access features such as video frames.
Quick test (same PC):
- Enable the TCP Shell Server.
- Open a terminal and connect to
127.0.0.1on port6666(default). - Type an EZ-Script command and press Enter.
Commands usually respond with True or console output. For example:
Servo(D0, 2) returns True, while Print("Hello") returns Hello.
Python example: Connect to TCP Server #0 on localhost port 6666 and speak from the connected EZB speaker.
import socket

# ARC TCP Server IP
server_ip = '127.0.0.1'

# ARC TCP Server Port
server_port = 6666

# The EZScript command to send to ARC. This example will speak out of the connected EZB
command = "SayEZB(\"I am connected\")\n"

# Create a socket
sock = socket.socket(socket.AF_INET, socket.SOCK_STREAM)

try:
    # Connect to the server
    sock.connect((server_ip, server_port))

    # When first connecting to the ARC TCP Server, it prints version info before a command can be sent
    version = b''
    while True:
        data = sock.recv(1024)
        if not data:
            break
        version += data
        if b'\n' in data:
            break
    print("Version:", version.decode())

    # Send the command to ARC
    sock.sendall(command.encode())

    # Receive and print the response
    response = b''
    while True:
        data = sock.recv(1024)
        if not data:
            break
        response += data
        if b'\n' in data:
            break
    print("Received response:", response.decode())

finally:
    sock.close()
2. TCP Port Adjustment
Choose a unique TCP port from 1025–65535. Leave it at the default unless you have a port conflict or you are running multiple servers.
3. EZ-B Connection Server Checkbox
Enables ARC to listen as a server for an EZ-B connecting into ARC (typically on index 0). If your EZ-B is configured in “client” mode (it connects to ARC), this must be enabled.
Settings - COM/USB Connection

These settings only matter when you connect using a COM port (USB/Serial). If you connect by IP/Wi‑Fi, you can usually ignore this section.
1. COM Port Connection Baud Rate Drop-downs
The baud rate is the communication speed for the serial connection. Select the baud rate required by your device for each connection index.
Note: When connected to an EZ-B via COM port, ARC cannot use an EZ-B camera. Use a USB camera instead.2 & 3. DTR & RTS Checkboxes
These enable serial control lines (flow/reset signaling) that some boards require. If your board will not communicate reliably, try enabling these as needed.
Arduino Leonardo and Arduino Pro Micro typically require DTR and RTS checked.Settings - IO Timing
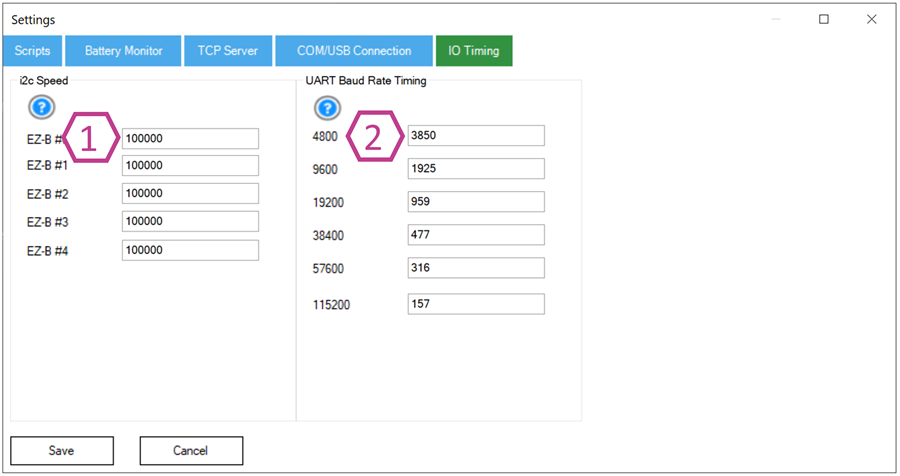
These options are typically for advanced troubleshooting. If you are a beginner, leave these at their defaults unless you are following specific hardware instructions.
1. I2C Speed Field
Sets the I2C bus speed per EZ-B connection. Default is 100000 (100 kHz). Maximum is typically 400000 (400 kHz), for hardware that supports it. Higher speeds can improve performance but may reduce stability with long wires or some sensors.
2. UART Timing Delay
Adjusts timing used by SendSerial commands for UART/serial communications.
Changing these values can help with certain devices that are sensitive to timing—but incorrect values can cause unreliable serial communication.
Common Beginner Workflow (Quick Steps)
- Decide whether you are connecting by COM (USB/Serial) or IP (Network).
- Use Index 0 for your first controller.
- Select the correct COM port or enter the correct IP address.
- Click Connect.
- (Recommended) Add a Connection Established Script to initialize servos/safe positions.
- (Recommended) Confirm Battery Monitor settings match your battery type.
Control Commands for the EZB Connection robot skill
There are Control Commands available for this robot skill which allows the skill to be controlled programmatically from scripts or other robot skills. These commands enable you to automate actions, respond to sensor inputs, and integrate the robot skill with other systems or custom interfaces. If you're new to the concept of Control Commands, we have a comprehensive manual available here that explains how to use them, provides examples to get you started and make the most of this powerful feature.
Control Command ManualGetAddress
Returns the address (without port) of the EZ-B at the specified index.
Syntax
var address = controlCommand("Connection", "GetAddress", index);
Parameters
| Name | Type | Required | Description |
|---|---|---|---|
index |
Number | No | The EZ-B index (0-4). Defaults to 0 when omitted. |
Returns
String - The address portion of the configured connection.
If the connection is serial (e.g., COM3), the full value is returned.
Examples
// Get address of EZ-B #0
var ip = controlCommand("Connection", "GetAddress");

// Get address of EZ-B #2
var ip2 = controlCommand("Connection", "GetAddress", 2);
GetStatus
Returns whether the EZ-B at the specified index is currently connected.
Syntax
var isConnected = controlCommand("Connection", "GetStatus", index);
Parameters
| Name | Type | Required | Description |
|---|---|---|---|
index |
Number | No | EZ-B index (0-4). Defaults to 0. |
Returns
Boolean
true= connectedfalse= disconnected
Examples
// Check if EZ-B #0 is online
var online = controlCommand("Connection", "GetStatus");

// Check EZ-B #4
var online4 = controlCommand("Connection", "GetStatus", 4);
ConnectAll
Connects all 5 connection slots.
Syntax
controlCommand("Connection", "ConnectAll");
DisconnectAll
Disconnects all EZ-Bs.
Syntax
controlCommand("Connection", "DisconnectAll");
Individual Connect / Disconnect Commands
Connect0 - Connect4
Connects a single EZ-B slot.
controlCommand("Connection", "Connect0");
controlCommand("Connection", "Connect1");
controlCommand("Connection", "Connect2");
controlCommand("Connection", "Connect3");
controlCommand("Connection", "Connect4");
Disconnect0 - Disconnect4
Disconnects a single EZ-B slot.
controlCommand("Connection", "Disconnect0");
controlCommand("Connection", "Disconnect1");
controlCommand("Connection", "Disconnect2");
controlCommand("Connection", "Disconnect3");
controlCommand("Connection", "Disconnect4");
Notes
- Slots correspond directly to connection indexes 0-4.
- These commands do not require parameters.
Related Tutorials

How To Choose Correct Battery(S).
The Robot Program Episode 009: Getting Six To Move

Control More Than One Robot
Ez-B V4 Connection Tutorial
Setting Servo Speeds And Initialization Script Tutorial

Connecting Arduino To ARC
Related Robots

Related Questions
Using Arduino Mega As A Isolation Device
EZB Software With Internet?

Upgrade to ARC Pro
Join the ARC Pro community and gain access to a wealth of resources and support, ensuring your robot's success.