

Configures and pushes WiFi SSID, password, system name and channel to EZ-Robot EZ-B v4 from ARC; saves settings with project for quick redeploy.
How to add the EZ-B Settings robot skill
- Load the most recent release of ARC (Get ARC).
- Press the Project tab from the top menu bar in ARC.
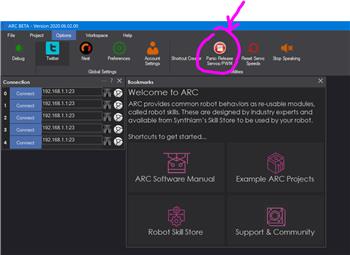
- Press Add Robot Skill from the button ribbon bar in ARC.
- Choose the General category tab.
- Press the EZ-B Settings icon to add the robot skill to your project.
Don't have a robot yet?
Follow the Getting Started Guide to build a robot and use the EZ-B Settings robot skill.
How to use the EZ-B Settings robot skill
This skill was created for schools or owners of many robots with dedicated WiFi network configuration for the EZ-Robot EZ-B4. This robot skill does not work with Arduino or other robot skills. This is only for EZ-Robo products. Use this skill to quickly change the WiFi settings to the connected EZ-B v4 inside the ARC software. If the reset button is pressed on the EZ-B v4, the WiFi settings will be set back to default. You can use this tool to configure settings for an EZ-B after reset rather than using the web configuration. With this skill your settings can be saved with the project and easily loaded to the connected EZ-B.
Main Window
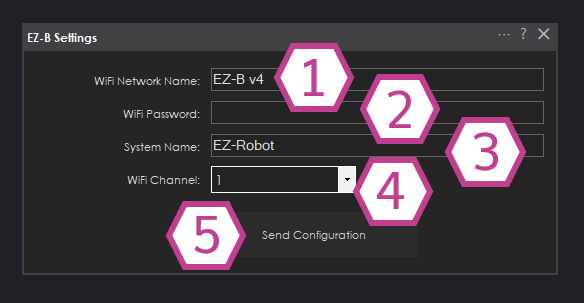
1. WiFi Network Name Text Field This is where you can enter a new SSID for your network
2. WiFi Password Text Field This is where you can enter a password for your SSID. Leave blank if you don't require a password.
3. System Name Text Field This is where you can enter a new System Name. EZ-Robot is the default.
4. WiFi Channel Drop-down This is where you can select a new WiFi channel. Default is 11. The most common WiFi channels are 1, 6, and 11 because they don't overlap with each other.
5. Send Configuration button If ARC is connected to an EZ-B v4 you can press this button to update it's settings with the selections you entered into the skill. The EZ-B v4 will reset automatically when the button is pressed.
How to Use the EZ-B Settings Skill
Connect an EZ-B v4 to the ARC software.
Add the EZ-B Settings skill (Project -> Add Skill -> General -> EZ-B Settings)
Enter the new settings that you'd like the EZ-B v4 to have.
Click the Send Configuration button to push the new settings to the EZ-B v4. Then wait for the EZ-B v4 to reset and after connect to the newly named SSID (the old SSID will disappear from your WiFi Network list).
Requirements
An EZ-B v4 I/O controller.Related Questions

Leap Motion Combine With ARC To Control In Space
Robot Building Safety?

Upgrade to ARC Pro
Join the ARC Pro community and gain access to a wealth of resources and support, ensuring your robot's success.
Question? What happens when your robot has multiple EZ-Bs? Does this change the network settings for all the EZ-Bs in your project? If not, how do you use this with multiple EZ-Bs?
One at a time I would guess. You can have different names for each ezb.
This manual page in the support section will help with that question: https://synthiam.com/Support/Tips%20to%20Make%20a%20Robot/Multiple%20EZ-B%20over%20WiFi
Oh I also should add that I didn’t fully read your question. You were asking how to use this skill with more than one ezrobot wifi ezb at the same time.
This skill doesn’t operate with more than one.
to use more than one, simply view the web administration console for any ezrobot ezb with your web browser. For example, if your ezrobot ezb has an IP Address of 192.168.1.5, then open your web browser and type https://192.168.1.5 and press enter
every ezrobot wifi ezb has a web administration tool. That includes the v4 and iotiny. More info about that on the manufacturers website @ www.ez-robot.com in their learn section